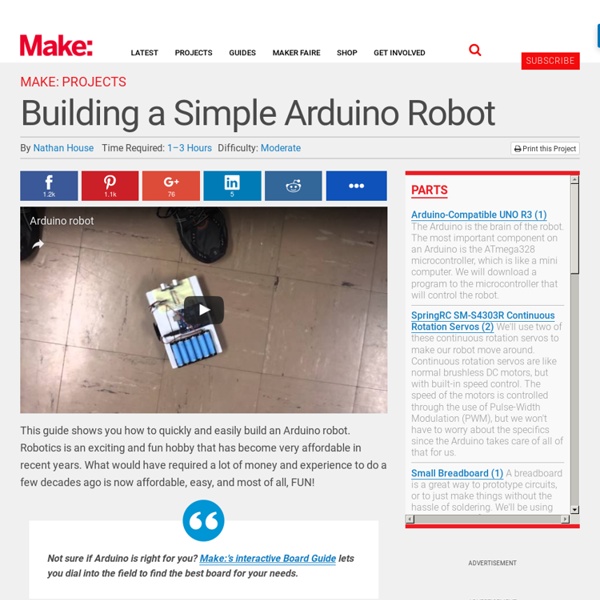
How to Build a Simple Arduino Robot
http://makezine.com/projects/building-a-simple-arduino-robot/
Related: Arduino
• Robotique
• Bricolage
My First Original Arduino Project: What I Learned About Learning
This post is really an op-ed written for those of you who, like myself, are new to making and are just getting into project building with Arduino. You might be a little overwhelmed. You might think you can’t learn this stuff.
sans titre
mBot with Me LED Matrix Have you ever imagined how vivid it would be if a dynamic face plate is added on your robot which enables it to have various facial expression like a real man? Or have you tried to program LED walls to display animations or characters? What Me LED Matrix 8×16 can do is to help you achieve these gorgeous display effects. It’s highly welcomed by mBot users.
Arduino PIR Motion Sensor
This Instructable is about how to create an Arduino PIR motion sensor for your room or office, using parts available from your local Radio Shack! Whether you're looking for a cool and easy-to-build security sensor, or an awesome first project to dive into the world of Arduino, Microcontrollers, and electronics, this project is for you. (This project really is easy. Take it from me, I'm 12, and I've only had my Arduino for a week and a half.) If you guys really like my project, please vote for it in the home technology contest! (To vote, click the ribbon in the top right hand corner.)
DIY Power Supply !: 6 Steps
AdWords We use AdWords to deploy digital advertising on sites supported by AdWords. Ads are based on both AdWords data and behavioral data that we collect while you’re on our sites. The data we collect may include pages you’ve visited, trials you’ve initiated, videos you’ve played, purchases you’ve made, and your IP address or device ID. This information may be combined with data that AdWords has collected from you.
Control RGB LEDs with this Android-Arduino Combo-Circuit
Connect a multicolor LED strip to your smartphone to make a touch-controlled light show! You can attach the color-changing LEDs to the underside of a coffee table, your bike, or anything else you think needs a bit more color. With our latest Weekend Project we’ll show you how to combine an Arduino, a simple solderless breadboard circuit, and your Android device (which must be compatible with USB host mode) to control a strip of full-color RGB LEDs.
mBot get started – Open-source Arduino Robot Building Platform
mBot-Blue(2.4G Version) mBot-Blue(Bluetooth Version) Unpack your mBot and assemble Download mBot instruction to put all parts together.
Installing an Arduino Library
What's a Library? Arduino libraries take a complex task and boil it down to simple to use functions. Arduino users have written lots of exciting add-ons for Arduino.
L9110 H-bridge module
By admin on 31/05/2013 L9110 H-bridge I bought another small motor driver, this time a module with 2 L91110 H-bridge chips. These dual L9110 H-bridge modules can be found for 3-4$ on Ebay or from Chinese webshops. The module has 2 L9110 IC’s, so it can control 2 DC motors or 1 stepper motor.
Related:
