
Home - JeeLabs Café - JeeLabs . net. Read this weblog post (May 2013), if you're lost on this site.
Question - What is a JeeNode? Answer 1 - A low-power Arduino-compatible board with wireless communication.Answer 2 - An extensible module to collect sensor data and control devices.Answer 3 - This: You can use the Arduino IDE to write software for it and upload the code.This example broadcasts 1 packet per second with a counter in it: #include <JeeLib.h> long counter; void setup () { rf12_initialize(11, RF12_8686MHZ, 17); } void loop () { ++counter; rf12_sendNow(0, &counter, sizeof counter); delay(1000); } Events¶ JeeDay 13.04 - April 19..20, 2013 - Utrecht / Houten, NL Projects¶ The list of projects at JeeLabs keeps on growing. Getting Started¶ Hardware¶ This is the main reference for all hardware products from JeeLabs which have escaped into the wild. Software Libraries¶ See the JeeLib home page for details, also for all the other libraries compatible with the Arduino IDE. Projects On Foam¶ Interesting Projects¶ Loose ends¶ All about Moteino. Wiki_sur_le_shield_capteurs_jeenode [DokuWiki]
Cette page présente le shield que j'ai réalisé pour les modules Jeenode fabriqués par JeeLabs.
![wiki_sur_le_shield_capteurs_jeenode [DokuWiki]](http://cdn.pearltrees.com/s/pic/th/shield-capteurs-jeenode-domini-81886490)
Les Jeenodes sont 'arduino compatibles'. Les fonctions apportées par ce shield sont les suivantes : Convertisseur DC/DC autorisant une tension d'alimentation de 0.9V - 5.5V : validée pour fonctionner sur un accu ou une pile, mode basse conso en veille. Attention, modification à réaliser sur le Jeenode, cf. §Hardware Capteur température et humidité I²C (SHT11 de Sensirion) Mesure de tension de la pile/batterie 1 interface pour piloter une BPW34 (pyranomètre). Schéma Nomenclature Modifications à réaliser sur le jeenode Dans le cas d'une utilisation du Jeenode en mode “low power”, il faut enlever le régulateur de tension IC2 afin de minimiser la consommation totale de la carte. (photo) Ressources utilisées P1.5 - AIO1 : Mesure de tension batterie P1.2 - DIO1 : Etat led. 0 = led allumée P2.5 - AIO2 : Mesure de température CTN P2.2 - DIO2 : Commande transistor mosfet (spare) Implantation Généralités Nota Led.
What is Norduino? Funky v2. The “Funky v2″ is a miniature open source/hardware cut-down clone of the Arduino Leonardo with RFM12B radio module.
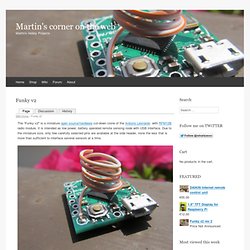
It is intended as low power, battery operated remote sensing node with USB interface. Due to the miniature size, only few carefully selected pins are available at the side header, none the less that is more than sufficient to interface several sensors at a time. Having gained experience with my Funky v1 project, I decided to create a new version. The Funky v1 project is a success, yet the areas I wanted to optimize are: The Attiny84 MCU that was used in the Funky v1 has limited RAM and sketch memoryThe Attiny84 requires an ISP programmer for sketch uploadingThe Attiny84 required a modified Arduino coreMany of the available Arduino libraries are not compatible with Attiny84 So the Funky v2 was created, see my posts here , here and here Board size is 20×21.2mm (0.78″x0.83″) in size (same as Funky v1)The MCU used in an Atmega32U4, the same MCU that Arduino Leonardo uses.