Arduino « The Rantings of a Techno-Mage
I bought an Arduino some time ago, but now I just received an ATMega168 from Daniel Jouiffe in Canada. He’s doing a trust scheme where he burns the boot loader onto an ATMega168, and then posts that and a 16MHz crystal to you, where ever you are. Then you pay him back however much you want. I just put into my Arduino NG board, and it works really nice. I’ve just doubled most specifications of my ATMega8.
Build Your First Robot (as seen in Popular Mechanics Magazine)
Parts list, FAQ, Templates, and Extra Goodies Welcome to the Build Your First Robot (BYFR) information page! The Build Your First Robot project, or ArdBot II, appears in the February 2012 issue of Popular Mechanics, and an updated version starting with the August 2013 issue of SERO Magazine! BYFR Information Central Parts List and Sources - Where to get parts for your BYFR/ArdBot II.
arduino meets processing - PUSHBUTTON
The Arduino meets Processing project intends to make it as easy as possible for anyone to explore the world of physical computing. All you need is an Arduino board as well as the Arduino and Processing software, which you can download on their project websites. On this website we explain how to:
Arduino Based Reflow Oven Controller – Testing & Progress
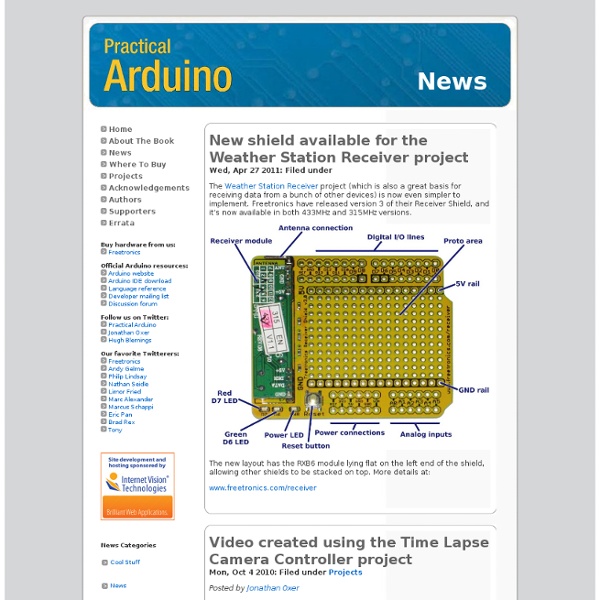
No, this post is not about Megatron looking for energon cubes. We just love labeling all our tools and machines with characters from the show we heart when we were young. Alright, finally there’s some progress on the reflow oven controller. I know many of you guys are asking when they’ll be available, I hope the waiting is going to be over pretty soon! While working on the reflow oven controller firmware, we came across some sample codes from Adafruit (Thanks LadyAda!) posted on GitHub (GitHub rocks!).
Speech Synthesizer
Synthesized speech was for a long time the Holy Grail of computing, and back in the 1980s when a 4MHz CPU made your computer the fastest machine in the neighborhood it just wasn't practical for software to create intelligible speech. In those days the only sensible way to generate speech was to offload the task to dedicated hardware because the CPU simply couldn't keep up. The most widely used speech chip through the 80s and early 90s was the famous SPO256A-AL2, the allophone speech processor. It was used in toys, in external speech synthesizer peripherals for desktop computers, in industrial control systems, and all sorts of other unexpected places. Then as CPU power continued to increase rapidly speech synthesis was moved to being a software function, and nowadays of course it is almost always done entirely in software by the main CPU using only a tiny fraction of the available processing power. Parts Required
Arduino
Arduino is an open-source computer hardware and software company, project and user community that designs and manufactures kits for building digital devices and interactive objects that can sense and control the physical world.[1] Arduino boards may be purchased preassembled, or as do-it-yourself kits; at the same time, the hardware design information is available for those who would like to assemble an Arduino from scratch. The first Arduino was introduced in 2005. The project leaders sought to provide an inexpensive and easy way for hobbyists, students, and professionals to create devices that interact with their environment using sensors and actuators. Common examples for beginner hobbyists include simple robots, thermostats and motion detectors. Adafruit Industries estimated in mid-2011 that over 300,000 official Arduinos had been commercially produced,[3] and in 2013 that 700,000 official boards were in users' hands.[4]
Arduino Robot 2 - Wandering Tank
What a busy couple of weeks I have had. Many upgrades for the printer have arrived, and work continues on understanding and possibly building Hexy before my Kickstarter version arrives from Arcbotics. In this post I will cover the upgrades I have made to the printer; why I made the upgrades, their cost; and finally show some updated Hexy prints to show off the new accuracy. First; I was printing the Seej Starter Set, in preparation for taking my printer to work on my last day. While doing so, the printer gave up the ghost. Badly.
Top 10 DIY Arduino Projects and HOW-TO Tutorials!
Arduino has been widely popular among hackers and DIY-addicts out there for modding/hacking things. For those of you just entering the Arduino world, here’s a bunch of great Arduino tutorials/projects that can help you jump-start your next project. 1) Did you know that you can program/flash your Arduino wirelessly? For those of you who are going to be making devices where the Arduino is hidden from easy access, read up on how you can program your Arduino wirelessly using Xigbee modules over at Lady Ada’s site. 2) Arduinome is a project the Monome for audio sequencers.
.: oomlout :.: Breadboard Based Arduino Compatible (BBAC) Micro-Controller
While work continues full steam ahead at .:oomlout:. HQ last week we reached a point where all of our pre-existing projects were on hold.
Arduino Tutorial - Learn electronics and microcontrollers using Arduino!
So, I get two or three emails a day, all basically asking the same thing: "Where can I learn about electronics?" In general, most of these people have seen some of my projects and want to be able to build similar things. Unfortunately, I have never been able to point them to a good site that really takes the reader through a solid introduction to microcontrollers and basic electronics. I designed this tutorial course to accompany the Arduino starter pack sold at the Adafruit webshop. The pack contains all the components you need (minus any tools) for the lessons Follow these lessons for happiness and prosperity.
arduinoscope - Oscilliscope and logic probe using arduino and processing
I saw the wonderful arduino/processing scope, and thought of many improvements, including: logic analyzer mode that shows 1's and 0's clearly. pause frame save frame configurable pin-count use as many pins as will fit on screen (tested with 12 at 800x800, seems ok) use scope class in your own thing, easy to reuse, and setup any kind of GUI shows volts, based on scaling settings Arduinoscope is very much a DIY sort of tool.