Arduino Based Midi Controller
> Santiagovalencia
Make Your Own MIDI Controller [Instructables How-To]
When we were in the studio with our Creators Project NYC Recording Session winners, we not only got to observe them exploring and experimenting with different styles of electronic music, but got let in on a secret: when they recorded their EP, they played their music “live” instead of using something that was already perfected and pre-mixed.
![Make Your Own MIDI Controller [Instructables How-To]](http://cdn.pearltrees.com/s/pic/th/controller-instructables-74072793)
This technique lent a human touch and improvisational air to the finished tracks, and we think it would also be a good way to give live DJ sets a more performative feel. This week we found an Instructable, on how to make a MIDI controller that lets DJs/VJs move off their computers, allowing them to control their software (at least in part) from a set of buttons. What’s great about a MIDI controller is that the controls can be mapped to any effect that you like, so buttons that control the volume could manipulate another effect for someone else. Here we’ll highlight the main steps of making your own MIDI controller.
Control Music Synthesizers With Gestures Through This Arduino-Based Saucer Called ‘The UFO’
Arduino has found its way into yet another musical device.

I came across the ‘UFO’ while in Berlin. It’s a MIDI controller that lets you compose music or control synthesizers by waving your hands about. Its creator, a Finnish former game developer named Tommi Koskinen, built it for use in performances with his band Phantom. After co-founding a company called Audiodraft and building games for several years for companies like Digital Chocolate and GameHouse, Koskinen said he felt a desire to build something more tangible. He was inspired by a performance he saw at a Helsinki art festival a year ago.
“There was this one artist that was using sonic sensors to control visuals and some tonalities,” Koskinen said. After some design courses at a university, he started prototyping a device. To be clear, this isn’t a MIDI theremin (or one of those instruments that was popular in 50s sci-fi films), since the technology is different. You can also use it to compose music.
Arduino MIDI controller - techshop using scarff boarduino. Tom Scarff is an expert in this field.

He supported me on my previous midi project, "a midi controlled, pneumatically operated, fire breathing dinosaur named Lunarsaurus which I showed at Maker Faire. So I turned to him for this project and found that he already had a kit (called a boarduino) ready to go. The Boarduino is interesting because of its size. It's tiny (.75" x 3.75") and will fit in a small spot and the price is good.
I prefer to buy it assembled - one less variable.
Controlador MIDI con Arduino.
Mi 1er controlador MIDI Arduino : Hazlo tú mismo. Quizá sea buena idea que pongas otra resistencia de 220R entre la pata TX del micro y el pin 5 del conector MIDI OUT, como se ve en la imagen que adjunto, sacada de ucapps.
No sabría decirte ahora mismo cual es el cometido de dicha resistencia, pero si está ahí (a mi me funciona en dos diseños distintos) será por algo. Enhorabuena por el cacharrete Archivos adjuntos:
Simple Arduino Midi Controler « Starfire’s Tech Blog. So I made a simple midi controller since there was a discussion about midi in an arduinome, just wanted to see what would be involved.
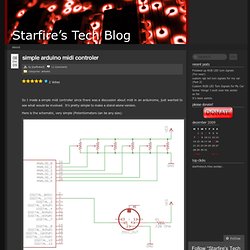
It’s pretty simple to make a stand-alone version. Here is the schematic, very simple (Potentiometers can be any size): Here is the the code. It’s stupid simple, it might be too simple. I don’t know if the delays have to be there but I didn’t want to spam the serial port, also this is just for 2 controls. And here is a video: Now go make your own controller with photoresistors, pressure sensors, touch sensors, whatever! Like this: Like Loading...
