
A Horizon-Stabilized Camera For Motorcycle Photography. A Horizon-Stabilized Camera For Motorcycle Photography This is a video camera accessory that I've been developing for use in motorcycle photography.
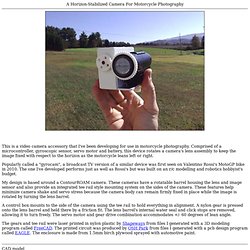
Comprised of a microcontroller, gyroscopic sensor, servo motor and battery, this device rotates a camera's lens assembly to keep the image fixed with respect to the horizon as the motorcycle leans left or right. Popularly called a "gyrocam", a broadcast TV version of a similar device was first seen on Valentino Rossi's MotoGP bike in 2010. The one I've developed performs just as well as Rossi's but was built on an r/c modelling and robotics hobbyist's budget.
My design is based around a ContourROAM camera. A control box mounts to the side of the camera using the tee rail to hold everything in alignment. The gears and tee rail were laser printed in nylon plastic by Shapeways from files I generated with a 3D modeling program called FreeCAD. CAD model Closeups Construction Results Resources More Contact. Home page. Arduino board as ATtiny programmer. This tutorial shows you how to wire up an Arduino used as an ISP (programmer) to an ATtiny45 or ATtiny85.
To find out how to write code for the microcontroller, see the the tutorial on programming an ATtiny using the Arduino 1.0.1 software (or the older version for Arduino 0022 ). Materials and Tools For this tutorial, you’ll need: Arduino Uno or Duemilanove (w/ an ATmega328, not an older board with an ATmega168) ATtiny45 or ATtiny85 (8-pin DIP package) a 10 uF capacitor (e.g. from Sparkfun or from Digi-Key ) a breadboard jumper wires For more information, see our list of materials and parts and our list of prototyping supplies . Download and Install the Arduino Software. Arduino. Top 40 Arduino Projects.
Arduino Tutorials. Infrared Remote Library. Do you want to control your Arduino with an IR remote?
Do you want to use your Arduino to control your stereo or other devices? This IR remote library lets you both send and receive IR remote codes in multiple protocols. It supports NEC, Sony SIRC, Philips RC5, Philips RC6, and raw protocols. If you want additional protocols, they are straightforward to add. The library can even be used to record codes from your remote and re-transmit them, as a minimal universal remote. To use the library, download from github and follow the installation instructions in the readme.
How to send This infrared remote library consists of two parts: IRsend transmits IR remote packets, while IRrecv receives and decodes an IR message. #include <IRremote.h> IRsend irsend; void setup() { Serial.begin(9600); } void loop() { if (Serial.read() ! This sketch sends a Sony TV power on/off code whenever a character is sent to the serial port, allowing the Arduino to turn the TV on or off. Girino - Fast Arduino Oscilloscope. I am a Physicist and the nicest part of working in this field is that I get to build my own instruments.
With this way of thinking, I decided to build a homebrew Arduino Oscilloscope. This instructable was written with the purpose of teaching a bit about microcontrollers and data acquisition. Arduino Pro Mini + Wii Motion Plus. Dimensions of the Wii Motion Plus are quite similar to Arduino Pro Mini card’s one.
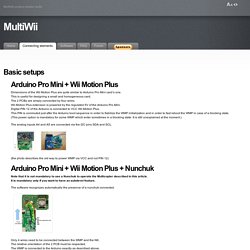
This is useful for designing a small and homogeneous card. The 2 PCBs are simply connected by four wires. Wii Motion Plus extension is powered by the regulated 5V of the Arduino Pro Mini. Digital PIN 12 of the Arduino is connected to VCC Wii Motion Plus. This PIN is commuted just after the Arduino boot sequence in order to fiabilize the WMP initialization and in order to fast reboot the WMP in case of a blocking state. The analog inputs A4 and A5 are connected via the I2C pins SDA and SCL. (the photo describes the old way to power WMP via VCC and not PIN 12) LCD Display with a Shift Register. When I first ordered my Arduino Experimentation Kit from those nice people at oomlout I also ordered a 16 character by 2 line LCD display.

It was really easy to set up and use thanks to the instructions that came with it and the LiquidCrystal library bundled with the Arduino software. The only problem is that it takes up a lot of valuable output pins, 6 in 4bit mode and 10 in 8bit mode, this makes it difficult to use in large projects, as you can quickly run out of pins. » ATtiny45/85 Servo Library. Recently I worked on a project where I wanted to control a servo using an ATtiny85.
I checked online for ready made code that did this but I couldn’t find anything satisfactory. Not wanting to switch to a larger microcontroller I decided to write my own servo library for the ATtiny85. I call it Servo8Bit. It supports up to 5 servos, runs on the ATtiny85 or ATtiny45 and uses only one 8 bit counter. It can generate a servo control pulse from 512 to 2560 microseconds with 256 steps of resolution. I enjoy using ATtiny microprocessors in my projects, particular the ATtiny85.
Water Tank Depth Sensor. Water is a precious resource in many parts of the world, and many people rely on water tanks to supplement their water supply by storing collected rainwater or water pumped from a well or bore.

But how do you measure how full a tank is? Tanks are constructed of opaque material to prevent algae growth and often kept closed up to prevent mosquito infestation or access by small rodents so it's inconvenient to physically look inside. And besides, having a way to measure tank depth electronically opens up a world of possibilities such as automatic control of pumps to top up tanks when they get low or to disable irrigation systems when not enough water is available. The obvious way to measure tank depth is by placing a series of conductive pickups at various heights inside the tank and measure the resistance between them. This project works a little differently. The Arduino then reads the output of the transducer and reports the depth of the tank.
Water Tank Depth Sensor Schematic Source Code.