
Play & make games, quick & easy. The Absolute Beginner's Guide to Arduino. Over the Christmas break from work I wanted to learn something new.
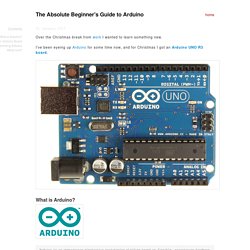
I’ve been eyeing up Arduino for some time now, and for Christmas I got an Arduino UNO R3 board. What is Arduino? Arduino is an open-source electronics prototyping platform based on flexible, easy-to-use hardware and software. It's intended for artists, designers, hobbyists, and anyone interested in creating interactive objects or environments. Source: Microcontroller Arduino is a microcontroller on a circuit board which makes it easy to receive inputs and drive outputs. A microcontroller is a integrated computer on a chip. Inputs Some examples of inputs would be a temperature sensor, a motion sensor, a distance sensor, a switch and so forth. Outputs Some examples of outputs would be a light, a screen, a motor and so forth. Tiny AVR Programmer Hookup Guide. Favorited Favorite 3 The ATtiny85 isn’t your everyday Arduino IC.
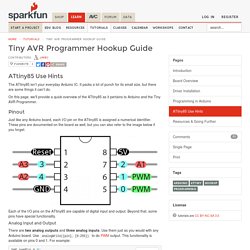
It packs a lot of punch for its small size, but there are some things it can’t do. On this page, we’ll provide a quick overview of the ATtiny85 as it pertains to Arduino and the Tiny AVR Programmer. Pinout Just like any Arduino board, each I/O pin on the ATtiny85 is assigned a numerical identifier. Each of the I/O pins on the ATtiny85 are capable of digital input and output. Analog Input and Output. Atmel: Switching Between ISP and debugWIRE Mode. Adam @ Hilltop Cottage › Debugging Arduino using debugWire (+ Atmel Studio and an AVR Dragon) This post is motivated by the lack of information about using debugWire with an Arduino (or similar) on the web.
There are quite a few brief comments on the forums and people asking how to do it but nothing really good, with the possible exception of a post by Steve Cogswell which refers to an old version of Arduino and an old version of Atmel Studio. This really notes for myself for next time, when I’m bound to have forgotten the recipe, but I hope someone else will find it useful. The previous post describes how to get started with using the Atmel Studio simulator, which is a good introduction to the activities required during on-chip debugging (OCD) without needing to fiddle quite so much and without wondering whether the hardware is playing nicely. What Can You Do with debugWire? Inspect memory, single-step through code, set break-points (at which execution will stop), inspect registers and input/output port values etc. i.e. as for the simulator, but for the real hardware. Need help with clearing DWEN fuse (brick) The inability to follow simple instructions.
This article talks about the Diecimila, but there is a newer article that talks about the Duemilanove Here’s a departure.
Today I’m going to give a little instruction in how to modify an Arduino board so you can actually do something useful with it – like debug it. But first, since my regular reader expects music, here’s some music. If you hated that, you’ll probably hate all my other music, too. No warranty is expressed or implied in this. 'Stuck' in debugWIRE mode - NOT. If you are 'stuck' in debugWIRE mode, and you have a JTAGICE mkII, you may be able to get out of this mode as follows: If the device is in 'debugWIRE mode', using the JTAGICE mkII debugger, within AVRStudio, one can: 1) Select: Debug > Start Debugging and Break 2) Select: Debug > Disable debugWIRE and Close 3) Now the device can be programmed using the ISP interface.
This avoids the use of the 'HV programming interface, which, I believe is only available through the (expensive) STKxxx?? There (appears to be) a LOT of confusion and mis-information both within Atmel's documentation and on various AVR forums (surrounding debugWIRE) - hope this helps others get 'unstuck'. On additional note, I had been using AVR STUDIO 6.0 and things worked OK. DebugWIRE OCD - - JTAGICE3. The debugWIRE communication pin (dW) is physically located on the same pin as the external reset (RESET).
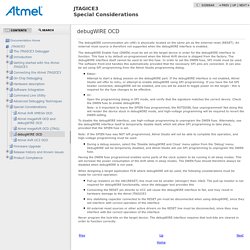
An external reset source is therefore not supported when the debugWIRE interface is enabled. The debugWIRE Enable fuse (DWEN) must be set on the target device in order for the debugWIRE interface to function. This fuse is by default un-programmed when the Atmel AVR device is shipped from the factory. The debugWIRE interface itself cannot be used to set this fuse. In order to set the DWEN fuse, SPI mode must be used. Atmel AVR. The AVR is a modified Harvard architecture 8-bit RISC single-chip microcontroller, which was developed by Atmel in 1996.
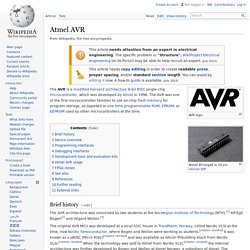
The AVR was one of the first microcontroller families to use on-chip flash memory for program storage, as opposed to one-time programmable ROM, EPROM, or EEPROM used by other microcontrollers at the time. Brief history[edit] The AVR architecture was conceived by two students at the Norwegian Institute of Technology (NTH),[1] Alf-Egil Bogen[2] and Vegard Wollan.[3] The original AVR MCU was developed at a local ASIC house in Trondheim, Norway, called Nordic VLSI at the time, now Nordic Semiconductor, where Bogen and Wollan were working as students.
[citation needed] It was known as a μRISC (Micro RISC)[citation needed] and was available as silicon IP/building block from Nordic VLSI. Among the first of the AVR line was the AT90S8515, which in a 40-pin DIP package has the same pinout as an 8051 microcontroller, including the external multiplexed address and data bus. How to get started with microcontrollers - Part 1 by MetkuMods. Intro You can find microcontrollers everywhere, from wrist watches to washing machines.
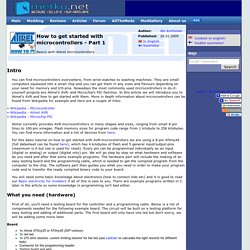
They are small computers squeezed into a small chip and you can get them in any sizes and flavours depending on your need for memory and I/O-pins. Nowadays the most commonly used microcontrollers in do-it-yourself projects are Atmel's AVR- and Microchip's PIC-families. In this article we will introduce you to Atmel's AVR and how to get started with them. More in depth information about microcontrollers can be found from Wikipedia for example and here are a couple of links:
A Beginners Guide to Programming the ATMEL ATtiny 45 and 85. A Beginners Guide to Programming the ATMEL ATtiny 45 and 85 (used with the SoftRock v9.0 RX or USB xtal interface) by Bob G8VOI (April 2009) Version 1.2 1: Introduction First of all, I am no expert in the programming these devices. This is meant for as a guide for those with no previous experience of the subject.
I wished to try out Fred PE0FKO's version of the SoftRock v9.0 firmware for myself, having evaluated the QRP2000 v2.0 firmware and found some limitations with that. Since then I have helped a number of others follow the same path as I did, to successfully program their own devices. ISP - Isolate SPI. Getting Started With ATtiny85 (DIP package), Jtagice3, and Atmel Studio 6. Can’t figure out how to use your jtagice3 to get the ATtiny85 to do something? There’s a bit of a convoluted set of steps to take with a fresh chip. Note that I’m definitely still new at this but wanted to share my newbie experience with others so they don’t have to struggle with it for as long as I did. Here are the steps: SecretsOfArduinoPWM. Secrets of Arduino PWM by Ken Shirriffwith further editing by Paul Badgerthe original document Pulse-width modulation (PWM) can be implemented on the Arduino in several ways.
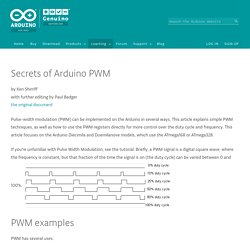
This article explains simple PWM techniques, as well as how to use the PWM registers directly for more control over the duty cycle and frequency. This article focuses on the Arduino Diecimila and Duemilanove models, which use the ATmega168 or ATmega328. If you're unfamiliar with Pulse Width Modulation, see the tutorial. PWM examples PWM has several uses: Dimming an LED Providing an analog output; if the digital output is filtered, it will provide an analog voltage between 0% and 100% .
Simple Pulse Width Modulation with analogWrite The Arduino's programming language makes PWM easy to use; simply call analogWrite(pin, dutyCycle), where dutyCycle is a value from 0 to 255, and pin is one of the PWM pins (3, 5, 6, 9, 10, or 11). AVR microcontroller Archives - Embedded Electronics Blog. NewbieHack - Microcontroller Tutorial - A Beginners Guide.