
Part 9: Finishing the Torso Area. 1.
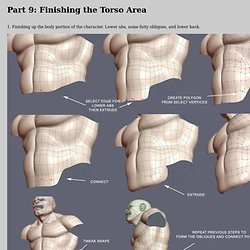
Finishing up the body portion of the character. Lower abs, some fatty obliques, and lower back. 2. Building arm. I notice that I have 5-points directly in the fault lines where my area will deform, not wanting to risk deformation problem later on, I rework the edge flow. Part 8: The Upper Body. I like to model the upper body separately from the head.
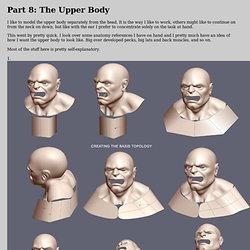
It is the way I like to work, others might like to continue on from the neck on down, but like with the ear I prefer to concentrate solely on the task at hand. This went by pretty quick. I look over some anatomy references I have on hand and I pretty much have an idea of how I want the upper body to look like. Big over developed pecks, big lats and back muscles, and so on.
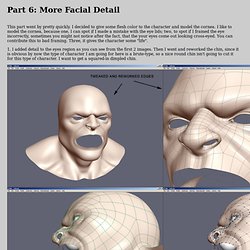
Most of the stuff here is pretty self-explanatory. I was asked what type of modeling I prefer, box or poly-poly. I was also asked about tweaking, and how much time I spend tweaking. Text and Images Copyright © 2004 Tony Jung. Part 7: The Ear. Part 6: More Facial Detail. This part went by pretty quickly.
Part 5: The Eye Region. The technique I am doing here is something new I have recently started with.
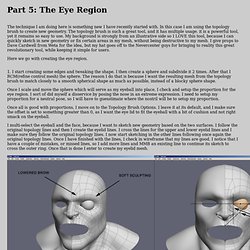
In this case I am using the topology brush to create new geometry. The topology brush is such a great tool, and it has multiple usage. it is a powerful tool, yet it remains so easy to use. My background is strongly from an illustrative side so I LOVE this tool, because I can quickly sketch in new geometry or fix certain areas in my mesh, without being destructive to my mesh. I give props to Dave Cardwell from Weta for the idea, but my hat goes off to the Nevercenter guys for bringing to reality this great revolutionary tool, while keeping it simple for users.
Here we go with creating the eye region. Part 4: The Nose. Okay, now for the nose.
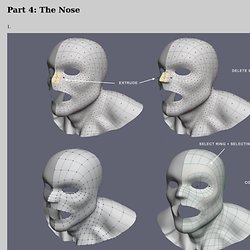
I do not model the nose until about now. The reason is because, the nose is a b*tch to model. It generally has many topology consideration that needs to work for facial animation and just so it looks good. It also demands a lot of reworking of the surrounding topology, but if you have a nice topology flow already established it will help more than hurt. One of the thing that makes the nose so tricky to model is that it requires more densely packed definition in a small area and that can cause problems, especially if it produces 5-points that won't play nice with deformation. Now a little rundown of what I did in this series. Part 3: Beginning the Upper Body. 1.
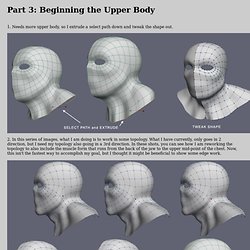
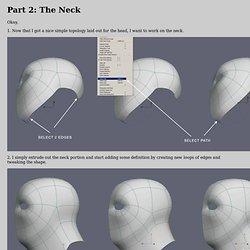
Needs more upper body, so I extrude a select path down and tweak the shape out. 2. In this series of images, what I am doing is to work in some topology. What I have currently, only goes in 2 direction, but I need my topology also going in a 3rd direction. Part 2: The Neck. Okay,
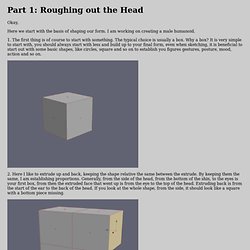
Part 1: Roughing out the Head. Okay, Here we start with the basis of shaping our form.
I am working on creating a male humanoid. Part 12 - The Foot. The foot is a tricky thing.
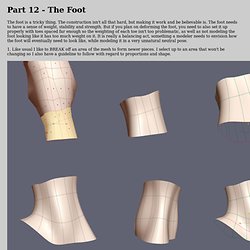
The construction isn't all that hard, but making it work and be believable is. The foot needs to have a sense of weight, stability and strength. But if you plan on deforming the foot, you need to also set it up properly with toes spaced far enough so the weighting of each toe isn't too problematic, as well as not modeling the foot looking like it has too much weight on it. It is really a balancing act, something a modeler needs to envision how the foot will eventually need to look like, while modeling it in a very unnatural neutral pose. Part 11 - Lower Body & Legs. The lower body is pretty easy and quick to build.
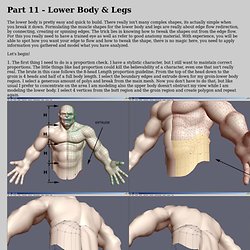
There really isn't many complex shapes, its actually simple when you break it down. Formulating the muscle shapes for the lower body and legs are really about edge flow redirection, by connecting, creating or spinning edges. The trick lies in knowing how to tweak the shapes out from the edge flow. For this you really need to have a trained eye as well as refer to good anatomy material. With experience, you will be able to spot how you want your edge to flow and how to tweak the shape, there is no magic here, you need to apply information you gathered and model what you have analyzed. Let's begin! Untitled Document. Making the hand. I want to make a big hand for the brute, about the size of the forearm.
Modeling a hand I have found over time becoming easier and easier, which is kind of funny since it was always the one thing that was difficult for me as an traditional artist, but because of 3D modeling it has helped me with sketching and drawing hands.