
How to make a keyboard – the matrix. Tutorial parts: 1 matrix | 2 controller (coming soon) | ...
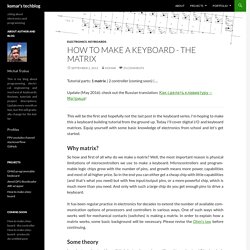
Update (May 2016): check out the Russian translation: Как сделать клавиатуру — Матрица! This will be the first and hopefully not the last post in the keyboard series. I'm hoping to make this a keyboard building tutorial from the ground up. Today I'll cover digital I/O and keyboard matrices. Equip yourself with some basic knowledge of electronics from school and let's get started. Building your own keyboard (from scratch) At the high end, these keyboards are often custom designed and hand assembled: CNC’d aluminum plates, RGB underglow, custom PCB/firmware, etc.

As I found out from the /r/MechanicalKeyboard community, there are a lot of members who built their own, and has contributed a lot of their work back to the open source community; from hardware design (e.g. GH60) to software/firmware (e.g. Keypad Tutorial for Arduino, ESP8266 and ESP32. The first part of the code is nearly the same, only we include the library of the LCD display LiquidCrystal_I2C.h and create an object of this library called lcd.
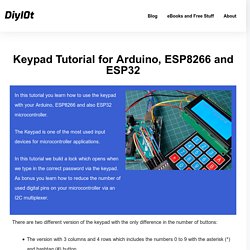
I use a 20×4 LCD display on I2C address 0x27 for this example. If you use a different one, you have to change the parameters of the lcd object. You can also visit my LCD display tutorial, where you learn everything you have to know about different LCD displays and how to use them. How to Set Up a Keypad on an Arduino - Circuit Basics. Shift Registers - 74HC595 & 74HC165 with Arduino. Untitled. Untitled. Una vez que hemos instalado nuestra librería Arduino Menu, tal y como explicamos en el tutorial anterior, ahora vamos a comenzar a programar para crear nuestro menú personalizado.

Hay que tener en cuenta que cada vez que cliquemos sobre un elemento de nuestro menú pueden ejecutarse acciones distintas dependiendo de la opción del menú diseñada para ello. Entre las opciones de un menú nos encontramos: SELECT -> Selecciona la opción que hemos escogido y ejecuta una función.TOGGLE -> Modo palanca, solo permite 2 opciones activado o desactivado.CHOOSE -> Elige de entre un conjunto de opciones.VALUE -> Selecciona y modifica el valor de una variable asociado a este campo.FIELD -> Crea un campo que modifica una variable definida en un intervalo.OP -> OpcionesEXIT -> Sale del menu, para ir hacia otro Ahora explicaremos una por una, como se definen nuestras opciones y poco a poco iremos construyendo un menú completo.
Select es el modelo de. Untitled. Interrupts in C++ An ideal C++ device driver would be a class containing, among other things, the ISR as a member function.

But this is harder to achieve than many C programmers assume. One of the goals of a recent project was to evaluate the effectiveness of C++ in writing low-level device drivers. With a push to reduce time to market, we were given a budget large enough to order some nice object modeling tools. Everyone in the team was experienced in using C in embedded systems.
Rotary encoder interrupt service routine for AVR micros « Circuits@Home. Encoder ISR About a year ago, I posted an article about 2-channel rotary encoder interfacing with MCU using lookup table.
With its linear program flow, inherent noise immunity and small processing requirements, this method produces extremely efficient code. The article attracted quite a bit of attention with many interesting comments and several code modifications. Reading rotary encoder on Arduino « Circuits@Home. Rotary encoder connected to Arduino Quadrature rotary encoders, also known as rotary pulse generators, are popular input devices for embedded platforms, including Arduino.
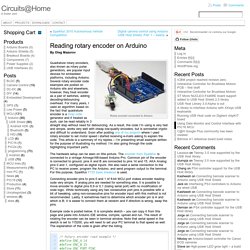
Several rotary encoder code examples are posted on Arduino site and elsewhere, however, they treat encoder as a pair of switches, adding decoding/debouncing overhead. For many years, I used an algorithm based on the fact that quadrature encoder is a Gray code generator and if treated as such, can be read reliably in 3 straight step without need for debouncing. As a result, the code I’m using is very fast and simple, works very well with cheap low-quality encoders, but is somewhat cryptic and difficult to understand. Soon after posting one of my projects where I used rotary encoder to set motor speed i started receiving e-mails asking to explain the code.
The hardware setup can be seen on title picture. Connecting encoder pins to pins 0 and 1 of 8-bit MCU port makes encoder reading code very simple. Oleg. Related posts: ATTiny USI I2C Introduction - A powerful, fast, and convenient communication interface for your ATTiny projects! I2C, it's a standard that's been around for around 20 years and has found uses in nearly every corner of the electronics universe.
It's an incredibly useful technology for us microcontroller hobbyists but can seem daunting for new users. This tutorial will solve that problem, first by reviewing what I2C is and how it works, then by going in-depth on how to implement I2C in Atmel's ATTiny USI (Universal Serial Interface) hardware. I2C is commonly used in GPIO expanders, EEPROM/Flash memory chips, temperature sensors, real-time clocks, LED drivers, and tons of other components. If you spend much time looking for new, cool parts you'll probably wind up with several I2C parts. Fortunately it is a protocol that is available on most microcontrollers, though it is a bit more complex than others.
Guide to Arduino and AVR Communications. If you spend any time playing with Arduinos, ATtinys or looking at AVR spec sheets, you soon encounter a bewildering smörgåsbord of acronyms for various communication protocols.

With examples such as I2C, LIN, SPI, TWI, USI, etc., it can get pretty confusing. If you don’t believe me, just take a look communications column for Digikey’s listing for the ATmega series chips. Confused yet? NewSoftSerial A New Software Serial Library for Arduino News: NewSoftSerial is in the core! Starting with Arduino 1.0 (December, 2011), NewSoftSerial has replaced the old SoftwareSerial library as the officially supported software serial library. This means that if you have 1.0 or later, you should not download this library. To port your code to 1.0, simply change all NewSoftSerial references to SoftwareSerial. NewSoftSerial is the latest of three Arduino libraries providing “soft” serial port support. NewSoftSerial Library, for an extra serial port. NewSoftSerial, by Mikal Hart, emulates an additional serial port, allowing you to communicate with another serial device.
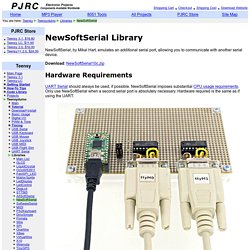
Download: NewSoftSerial10c.zip Hardware Requirements UART Serial should always be used, if possible. NewSoftSerial imposes substantial CPU usage requirements. Corrupt output/garbage from the ATmega328p. Hi everyone, A beginner’s guide to connecting and operating the WiFly to Arduino Serially. We were working on a home automation project , we used the wifly gsx in our project .When we bought it, we thought it will be easy to communicate it like a serial modem between the arduino and PC ,,, of course we are not noobs :) but every inch in the datasheet made us feel like one :)And when we searched for a solution for even one of our countless problems we faced.... the result can be summarized in three words ...
WIFLY NOT WORKING or we are noobs :D Of course i am kidding :) ,,we are not noobs and wifly is WORKING :o , thanks to sparkfun wifly library and We decided to start our new virtual hackerspace with this easy step by step tutorial for wifly :Please post any problem you faced with wifly or arduino . boolean initSettings() WiFly.SendCommand("set wlan auth <value>","AOK"); //WiFly.SendCommand("set wlan key <value>","AOK"); WiFly.SendCommand("set wlan channel <value>","AOK"); WiFly.SendCommand("set wlan join <value>","AOK"); Arduino/hardware/arduino/avr/libraries/SoftwareSerial at master · arduino/Arduino.