OneWire Arduino Library, connecting 1-wire devices (DS18S20, etc) to Teensy. OneWire lets you access 1-wire devices made by Maxim/Dallas, such as temperature sensors and ibutton secure memory.
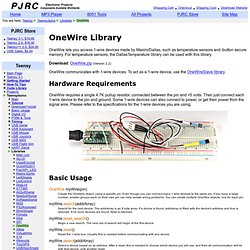
For temperature sensors, the DallasTemperature library can be used with this library. Download: OneWire.zip (Version 2.2) OneWire communicates with 1-wire devices. To act as a 1-wire device, use the OneWireSlave library. Hardware Requirements OneWire requires a single 4.7K pullup resistor, connected between the pin and +5 volts. Basic Usage OneWire myWire(pin) Create the OneWire object, using a specific pin. MyWire.search(addrArray) Search for the next device. MyWire.reset_search() DIY Arduino. IRthMonKeYSunday, February 2, 2014I love this!
Thanks Sir Kingsbury! If anyone else finds this awesome step by step useful and you keep returning to it for references ..I just keep the site open all the time on a tab.... Then take a fraction of the time it took this guy to create and document all of this and, shoot him a donation! I am for sure. This info has been really valuable to me just starting out in ICs way more valuable than what I could give financially. SchelSaturday, February 1, 2014Just a tip..the Hydrogen peroxide and muriatic acid are both -air dissipates . once the etching is done.. the muriatic acid and H.P can be poured into a bucket or preferably a pan. add as much water as the container can hold and leave uncovered in a safe open/ outdoor area..after a few days the remaining diluted acid and H.P will have evaporated leaving the water and copper particulates.
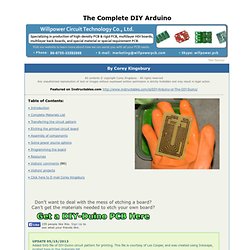
MurSunday, October 20, 2013Good tutorial ,I used ordinary A4 paper and obtained very good result.Thank you. Bread Board Power Supply Shield (5V/3.3V compatible) Standalone Arduino / ATMega chip on breadboard. If you're like me, after I got my Arduino and performed a final programming on my first chip, I wanted to pull it off my Arduino Duemilanove and put it on my own circuit.
This would also free up my Arduino for future projects. The problem was that I'm such an electronics newbie that I didn't know where to start. After reading through many web pages and forums, I was able to put together this Instructable. I wanted to have the information I learned all in one place, and easy to follow. Comments and suggestions are welcome and appreciated as I'm still trying to learn all this stuff. Edit:Fellow Instructable member, Janw mentioned to me that it's always a good idea to add a capacitor or 2 near your power.
Edit2: Building upon the previous edit, I wanted to mention that Instructable member, kz1o brought out some more information regarding the capacitors. .:oomlout:. Arduino & DIY Electronics and kits in the UK. Arduino programmer on breadboard using FT232RL ‹ BUILD CIRCUIT. ArduinoToBreadboard. This tutorial explains how to migrate from an Arduino board to a standalone microcontroller on a breadboard.
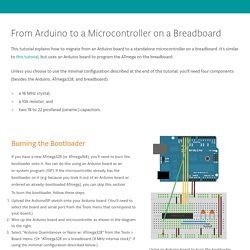
It's similar to this tutorial, but uses an Arduino board to program the ATmega on the breadboard. Unless you choose to use the minimal configuration described at the end of this tutorial, you'll need four components (besides the Arduino, ATmega328, and breadboard): a 16 MHz crystal, a 10k resistor, and two 18 to 22 picofarad (ceramic) capacitors.
Uploading Using an Arduino Board Once your ATmega328p has the Arduino bootloader on it, you can upload programs to it using the USB-to-serial convertor (FTDI chip) on an Arduino board. Build a Mintronics: MintDuino. Step #1: PrevNext Start building your MintDuino by adding the 7805 power regulator.
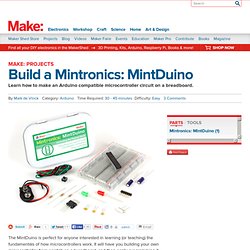
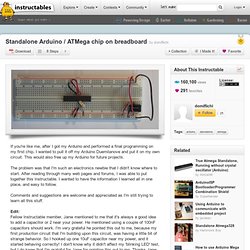
This converts the 9v power to 5v power that the ATMega can use.Insert the 7805 into column "i" on the breadboard and rows 1,2 & 3 as pictured. Arduino Breadboard Tutorial -Arduino Workshop Project Video #1. Setting up an Arduino on a breadboard. Overview This tutorial shows you how to build an Arduino compatible breadboard with an Atmel Atmega8/168/328 AVR microcontroller and FTDI FT232 breakout board from SparkFun. You could also use the Arduino USB Mini. Originally created David A. MellisUpdated from the ITP version by Carlyn MawUpdated October 23, 2008 by Rory Nugent Parts To do this, you'll need: The Supplies Basic Parts for wiring up Arduino A breadboard 22 AWG wire 7805 Voltage regulator 2 LEDs2 220 Ohm resistors 1 10k Ohm resistor 2 10 uF capacitors 16 MHz clock crystal 2 22 pF capacitors small momentary normally open ("off") button, i.e. USB to Serial Communication Board You will need a FT232 USB Breakout board from SparkFun.
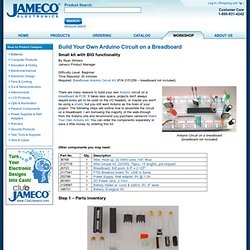
FT232RL USB to Serial Breakout Board, SKU BOB-0071Arduino Serial USB Board, SKU DEV-08165 If you plan to use the top option and have not yet soldered headers to the breakout board, now would be a good time. Bootloading your Atmega Chips. Arduino on a Breadboard. Small kit with BIG functionality By Ryan Winters Jameco Product Manager Difficulty Level: Beginner Time Required: 20 minutes Required: BareBones Arduino Circuit Kit (P/N 2151259 – breadboard not included)