
DIY Capiz Shell Chandeliers -Cant believe they're faux! To make a capiz shell chandelier is time consuming, but so worth the effort!
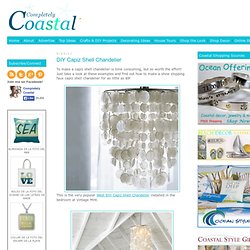
Just take a look at these examples and find out how to make a show stopping faux capiz shell chandelier for as little as $9! This is the very popular West Elm Capiz Shell Chandelier installed in the bedroom at Vintage Mint. ORANGE RIND VOTIVES. Record Lampshade. Design*Sponge » Blog Archive » diy project: brenna’s paper capiz shell chandelier.
I love wax paper for packing lunches; i wrap sandwiches in a piece of wax paper and tie it like a present with a little cotton string. it’s so much better looking than a plastic bag. wax paper comes in handy for more things than i realized, like rolling it up to use for a funnel, or how about rubbing a piece of wax paper on the top of your shower curtain rod to cut down on that terrible screeching in the morning…problem solved. but who knew that if you iron layers of wax paper together it looks remarkably similar to a capiz shell?
This discovery brought me to today’s project: the faux capiz chandelier. hung over your dining table, or outside at an outdoor dinner party, it is an easy solution to a dramatic light fixture and will look phenomenal in either setting. i hope you enjoy making your own as much i did! -brenna CLICK HERE for the full how-to after the jump! Materials: Instructions: 1. spray paint your planter basket. let dry. 8. once you cover the hanging basket you are done! Paper Lanterns. Universal lamp shade polygon building kit. I saw a lampshade made out of the shape below at a friend's house, so I traced the shape and made my own. the lamp i saw used thin plastic for the pieces.
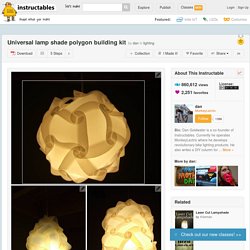
I believe the original design for this lamp was done over 30 years ago by the firm Iqlight, they sell pre-cut parts in case you do not want to make the parts yourself. Below is the shape as an image, and i've also attached a DXF file. You will need sheets of paper or plastic that allow light to get through. The stiffness of your material determines how large your pieces can be - stiffer material for larger pieces and larger lamps, thinner material for smaller pieces and smaller lamps. (see next step) You will need a lamp fixture - just a raw socket on a cord. I experimented with a number of different plastics and sizes for the parts, here are my results: - HDPE: works well, looks good, cheap and easy to get. . - Vinyl: I did not try it, probably want to use thicker pieces since it is not very stiff. but you can use colors! Guest post {Marie Darby…diy photo lampshades.
PINTEREST UPDATE: This is a post from 2010.

I do not take custom orders, only the tutorial is available. The lamps have held up wonderfully. As many of you requested, Marie is sharing a little tutorial here on how she made her lampshades. When she made them she was not planning on doing a tutorial for this blog, so be sure to thank her for taking the time to write all this out.
Also, for those wondering…Kara will be sharing some tutorials for her book art on her blog soon. Marie is happy to do custom orders for those that prefer buying over making! * LAMPSHADE – Hobby Lobby carries self-adhesive shades & nightlights, Target has some smaller lamps for $19 that would be perfect for this project, I’ve found some lamps & shades on Craigslist. Plastic Cup Lamp. Now that my university is closed for winter holidays, I finally have more free time to do all the crafty things I’ve been wanting to.

One of these is a lamp made from plastic cups I’ve seen at taf, the art foundation, in the Monastiraki region in the center of Athens. When I first saw it at taf, I was amazed; I looked closely and I couldn’t believe my eyes! The object itself is so peculiar, modern and alien-like it could be in any design exhibition. With my best friend’s birthday coming up, I decided to make it myself and give it to her as a gift. It turns out it was the easiest craft I’ve even done, the epitome of DIY objects! Disclaimer: There have been some concerns about the safety of this construction (see the comment of user “when” below for example).
I only needed a couple of things: 200-250 large plastic cups (recyclable, at least )600-700 staplesa staplera lamp socket, lamp cord and plug – mine came from a broken IKEA lamp! That’s all you will need. DIY Stone Sconces. This is a super easy project that anyone can do on the super cheap.
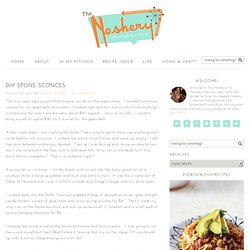
I wanted some nice sconces for my guest bath downstairs. I looked high and low and couldn’t find anything I wanted and the ones I did like were about $20 a piece….story of my life. I couldn’t bring myself to spend $40 on 2 sconces for the guest bath.