Three Point Lighting Tutorial
Three Point Lighting
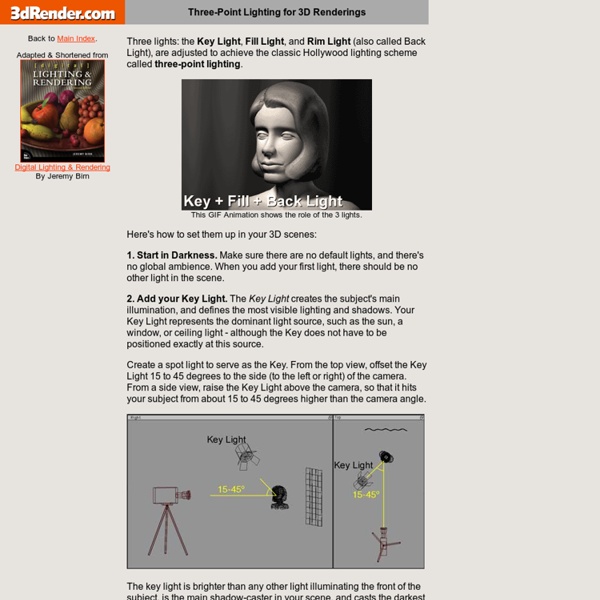
The Three Point Lighting Technique is a standard method used in visual media such as video, film, still photography and computer-generated imagery. It is a simple but versatile system which forms the basis of most lighting. Once you understand three point lighting you are well on the way to understanding all lighting. The technique uses three lights called the key light, fill light and back light. If you only have one light, it becomes the key.If you have 2 lights, one is the key and the other is either the fill or the backlight. Key Light This is the main light. Fill Light This is the secondary light and is placed on the opposite side of the key light. Back Light The back light is placed behind the subject and lights it from the rear. If you have a fourth light, you could use it to light the background of the entire scene. New — check out our Flash 3-Point Lighting Simulator!
DIY Lighting
Professional lighting kits for video and photography are very expensive. Fortunately for the budget-impaired enthusiast, it is possible to put together a perfectly adequate lighting kit for less than $US100. A good beginner's lighting kit should include: Three (or more) lights with standsReflector board(s)Power cables, extension leads and a multi-box. The Lights The standard budget light is the halogen work lamp which can be found at any hardware store or purchased at amazon.com for as little as $US10. The stand-less units have a small handle and can be rested on any solid surface such as a table or the floor. Lights with stands are more versatile and you should have at least one of these (preferably two or three). Some lights (like the W12665 unit pictured) can be used with or without the stand, making them even more versatile. One drawback of these cheap lights is that the colour of the light is quite yellow. Reflectors Hobby shops have a lot of items which may be of interest. Power Safety
Film and Video Lighting Equipment, Bulbs, Globes, Lamps, Arri, Mole-Richardson, Kino Flo, Chimera, Dedolight, Lowel, K5600, Joker, Lighting, Setwear, Cinebags, HMI, Gels, Grip, Kits
Home
Related:
Related:
