
Normalmaps for the Technical Game Modeler. Normalmaps for the Technical Game ModelerBy Ariel Chai, 15th of June 2010, all rights reserved.
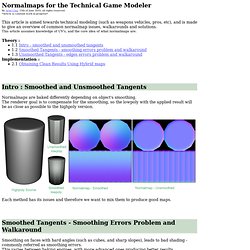
*Article is constant work in progress*This article is aimed towards technical modeling (such as weapons vehicles, pros, etc), and is made to give an overview of common normalmap issues, walkarounds and solutions. This article assumes knowledge of UV's, and the core idea of what normalmaps are. Theory : Implementation :2.1 Obtaining Clean Results Using Hybrid mapsNormalmaps are baked differently depending on object's smoothing. The renderer goal is to compensate for the smoothing, so the lowpoly with the applied result will be as close as possible to the highpoly version.
NormalMap. What is a Normal Map?
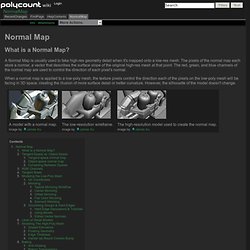
A Normal Map is usually used to fake high-res geometry detail when it's mapped onto a low-res mesh. The pixels of the normal map each store a normal, a vector that describes the surface slope of the original high-res mesh at that point. The red, green, and blue channels of the normal map are used to control the direction of each pixel's normal. When a normal map is applied to a low-poly mesh, the texture pixels control the direction each of the pixels on the low-poly mesh will be facing in 3D space, creating the illusion of more surface detail or better curvature. However, the silhouette of the model doesn't change. Tangent-Space vs. Normal maps can be made in either of two basic flavors: tangent-space or object-space. Developer.download.nvidia.com/assets/gamedev/docs/ShaderIntegration_China.pdf.
Maya User's Guide: Feature-based displacement map attributes. ZBrush to Maya Displacement map. Displacment maps.
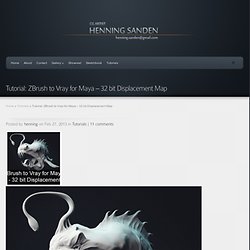
Maya. Combined, the two words sends shivers down the spine of any CG artist. It’s a topic I’ve spent countless hours trying to wrap my head around. In this tutorial we’ll look at a reliable way to use 32 bit displacement maps in Vray for Maya generated in ZBrush. The advantages of using a 32 bit map vs a 8 0r 16 bit are two in particular: - You dont have to worry about fiddling with the displacement amount, as long as your Zbrush and Maya model are the same size. with 32 bit maps, the displacement amount will replicate your Zbrush model as closely as it can automatically. - You have significantly more data to work with so your displacement will be more accurate and will contain more information.
I’ll assume you know the difference between a normal, bump and displacement map, and why a displacement map is necessary. Maya User's Guide: Troubleshoot black holes appear on rendered surfaces with displacement maps. Octane Render. Maya User's Guide: Connect a texture as a displacement map. Photography Cheatsheets. 3ds Max Help: Baked Texture Elements. Www.escapestudios.com/assets/Uploads/ESCAdvancedShadingwithMayaMentalRay2.pdf. Tutorial make chrome ball using autodesk maya. Maya tutorial: How to attach a texture to a mi car paint material. The Best Way to Render Wireframe in Maya. Posted: January 25th, 2010 | Author: Ayan | Filed under: 3D | Tags: 3D, Maya | 61 Comments » A quick google for render wireframe in Maya will get you some sound results.
Unfortunately, I tried them and they didn’t consistently produce the results I needed. So here is the most consistent, and thus in my opinion best way to do wireframe in Maya. Method 1: “The Best Way” – Mental Ray Contours Why is it the best? Rendering Wireframe with Mental Ray The Worse Ways For full disclosure, here are some other not so good ways to render wireframe. Maya User's Guide: Remove namespaces. Specialized passes: Material ID, Object ID and UV Pass – Tutorial. When outputting to composite rendered passes, it can be very useful to have the ability to select your render components by types.
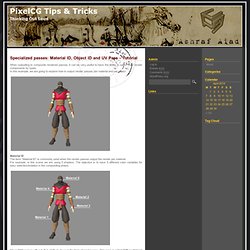
In this example, we are going to explore how to output render passes per material and per object. Material ID The term “Material ID” is commonly used when the render passes output the render per material. Part 3: Multi-Tile Shader Setup/Rendering in Maya. – Brian Freisinger. Part 3: Multi-Tile Shader Setup/Rendering in Maya.
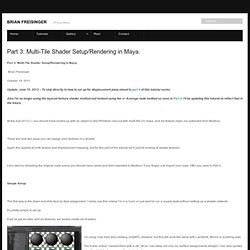
Brian Freisinger October 18, 2011 Update: June 10, 2012 – To skip directly to how to set up for displacement jump ahead to part 4 of this tutorial series. Also I’m no longer using the layered texture shader method and instead using the +/- Average node method as seen in Part 4. I’ll be updating this tutorial to reflect that in the future. At the end of Part 2 you should have ended up with an object (Cube Primitive) laid out with multi-tile UV maps, and six texture maps you extracted from Mudbox. There are now two ways you can assign your textures in a shader.
Again this applies to both texture and displacement mapping, but for this part of the tutorial we’ll just be looking at simple textures. Let’s start by reloading the original cube scene you should have saved and then exported to Mudbox. Simple Setup: The first way is the down and dirty face by face assignment. It’s pretty simple to set up. Figure 19. Create Light Streaks in Maya Mental Ray Final Gather.
Maya Online Help: Create light fog using mental ray for Maya sample workflow. DSLR Lighting Techniques from Eve Hazelton. Complex Material Tutorial. By Joe “EarthQuake” Wilson How do I make X material type in Toolbag?
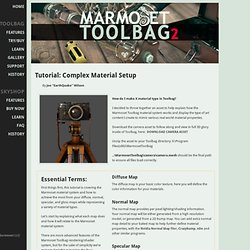
I decided to throw together an asset to help explain how the Marmoset Toolbag material system works and display the type of art content I create to mimic various real world material properties. Download the camera asset to follow along and view in full 3D glory inside of Toolbag, here: DOWNLOAD CAMERA ASSET Unzip the asset to your Toolbag directory: X:\Program Files(x86)\MarmosetToolbag .. Essential Terms: First things first, this tutorial is covering the Marmoset material system and how to achieve the most from your diffuse, normal, specular, and gloss maps while representing a variety of material types. DSLR Lighting Techniques from Eve Hazelton.