
Studio Quality Product Photography With a $12 Set Up: Guest Post from Via U Photography Blog. I took this picture of a bottle of Anderson Liquid Soap bottle in my kitchen.
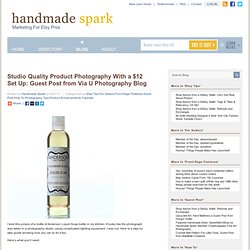
It looks like the photograph was taken in a photography studio, using complicated lighting equipment. I was not. Here is a step by step guide showing how you can to do it too. Here’s what you’ll need: 1. This is one of those times when bigger is indeed better. 1. Now you will need to redecorate your home a bit, move a table as close to a window as you can. Is your furniture high enough? Don’t let the neighbors watch. Put a long piece of aluminum foil on the table, I used the dull side up for this picture. Fold down the foil to have a clean edge. Use the card so the light coming in from the window bounces back to reach the bottle.
Play with the angle of the card to find the position that puts the most light on your product. Shoot to Sell: Taking Better Photos for eBay, Etsy & Instructables. eBay: Last bastion of the truly awful product shot.
The fuzzy focus, the baleful tinge of the fluorescent lights, the blinding glare of the flash. It’s almost depressing. (Except for that one listing where you could see the naked photographer in the reflection of the mirror he was trying to sell. That was hilarious.) If you sell stuff online, you know that you need attractive pictures to sell your wares. Don’t sweat it. Remember, if you can make somebody want to buy Aunt Tilly’s ceramic owl collection, you can conquer the world. How to Take Better Photos for eBay, Etsy & Instructables p.s. P.p.s. If you read our food photography tips a little while back, this may sound eerily familiar. Lighting If you can find a way to use natural light, do it. Background Keep your backgrounds as simple as possible. Small object photography - for artists and craft makers. Tutorial: $6 Solution to Jewelry Photography. 1.
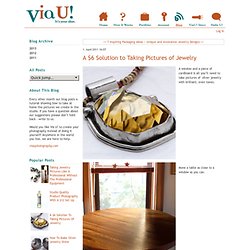
April 2011 16:07 A window and a piece of cardboard is all you’ll need to take pictures of silver jewelry with brilliant, even tones. Move a table as close to a window as you can. Make sure that the top of the table is a higher than the window sill. Tape a piece of tracing paper to the window. When using white paper as a background put something white underneath to avoid the table coming through making it look dark.
I used a 2’ x 2’ piece of foamcore to bounce back light from the window, you can use anything that stands upright without bending. Light will reflect from the white card and from the white surface as well. Silver is like a mirror, it shows whatever is around. Pendant, a courtesy of Roxy's Jewelry If you pull the white card away from the window it will create a dark area that will also reflect on the jewelry. Different tones of silver make a picture have more depth. How-To Make and Use a Light Box to Improve Your Product Photography.
Article by: Anna from The House of Mouse Original article Great photos are one of the most important things to get right if you sell online. Your photographs are your virtual shop window: If they are not light, bright and eye-catching then often buyers will surf right past your store without even noticing your work. Really beautiful photographs will bring buyers through your virtual door and keep them there long enough to remember your creations. These photography tips are designed to help you make your photographs looks bright, eye catching and professional and you don’t need to have an expensive camera to do this! This tutorial comes in two parts: How to make a Light Box How to edit your photos to make them pop I use both processes for all of my photographs. Part 1: How to make a Light Box These tips are one way of taking great photos, but they are certainly not the only way.
First select a box that is the right size for what you want to photograph. Finally your light box is ready!