
Monitor, Serial input Graphing utility for Windows. Arduino – Serial Communication. By Sami Mughal The Arduino boards, and I believe this applies to all of them, even though I have used only two so far (the UNO and the MEGA), allow for Serial Communication.
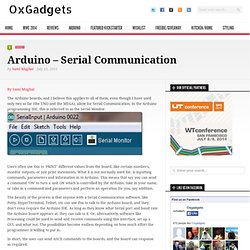
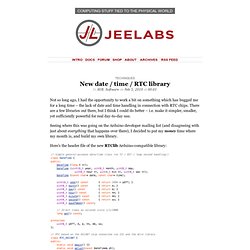
In the Arduino programming IDE, this is referred to as the Serial Monitor. Blog Archive » Ardunio RTC, temp sensor, and LCD. History, contrary to popular theories, *is* kings and dates and battles - Terry Pratchett, Small Gods Wednesday 25th May, 2011 | 7:49 pm I figured that if I was going to end up building some kind of aquarium controller / monitoring system based around the Arduino, I’d need a way of keeping track of time. Either to automate certain events like turning lights and off, or simply to log the time temperature readings we taken, I’d like something more advanced that milli() built in to the Arduino to track time since it was last turned on.
Plus, if the power goes out (we lost power for a few hours on Monday after a big storm came through…), then I’d have to tell the Arduino to reset it’s time and calculate afresh when it needed to carry out certain events. There’s a few basic little circuits built around the DS1307 chip that act as a real time clock – I went with this little kit from Adafruit . » New date / time / RTC library JeeLabs. In AVR, Software on Feb 5, 2010 at 00:01.
Arduino-LCD-time-temp/Display_Date_and_Time_on_LCD.pde at master · fouldsy/Arduino-LCD-time-temp. Connecting to a DHTxx Sensor. PLAY WITH HUMIDITY & TEMPERATURE SENSOR DHT11. DHT11 is the sensor temperature and humidity, he has a digital output signal is calibrated with temperature and humidity sensors are complex.
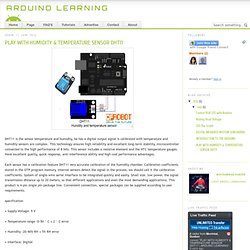
This technology ensures high reliability and excellent long-term stability. microcontroller connected to the high performance of 8 bits. This sensor includes a resistive element and the NTC temperature gauges. Have excellent quality, quick response, anti-interference ability and high cost performance advantages. Each sensor has a calibration feature DHT11 very accurate calibration of the humidity chamber. Calibration coefficients stored in the OTP program memory, internal sensors detect the signal in the process, we should call it the calibration coefficients. Specification • Supply Voltage: 5 V • Temperature range :0-50 ° C ± 2 ° C error • Humidity :20-90% RH ± 5% RH error • Interface: Digital To display the temperature in laptop screen Program on Arduino.
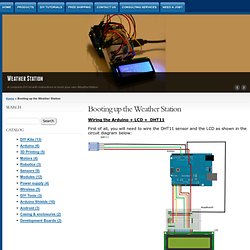
Booting up the Weather Station. Wiring the Arduino + LCD + DHT11 First of all, you will need to wire the DHT11 sensor and the LCD as shown in the circuit diagram below: Fig 1: Circuit to wire up the Arduino the LCD and the DHT11 sensor Loading the program to get the weather station going:
Lab3 - Laboratory for Experimental Computer Science. For frequency measurement in the audio or sub audio range the determination of the signal period length delivers the most accurate results.
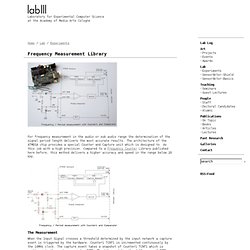
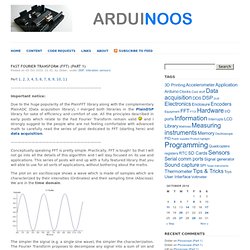
The architecture of the ATMEGA chip provides a special Counter and Capture unit which is designed to do this job with a high precision. Compared to a Frequency Counter Library published here before, this method delivers a higher accuracy and speed in the range below 20 KHz. When the Input Signal crosses a threshold determined by the input network a capture event is triggered by the hardware. » Blog Archive » Fast Fourier Transform (FFT) (Part 1) Part 1, 2, 3, 4, 5, 6, 7, 8, 9, 10, 11 Important notice: Due to the huge popularity of the PlainFFT library along with the complementary PlainADC (Data acquisition library), I merged both libraries in the PlainDSP library for sake of efficiency and comfort of use.
» Blog Archive » Fast Signal Sampling (Part 1) Part 1, 2, 3, 4, 5, 6, 7, 8, 9, 10, 11, 12, 11, 12 In an early post, I described an electronic interface which adjusts the level electret microphones to the level of Arduino’s ADC.
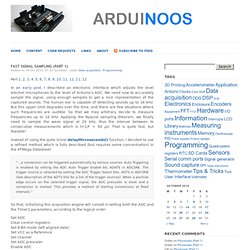
We need now to accurately sample the signal, using enough samples to get a nice representation of the captured sounds. The human ear is capable of detecting sounds up to 16 kHz. But this upper limit degrades over the time, and there are few situations where such frequencies are audible. So that we may arbitrary decide to measure frequencies up to 10 kHz. Instead of using the quite trivial delayMicroseconds() function, I decided to use a refined method which is fully described (but requires some concentration) in the ATMega Datasheet “…a conversion can be triggered automatically by various sources.
Blog » ADC. [Martin Nawrath] from Lab3, Cologne, made a nice ADC tutorial based on the 18bit LTC2400: If the resolution of the Arduino is not enough for your application you have to try it with a better ADC.
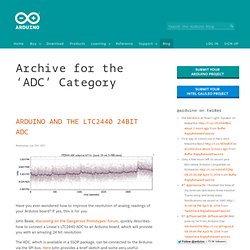
The LTC2400 gives you a resolution of up to 24 bit at a datarate of 5 samples per seconds and is quite simple to connect. With this device you can connect sensors which have only a low output level like thermo couples or force strain gauges. Tinkerish.com. DIY Arduino Based Pulse Oximeter Part I (with video) I recently completed the first half of my Pulse Oximeter.
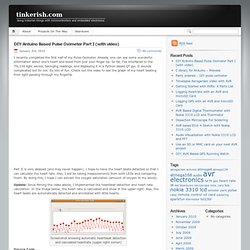
Already, one can see some wonderful information about one’s heart and blood from just your finger tip. How can I calculate processor usage? Thank you kf2qd and wildbill for your additions to the thread!
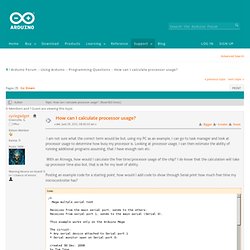
Clearly, processor utilization is useful knowledge on a PC, but on an Arduino, why do you care? Your code is either fast enough or it's not. If not, it's time for some tuning, likely using the profiling suggestions above. Don't worry about it until you're forced to. I understand what you are saying. Audio Grains » Music Technology one post at a time! » DSP. The PONO Express Rolls In Neil Young finally got to introduce PONO to the crowds at SXSW this weekend as previously announced. It is indeed simply a hi-res lossless audio player (and music store). Arduino Audio Input. If you've ever recorded audio on your computer, you may have seen it represented as a waveform like the one in fig 1.
If you zoom in on this wave (as in fig 2) you will see that the shape is made of thousands of tiny oscillations back and forth. This is called an audio signal and when we are dealing with audio signals in electronics, these oscillations represent oscillating voltages over time. When we look at an audio signal with an oscilloscope, we see a similar picture (fig 3). Notice how the audio signal in fig 3 oscillates around a center voltage of 0V; this is typical of audio signals. The amplitude of an audio signal is the distance between its center voltage and its high or low peak. Lab3 - Laboratory for Experimental Computer Science. This is an experiment to show how some realtime audio processing can be done with the Arduino. The first set of examples alter an incoming audio signal and put it back to an audio output.
We achieve effects like Reverb, Phasor, Flanger or Ringmodulator. The second set of examples are outputting computed waveforms like Sinewave, Bell and Xylophone sounds. Arduino Realtime Audio Processing. Arduino « coolarduino. Thermistor_Sketch_bb.jpg. Arduino – Digital Thermometer. Limor.
LCDLibrary. (redirected from Tutorial.LCDLibrary) Reference Language | Libraries | Comparison | Changes. Blog » FFT. Makers need to familiarize themselves with the core concepts and the theory involved in creating applications such as Motion Sensing and Face Tracking. Electronics - Henning Karlsen. Basic functionality of this library was origianlly based on the demo-code provided by ITead studio (for the ITDB02 modules) and NKC Electronics (for the RGB GLCD module/shield). This library supports a number of 8bit, 16bit and serial graphic displays, and will work with both Arduino and chipKit boards.The library works great with the ITDB02 series of display modules from ITead Studio, the TFT01 series of display modules from ElecFreaks, and the RGB LCD Shield and module from NKC Electronics.
SainSmart Mega2560+3.2" TFT LCD Shield+Touch Screen. Modified 8bit FFT in c. Labs / MIDI Output using an Arduino. Overview This page covers only the details of MIDI communication on the Arduino module. For a more general introduction to MIDI on a microprocessor, see the MIDI notes on Tom's physical computing site. MIDI, the Musical Instrument Digital Interface, is a useful protocol for controlling synthesizers, sequencers, and other musical devices. MIDI devices are generally grouped in to two broad classes: controllers (i.e. devices that generate MIDI signals based on human actions) and synthesizers (including samplers, sequencers, and so forth).
Connect midi drumkit...how? - NI User Forums. Arduino 1.0 is Out: Here's What You Need To Know. The Arduino team just released version 1.0 of the Arduino development environment! With it comes a bunch of changes that will affect you, especially if you use any add-on libraries: The language changes include modifications to the Serial class, addition of DHCP and DNS support to the Ethernet library, a new SoftwareSerial library, multi-file support in the SD library, modifications to the Wire library and UDP class, etc.
Arduino Simulation with Proteus - YouSpice, SPICE simulation community. We 'll show how to simulate the celebrated open-source electronics prototyping platform Arduino with Proteus .You can find other informations, project files and arduino software at its homepage. AdaFruit 2.8" TFT Touch Shield for Arduino (ADA376) Spice up your Arduino project with a beautiful large touchscreen display shield with built in microSD card connection. Smart GPU - vizic technologies. Spooky Arduino Projects #4 – Musical Arduino. Code, circuits, & construction. Raspberry Pi. HIDUINO: Your Arduino is Now A MIDI Interface.
Notes and Volts: Fun with Arduino - Midi Input Basics. Midi. ComponentLib2. Arduino Tutorial - Learn electronics and microcontrollers using Arduino! Playground - TutorialList.