
Mini Client with the Arduino TRINKET and the ESP8266. Ending the temperature to a ThingSpeak channel using the TMP35 sensor.
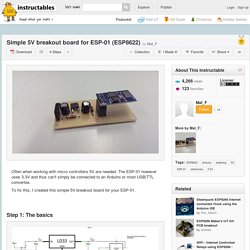
This is a small and low cost implementation of IoT (Internet of Things, possibly one of the next technological revolutions). The ESP8266 can be used alone thanks to the apparition of several environments like LUA, C, Micro Python etc.. In this case I wanted to keep the solution in the Arduino environment to take advantage of many ready-to-use libraries and examples. Then I realized, due the reduced space in the Trinket (5.310Kb for code), the usability of such libraries it’s not so simple. Programming the ATtiny85 with an ISP programmer will permit the use of the full 8K programming memory. Power considerations: The ESP8266 is power hungry when is communicating with a Wi-Fi spot. Wiring diagram: (….. on the works) Simple 5V breakout board for ESP-01 (ESP8622) For the circuit you need the following parts: 1x low drop voltage regulator (I used a LF33 CDT)1x 10µF capacitor1x 100µF capacitor1x 1k resistor1x 1.8k resistor1x 2 pin header (male) and jumper1x 2x4 header connector (female - for the ESP-01)1x 4 pin header connector (male or female)1x piece of perfboard.
ESP8266 WiFi module Arduino 3.3V connection. In this tutorial we will show how to connect ESP8266 WiFi module to Arduino.
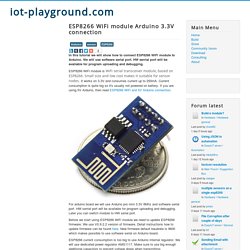
We will use software serial port. HW serrial port will be available for program uploading and debugging. ESP8266 WiFi module is WiFi serial transceiver module, based on ESP8266. Small size and low cost makes it suitable for sensor nodes. It works on 3.3V and consumes current up to 250mA. For arduino board we will use Arduino pro mini 3.3V 8Mhz and software serial port. Before we start using ESP8266 WiFi module we need to update ESP8266 firmware. ESP8266 current consumption is too big to use Arduino internal regulator. Power supply Connecting ESP8266 WiFi module and Arduino Pro Mini 8Mhz, 3.3V ESP8266 WiFi module pinout Arduino Pro Mini 3.3V 8Mhz pinout Testing ESP8266 DHT22 temperature and humidity sensor node. In next post we will show how to use ESP8266 module connected to Arduino as sensor node with ESP8266 EasyIoT libray.
To support this site and EasyIoT framework development please buy in our store. ESP8266 WiFi module and 5V Arduino connection. In this tutorial we will show how to connect ESP8266 WiFi module and 5V Arduino.
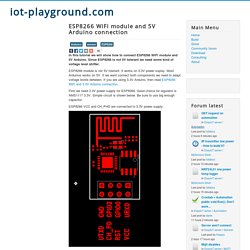
Since ESP8266 is not 5V tolerant we need some kind of voltage level shifter. ESP8266 module is not 5V tolerant. It works on 3.3V power suplay. Most Arduinos works on 5V. If we want connect both components we need to adapt voltage levels between. ESP8266 Wifi with the Arduino Micro. A few months ago a new board called the ESP8266 arrived on the scene and promised a very cheap way for serial devices (such as the Arduino) to to make HTTP requests.
The device itself was less than $10 (I got a few on AliExpress for $5) and it meant that smart microcontrollers could be easily made into “Internet of Things” devices. The boards (from the factory) operate at 115200, and that is just too fast for SoftwareSerial, so I decided to use and Arduino Micro to play around with it. The Arduino Micro has two serial ports so that it can communicate over USB (for debugging) as well as communicate over another serial channel (Serial1). This mean that I could use the Arduino Micro as a serial pass-through device and communicate with the ESP8266 directly. The annoying part was the 8 pin setup was not very breadboard friendly, so I de-soldered the back row of pins (GND, GPIO1, GPIO2, RX) and attached external wires so that they would work easier on a breadboard.
Like this: Like Loading... Tiny gadgets. For a while now, I’ve been playing with the super-cheap esp8266 WiFi module.

It’s been a bit of an uphill struggle, mostly because of the poor documentation (actually, that’s not fair – the documentation may well be excellent, but my understanding of Chinese isn’t) and the lack of easy programming tools. Until now, there have been essentially three ways of using the module: Serial for breakfast The initial method was to control the module via a serial link. As supplied, it can communicate with an arduino (or anything else) using a simple serial connection, using AT-style commands which will be familiar to anyone who has worked with modems, especially GSM ones. C for elevenses Pretty soon after it became available, smarter people than me figured out that the module is powered by a general-purpose microprocessor (and a pretty powerful one at that). Of course, there’s a catch. Lua for lunch More recently, there has been nodemcu.