
Arduino Nano: DHT11 Temperature and Humidity Visual Instrumentation With Visuino. Manipulation des String avec Arduino.
UltraSons. LowPower. Power off from an Arduino Sketch using the Pololu Power Switch. If you need an Arduino to shut off from within your Sketch, this is the solution.
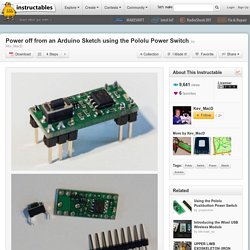
We will explore wiring the Pololu Pushbutton Power Switch, programming the Arduino to shut off the power, and making the unit "power on" only. The Pololu Pushbutton Power Switch comes in two versions - the SV version geared towards 4.5V-20V range, and the LV which specifies 2.5V-7.0V range. I will use a 9V battery for this demo, and thus the SV version of the power switch.
PulseIn. Reference Language | Libraries | Comparison | Changes Description Reads a pulse (either HIGH or LOW) on a pin.
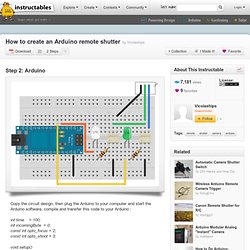
For example, if value is HIGH, pulseIn() waits for the pin to go HIGH, starts timing, then waits for the pin to go LOW and stops timing. Returns the length of the pulse in microseconds. How to create an Arduino remote shutter. First, check that the remote shutter works on your camera.
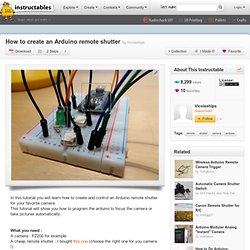
Take apart the small device by removing the screws and opening it. As you can see the remote shutter is composed of resistances and a simple button, The camera measure the resistance between two wires. To focus / shoot you just have to set the right resistance. When you "middle press" the camera focuses. When you press the button the camera shoot a picture. Connect the remote shutter to your camera and play with the button. What you need to do is solder 3 wires to these pins and pull them out of the device. Arduino Tutorial - Lesson 5.
We've done a lot so far, blinking lights, printing messages...all of that stuff is output: signals coming from the Arduino.
The next step is to start playing with input, with the Arduino responding to outside events. In this lesson we will begin with the most basic kind of input, a push-button switch! PIR Motion Sensor. PIR sensors allow you to sense motion, almost always used to detect whether a human has moved in or out of the sensors range.
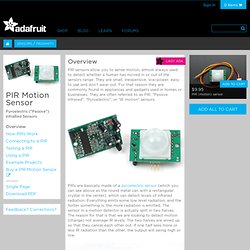
They are small, inexpensive, low-power, easy to use and don't wear out. For that reason they are commonly found in appliances and gadgets used in homes or businesses. They are often referred to as PIR, "Passive Infrared", "Pyroelectric", or "IR motion" sensors. PIRs are basically made of a pyroelectric sensor (which you can see above as the round metal can with a rectangular crystal in the center), which can detect levels of infrared radiation. Everything emits some low level radiation, and the hotter something is, the more radiation is emitted.
An Online Opensource Robot and Hardware Shop.
Stepper. Web. Carte SD et Arduino. Voici une marche à suivre pour brancher un lecteur de carte SD (le modèle fabriqué par LC Studio qu'on feut facimement trouver sur eBay pour une bouchée de pain).
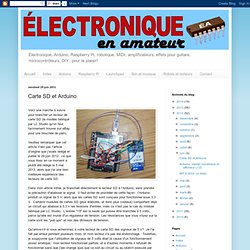
Veuillez remarquer que cet article n'est pas l'article d'origine que j'avais rédigé et publié le 29 juin 2012: ce que vous lisez en ce moment a plutôt été rédigé le 5 mai 2013, alors que j'ai une bien meilleure expérience des lecteurs de carte SD.
How to create an Arduino remote shutter : Arduino. Copy the circuit design, then plug the Arduino to your computer and start the Arduino software, compile and transfer this code to your Arduino : int time = 100; int incomingByte = 0; const int opto_focus = 2; const int opto_shoot = 3; void setup() { Serial.begin(115200); // Baud-rate pinMode(opto_focus, OUTPUT); pinMode(opto_shoot, OUTPUT); } void loop() { // Send data only when you receive data if (Serial.available() > 0) { // Reading incoming bytes : incomingByte = Serial.read();
Photoduino: The opensource camera controller based on Arduino. DIY altimeter for FrSky telemetry receivers with Arduino & BMP085. Build Log DIY altimeter for FrSky telemetry receivers with Arduino & BMP085 Hi, Let me share this cheap and simple barometric altimeter.
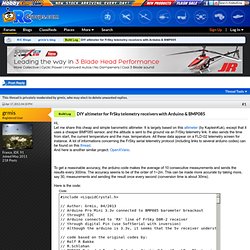
It is largely based on this altimeter (by KapteinKuk), except that it uses a cheaper BMP085 sensor, and the altitude is sent to the ground via an FrSky telemetry link. It also sends the time from start, the current temperature and the max. temperature. All these data appear on a FLD-02 telemetry screen for instance. To get a reasonable accuracy, the arduino code makes the average of 10 consecutive measurements and sends the results every 300ms. Here is the code:
Solaire. Raspberry Pi : fabriquons des trucs! - Topics perso et Community Management. Description des composants utiles pour commencerNous avons vu dans le post précédent ce qu'est précisément le Raspberry Pi, ainsi que le materiel requis pour s'en servir.
Cependant, il s'agissait du minimum syndical requis pour faire fonctionner le Pi. Notre but n'étant pas de simplement faire un serveur, je vais vous présenter ici quelques équipements intéressants, et nous ferons des "packs" de démarrage. Ou acheter? En premier lieu, je vous recommande trois sites : Ces trois sites proposent un catalogue très intéressant de composants adaptés aux besoins de la robotique, de la domotique, de l'instrumentation, et même de l'expérimentation en général.
Les composantsLes ArduinoAvant de commander, je voudrais vous parler des Arduino. Les BreadboardUne breadboard, ou plaque de prototypage sans soudure, et une plaque dotée de nombreux trous. La plaque que vous voyez est une breadboard avec à droite un schéma superposé dessus. PHOTO INTERRUPTEUR KINGBRIGHT KTIR0221DS. Home Page. Proposé par le site www.mon-club-elec.fr.
Projects.