
DIY Minaudière I have an awful habit of losing sunglasses. Needless to say, I’ve accumulated an impressive collection of sunglass cases over the years. Recently we’ve discovered that these abandoned containers can easily by re-purposed into fabulous mini clutches! Inspired by those spotted during Milan and Paris Fashion Weeks, we made a super simple minaudière with just a few tools and a fancy piece of hardware. Open the sunglass case and drill a hole in the top center. Easy. Perfect for all the essentials . . . minimalism at its best! (top image from style.com, rest of images by Honestly…WTF) DIY No Knit Scarf We love Rike Feurstein. Her hats are sick and her chunky knits are lusciously bold and amazing. And when we saw her Dylan scarf, we thought it was genius. A scarf that didn’t require knitting? You’ll start by transforming a skein of yarn into a hank of yarn, which is yarn that is loosely wound into a large ring shape and then twisted. Cut 3 pieces of leather at approximately 1.75″ wide and 4″ long. Voila! (top image from here, rest of images by Honestly…WTF)
Mommy by day Crafter by night: Dolly Diaper Bag + Tutorial Every time my daughter goes through the American Girl Catalog, the Bitty Baby Diaper Bag is always at the top of her wishlist. At $36 I can hardly justify buying it, so I decided to recreate it for her. I made 2 (one for each of my girls) for far less than the price of one Bitty Baby Diaper Bag. These don't come with all the goodies the real one does, but I am hoping they will still be a hit for Christmas this year. :) Supplies needed to make this bag: --1/2 to 3/4 yard main fabric --1/2 yard coordinating fabric for the liner --1/2 to 3/4 yard fusible fleece --thread --small piece of cardboard *** Updated 2013: Use a piece of fusible Peltex instead of the cardboard --Velcro (I kinda guessed with the yardage because I just used supplies I had on hand, but if you are buying fabric specifically for this project- get a little extra just to be on the safe side! To start, get all of the cutting done... This bag measures 10 in(l)x 8 in(h) x 5 in (w) 8x11= 2 pieces {front and back of bag} 8x11= 2 pieces
Headband Makeover {How to Make a Bow} Mrs. Priss Headband Makeover {How to Make a Bow} Feb01st2010 Supplies: Headband (mine was busted)Ribbon (I used 7/8″ wide for this size bow, but you should adjust measurements below according to ribbon width)ScissorsHot Glue Gun (If you’re wondering, I’m gazing down at my toilet.) Other tutorials: Bib Clips: A Simple DIY for Moms Anthropologie Floral Necklace Anthropologie Bonheur Necklace Tags: bow crafting crafts diy headband tutorial Categories: DIYs and Tutorials Me Being Crafty Personal Related Posts Dainty Flowers for Your Hair – Yeahhh, it’s another tutorial.I came up with these flowers one day when I was in a crafty mood...DIY – Anthropologie Inspired Flag Bunting NecklaceI absolutely love this necklace, but with the $70 price tag I was like, ummmmmm…...Anthropologie Bonheur Necklace TutorialA few months ago (okay, six), I posted a photo of an Anthropologie-inspired necklace I... 50 Comments Thus Far
DIY Market Bag With Earth Day just around the corner, we’re turning to artist and environmentalist Chris Jordan for inspiration. In this large-zoom photograph he has captured 1.14 million brown paper supermarket bags, the number used in the US every hour. And did you know that 2.7 billion plastic bags are used every day worldwide? Floored by these staggering numbers we were motivated to do a quick and easy DIY, recycling an old t-shirt into a reusable fringed market bag. Lay the t-shirt on a flat surface. Snip 8 evenly spaced slits along the bottom hem of the t-shirt. Attach a safety pin to the end of one of the strings. You can trim the strings but we like leaving the fringe as is. Aren’t you excited to BYOB (bring your own bag)? Make one for a friend. (top image from here, rest of images by Honestly…WTF; thanks to Leethal & Lynn for the inspiration!)
DIY Lace Earrings Dolce & Gabbana‘s Spring ’11 collection undoubtedly furthered our already fanatical obsession with lace. Honestly, how dreamy is the collection?! We thought we’d make good use of some vintage lace trim we had laying around and turn them into earrings similar to the ones we saw on the runway. And thanks to some tips from a DIY previously featured on Poppytalk, making lace earrings proved be a cinch! Mix equal parts glue to water in a bowl. Submerge the cut shapes into the glue mixture. I haven’t stopped wearing mine since and can’t wait to make more. (top image from Vogue.com, rest of images by Honestly…WTF)
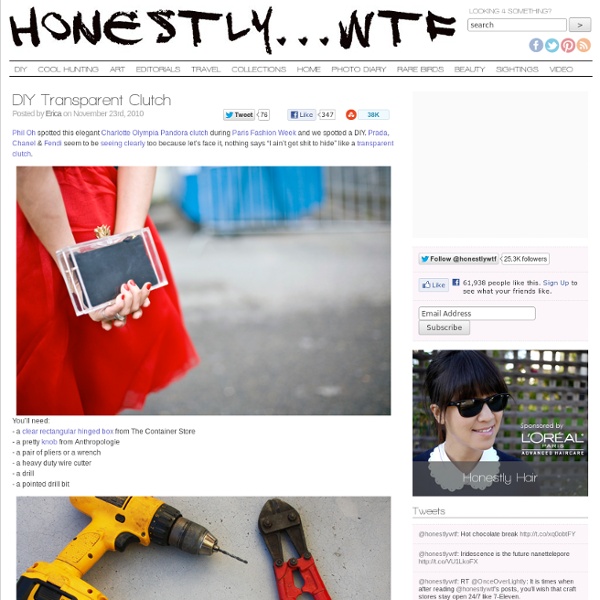
Make It: sketchy pleat clutch Simple DIY today… Drawn with fabric markers, cut from a curved pattern, and constructed with a single pleat for a handy sized zipper clutch. Suitable for sunglasses and a few other spare parts. Finished Dimensions: 5.5 inches tall x 9 inches wide Materials: Crayola Fabric Markers from the May Whimseybox7″ zipperplain fabric measuring 15 x 12 for exterior (cut to 7.5″ x 12″ wide)lining fabric measuring 15 x 12 (cut to 7.5″ x 12″ wide)optional: 24″ bias corded trim/pipingusual suspects: pins, thread, needle, water soluble penThis Complimentary Pattern Preparation: Using fabric markers by Crayola begin doodling your pattern on two plain fabric panels measuring 7.5″ tall x 12″ wide. Construction: Note: Seam allowances are approximately 3/8″. Cut main fabric to Pattern Piece “1.” Stuff lining inside the bag. I took a cue from a Lisa Stickley design to make the yellow pattern (also similar to an older Denyse Schmidt print, and a new large scale print by Lotta Jansdotter). Other inspiration:
Natural Dyes From Plants - Pioneer Thinking Did you know that a great source for natural dyes can be found right in your own back yard! Roots, nuts and flowers are just a few common natural ways to get many colors. Yellow, orange, blue, red, green, brown and grey are available. Gathering plant material for dyeing: Blossoms should be in full bloom, berries ripe and nuts mature. To make the dye solution: Chop plant material into small pieces and place in a pot. Getting the fabric ready for the dye bath: You will have to soak the fabric in a color fixative before the dye process. Color Fixatives: Salt Fixative (for berry dyes) 1/2 cup salt to 8 cups cold water Plant Fixatives (for plant dyes) 4 parts cold water to 1 part vinegar Add fabric to the fixative and simmer for an hour. Dye Bath: Place wet fabric in dye bath. Muslin, silk, cotton and wool work best for natural dyes and the lighter the fabric in color, the better. NOTE: It’s best to use an old large pot as your dye vessel. Shades of ORANGE – Alder (Alnus rubra) (Bark)- orange
Just B: B Bright: DIY color block pouch Everywhere you look Celine pouches are somewhere to be found, lusted or dreamed of. I myself had a moment of weakness drooling over the leather pieces held together by thread and a zipper shown here. Also, where I found a least expensive alternative achieving the same look. When I saw a photo of a color block Celine pouch (pinned here) I knew that's what I wanted. Step one: All you need is a leather pouch, acrylic paint in white and the color bright color of your choice, paint brush, painters tape, blow dryer & acrylic coating spray (shown later) and good tunes to listen to Step two: Mark off the area you want to paint with painters tape. Step three: Mix white acrylic paint with a bit of water for first layer to help it adhere to the leather. Step four: After the white dries, bring out the neon guns and do the same without water added. Step five: When you're finally satisfied with the painted color cover the non painted leather with paper or cover with a magazine of some sort.
DIY Flower Halo You’ll start by cutting 2 circles from the piece of felt at approximately 2″ in diameter. Form the wires of your halo by molding and bending each piece into a half circle. Lay the two half circles opposite of each other to create a single circle, laying it over the top of your head to check the fit. Wrap floral tape over 2 sections of overlapping wire at 11 o’clock and 3 o’clock. Trim any overlapping pieces with the wire cutters. (Click images to enlarge) Using the wire cutters, cut the stem off the flower making sure the back is flat. The possibilities are endless with this as you can wrap flowers around half or the entire perimeter of the halo, reinforcing with glue. Your flower halo is ready to wear! (images by Honestly…WTF)
DIY Découpage Floral Bag When H&M asked us to DIY a boho-inspired item for their summer issue, découpage was the first thing that came to mind. Honestly, does it get any better than customizing a simple handbag with a brilliant floral print? However you create it, it’ll be satisfying to know that you’ve designed yourself a one of a kind bag! You’ll need:a handbagcotton fabric with a large floral patternpainter’s tapeMod Podgecraft paint2 small plastic dishes2 brushesscissors Start by taping off the edges and hardware of the handbag. Squeeze a dollop of colored craft paint into a small disposable container. Allow the first layer to dry completely. While the paint dries, carefully cut out a handful of flowers from the fabric. Arrange them onto the painted section of the bag. Remove the painter’s tape when the Mod Podge has dried clear and your floral handbag is complete! (all images by HonestlyWTF)