
Address Book Tutorial in iOS. Meet our Furry Little Friends!
Although Objective C is an object-oriented language, not all of the frameworks you’ll use while developing for iOS are object-oriented. Some are written in C, such as the Address Book API, which you’ll learn about in this tutorial. The Address Book is the way you can read or modify the user’s contacts from your apps (the same contacts that show up in the Contacts app). Because the Address Book is a C-based API, it does not use objects; instead it utilizes other types. In this Address Book tutorial, you’ll become familiar with a few of these: ABRecordRef: This is a contact record.
This Address Book tutorial assumes you are familiar with the basics of iOS development, and are comfortable with the basics of C syntax. Alright, let’s dive in and get some addresses! Getting Started To begin this tutorial, download the starter project that has the user interface pre-made, so you can stay focused on the Address Book part of the tutorial. Installing pip, virtualenv and Django [Tutorial 1] A few months back, I got hooked to Django for my web development needs and as an attempt to share my learnings with everyone else, i thought of doing a series of articles on Django.
![Installing pip, virtualenv and Django [Tutorial 1]](http://cdn.pearltrees.com/s/pic/th/installing-virtualenv-tutorial-85668690)
The objective here is to get you started with Django, do a live project (something like a Job Board) as part of the tutorial series and then also coach you on deploying your Django project on Heroku. I will also cover Twitter Bootstrap as part of the series to deck up the front end, though i must state clearly that CSS and HTML will largely be out of scope for this tutorial series and large emphasis is going to be around Python and Django. Why Django or Why I recommend Web Development with Django? Its a framework built using Python (one of my favourite programming language)Documentation is an important aspect of any framework and Django scores hands down on this aspect. It has one of the best and cleanest documentation available. Many web applications require users to sign in and out in order to perform important tasks (like administration duties).
In this article, we'll create an authentication system for our application. In the previous article, we built a contact page using the Flask-WTF and Flask-Mail extensions. We'll use Flask-WTF, once again, this time to validate a user's username and password. We'll save these credentials into a database using yet another extension called Flask-SQLAlchemy. You can find the source code for this tutorial on GitHub. Growing the Application So far, our Flask app is a fairly simple application. Our app is currently organized like this:
Scala is one of the most attractive programming languages out right now.
There is a lot of hype around it and programmers world-wide are publicly recognizing it as the possible next big thing in programming. Here’s why. Scala is all about functional programming in an object oriented context. It tries to take the best of both worlds and combine them into a highly efficient, intelligent, and relatively easy to understand language. Right now it is the leader in today’s renaissance of functional programming languages. I recently finished Martin Odersky’s Scala course and I found it very difficult to figure out how to get started. The Pieces of the Puzzle Here are the puzzle pieces we’ll talk about in this lesson, feel free to skip over the ones you already know: PaintCode Tutorial: Bezier Paths. This post is also available in: Italian, Japanese, Russian If you're new here, you may want to subscribe to my RSS feed or follow me on Twitter.
Thanks for visiting! Learn how to create dynamic curved arrows! Welcome to our third and final part of our PaintCode tutorial series! PaintCode is a neat app where you can draw user interfaces like in Photoshop – but instead of generating an image, it generates Core Graphics code. In the first part of the series, you learned how you could use PaintCode to create beautiful resizable and recolorable buttons. In the second part of the series, you learned how to create your own custom progress bar design using PaintCode, and then integrate it into your app. In this third and final part of the series, you’ll create an interactive quiz app. The user must match up each question with the correct answer by dragging an arrow from the question to the answer. Without further ado, open up PaintCode to get started on your last — and coolest — dynamic UI control! Ry's MathML Tutorial.
‹ Back to Ry’s MathML Tutorial Now that we have the bulk of MathML’s typesetting capabilities out of the way, we can focus on a few elements and entities directly related to calculus.
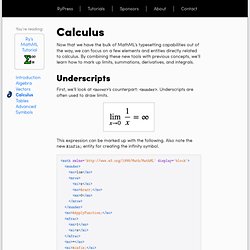
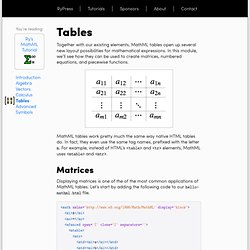
By combining these new tools with previous concepts, we’ll learn how to mark up limits, summations, derivatives, and integrals. Underscripts. Ry's MathML Tutorial. ‹ Back to Ry’s MathML Tutorial Together with our existing elements, MathML tables open up several new layout possibilities for mathematical expressions.
In PLIST tutorial, I have covered how to Read Plist data and how to Generate Plist with Objective-C in iOS.

What is PLIST? Plist stands for Property List. Plist is used to store data in hierarchical manner.A Property List can contain containers and primitives. Containers - Array, DictionaryPrimitives - Boolean, String, Number(Integer,Float), Date, Data A Container can contain other containers and primitive data-types. i.e. Below Image shows Property List types and their representation in Objective-C. Note: I am going to show how to read the below sample PLIST and generate the same with objective-C. Sample Plist: This contains all primitives and containers. If you open the PLIST with XCode, it looks like the below image.
Reading/Writing Plist. After implementing our Twitter-clone, Ribbit, in plain PHP and Rails, it's time to introduce the next walk-through: Python!
In this tutorial, we'll rebuild Ribbit using Django. Without further delay, let's get started! Step 0 - Bootstrapping As of the time of this writing, Django 1.4 supports Python 2.5 to 2.7.3. Before proceeding, make sure that you have the apt version by executing python -v in the terminal. To set up our Django development evironment, we'll start off by creating a Virtual Environment. With our Virtual Environment, set up and activated (your command prompt should be changed to reflect the environmen's name), let's move on to installing the dependencies for the project.
With all of the dependencies set up, we're ready to move on to creating a new Django Project. Step 1 - Creating the Project and the Ribbit App.