
FStormRender for 3ds Max. Kernel Settings render samples set maximum possible samples number for image rendering.
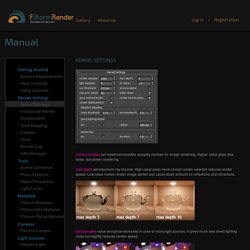
Higher value gives less noise, but slower rendering. max depth set maximum ray bounce. High value gives more correct render view but reduces render speed. Low value makes render image darker and cause black artifacts on reflections and refractions. light samples value should be increased in case of many light sources. GI clamp cut ray brightness if it is too high. Ray threshold is the distance to offset new rays to avoid an intersection with the same geometry. Process alpha turns frame buffer alpha channel on and cuts the environment. gray material mode replaces all material with simple gray material. Render beauty pass can be switched off in case off only render elements rendering to speed up the process. render displacement can be switched off as a fast way to get rid of all displacement in the scene in testing purposes.. Morné Studio » Render 3D Objects as 2D Billboards – Simple Version.
Tutorial Intro There may come a time when you would like to render some 3D objects as 2D billboards.
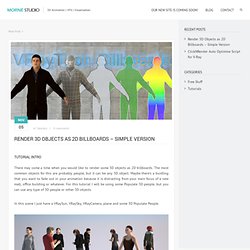
The most common objects for this are probably people, but it can be any 3D object. Maybe there’s a buidling that you want to fade out in your animation because it is distracting from your main focus of a new mall, office building or whatever. For this tutorial I will be using some Populate 3D people, but you can use any type of 3D people or other 3D objects. In this scene I just have a VRaySun, VRaySky, VRayCamera, plane and some 3D Populate People. Step 1 To give the 3D objects an outline, we need to add VRayToon into the Environment and Effects under Atmosphere > Effects. Step 2 The outlines look ok, but it’s now also on the plane and also in and around people’s fingers, ears etc.
Vray. (3ds Max) Normal Map Baking Tutorial. Tipniques: Distributed Bucket Rendering with 3DS Max Design 2013. Are your rendered images taking a long time to render?

If you are using the mental ray rendering engine, you can take advantage of a great feature of 3DS Max Design (as well as 3DS Max) called distributed bucket rendering. Distributed bucket rendering can be used for speeding up the rendering of single images. If you render a large number of high-resolution still images, you will get much faster results with distributed bucket rendering. This type of rendering uses the processors from other machines on your network to speed up the rendering time on your machine.
HDRI Setup Part 1. Understanding Rendering and Lighting of Living Room. In diffuse I use the simple parquet map.
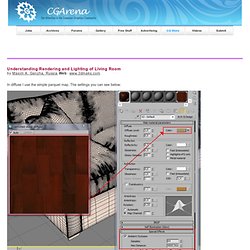
The settings you can see below: The bump settings: Coffee Table - Materials and grid of coffee table looks like this: The glass is just the "Arch & Design" material/ we pick up the finished material as it shown at the picture below: 3dsMax Monday Movie #76: Cross Sections. Linear Workflow: a guide. This has been the subject of discussions on many forums over recent years.

I realised that there were all sorts of tutorials offering often conflicting information regarding the process. This is not the only way, just my way. I would like to thank my mate Ben Cowell and Phil Shoebottom for offering some clarity on a few points. SO, WHAT IS LINEAR WORKFLOW? (explained without maths, graphs and tables) Look at the above image, what is the difference between the image on the left and the image on the right?
Vray and 3ds Max process the data in which to make an image in ‘linear space’, also known as Gamma 1.0, but by default all monitors show you the image with a Gamma of 2.2 (sRGB), which basically makes the image ‘look’ dark, although it actually isn’t dark at all. As well as the image itself, textures and materials also need to be correctly converted to Gamma 2.2. Go to cutomize/preferences/Gamma and LUT. Rendering Algorithms Rollout (mental ray Renderer) RenderFarm. C o m: Efficient Interior Lighting with mental ray. Many folks have asked me to do an in-depth interior lighting tutorial.

The question you’re probably really asking is "how do you light an interior scene that renders quickly? " To achieve this, it is more art than science. To get quick render results you have to take shortcuts and cheat a little to get those fast results. I’ll show you how I set up lighting for my interior scenes. I’m assuming that the scene has already been textured. Here is an outline of how I setup my lighting in my scenes, and I broke it up into 8 steps: 1. 1. This one is fairly straight forward. 2. Setting my exposure to the preset default of interior daylight gives me a good benchmark to know what to tweak my lighting against. 3.Turn OFF Final Gather This is done due to the technique in using the combination of FG with GI. 4.Turn ON Global Illumination This is really the first step in tweaking the lighting. The default setting is actually pretty good, and works for most scenarios. 3ds Max Mental ray Hdr Tutorial. Ad Sponsored Tools & Resources for the Computer Graphics Industry.
3d Max Mental ray exterior light & render setup tutorial. Global Illumination and Final Gather in mental ray for 3ds Max 2010.