
(113) Arise.Works.
Houdini Rendering - GridMarkets. Its a circus out there. Utility Image planes:- Rendering a P Pass:- Add the P image plane in your rop.
Quantize :- 32 bit float as the output so as not to get any antialiasing on the edges. Sample filter :- to Closest Surface Pixel filter :- to minmax min If you anti-alias the P channel, you don't actually have a real P value there but a blurred nonsense value that will cause errors in the a composite. Rendering a Pz Pass:- Add the pz image plane in your rop. Pixel filter :- to minmax min Set the pixel filter to “closest sample filtering” or “minmax min” for no antialiasing or feathering of edges which cause useless depth information. Rendering a Normal Pass:- Add the N image plane in your rop. Hip file example :- rop_extraimageplanes.hip. Mantraレンダリングを理解する. Lesson 5: Facing Ratio Pass! « Houdini Render Passes. So the idea for this section came about after seeing a presentation by one of my classmates on how some of the effects for District 9 was achieved.
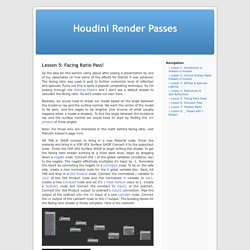
The facing ratio was used in post to further customize level of reflection and specular. Turns out this is quite a popular composting technique. So i’m looking through the Material Palette and I don’t see a default shader to calculate the facing ratio. So we’ll create our own here. Basically, we would need to shade our model based on the angle between the incidence ray and the surface normal. Note: For those who are interested in the math behind facing ratio, visit Malcolm Kesson’s page here.
Hit TAB in SHOP context to bring in a new Material node. The next step would be to add artistic controls for direct access to facing ratio intensity, the Rim Width, Roll Off and Color. Let’s add parameters for the Color. To add control over the rim width and roll off, we will use a Smooth VEX node. Here are some render tests: Nuke プラクティカル・ガイド:Vol. 7:主要 3DCG ソフトウェアとの連帯・後編(Houdini, CINEMA 4D & Softimage) Houdini 編 1.Houdiniにおけるレンダーパスの設定法 まず、Houdiniでのレンダリングには標準搭載されているMantraを使用する。
今回マルチパスの出力に用いるOpenEXRにも対応している。 レンダーパスを作成するには、まず、TAB MenuからMantraを作成する必要がある。 Houdiniが他のソフトウェアと異なる点で、レンダリングするための「オペレータ(ノード)」を作らなくてはいけない。 Mantraを作成したら、パラメータの[Properties→Output→Extra Image Planes]から+マークで、新たなパスを追加できる。 2.VEX Variableの設定 Extra Image Planeを追加したら、レンダリングする要素を決定する。 Mantra Surfaceなどの、予め用意されているシェーダには、主要なVEX Variableが多数用意されている。 VEX Variableには、シェーダ側で新たに定義した変数名を入力し、もしチャンネル名を変更したいのであれば、そこも設定する。 3.Depthパスの設定 まずDepth(深度情報)のパスを作成していく。 深度情報にクランプをかけたりする場合も、このシェーダ内で行うことも可能。 こうして変数は、Mantra側で、depthのVariableを読み込み、レンダリングの際にRGBの値にカメラからの距離が埋め込まれる。 "Dragon's Breath" - Houdini PyroFX with Breakdowns. PBR: object(indirect) reflections only pass? Lesson 4: Reflectivity & Self-Reflections « Houdini Render Passes. There are quite a few different ways to do a reflection pass in Houdini.
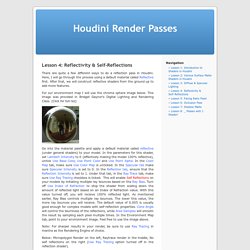
Here, I will go through the process using a default material called Reflective first. After that, we will construct reflective shaders from the ground up to add more features. For our environment map I will use the chrome sphere image below. This image was provided in Bridget Gaynor’s Digital Lighting and Rendering Class. (Click for full rez) Go into the material palette and apply a default material called reflective (under general shaders) to your model. Note: For sharper results in your render, be sure to use Ray Tracing in mantra as the Rendering Engine of choice. Below: Micropolygon Render on the left, Raytrace render in the middle, No self reflections on the right (Use Ray Tracing option turned off in the reflection shader).
Custom Reflection Shader Now for the fun part. Hit TAB and bring in a Fresnel VEX node. The results of this shader gives you reflections with self-reflections for complex objects. Note! BSDF Bonanza: GGX, Microfacets, Disney BRDF and More - Shaders. Hello.
Since Houdini 12.5 and the addition of the cvex_bsdf() function the user base is no longer restricted to the confines of Phong and Blinn. While these models are tried and true over the past few years newer reflectance models have stepped into the spotlight (pun!) , notably the ever so popular GGX. So for the lulz I implemented a variety of the newer ones and would like to share. Ultimately this is an incredibly huge topic and would take a significant amount of writing to explain all the fun bits so instead I'm going to link spam because I got TF2 to play.
Background & Learning Physically Based Rendering for Artists (youtubez) Physically Based Specular for Artists Basic Theory of Physically-Based Rendering Cook-Torrance Model in Mantra Shader Microfacet BRDF (This is quite "mathy" but gives a nice overview of what is going on inside the Microfacet VOP) Disney BRDF (Disney's BRDF from Siggraph 2012, minimal parameters with a fair bit of flexibility. Siggraph 2010 Course Notes. Physically Based Rendering for Artists. How do I bake a projection to a texture file? - Rendering. Autodesk Maya オンライン ヘルプ: 流体をレンダーする. Computer Graphics - memoRANDOM.