
How To Mix Chalkboard Paint in Any Color. We love using chalkboards as backdrops for displays and parties (like this one here!).

So we were super excited to learn that you can create your own custom colors-and it's really easy! We first learned how from Martha Stewart whose tutorial you can read here. She recommends that you use latex paint, but we tried it out with acrylic paints with much success. Here's how you too can create your own chalkboard paint...
Supplies: 1/2 cup acrylic paint (choose any color you like, or mix colors together to make the perfect shade!) 1. 2. Once your chalkboard has fully dried be sure to slate the surface before using it for the first time. Silk-Dyed Eggs {aka TIE-Dyed!} I posted this tutorial a few years ago and it has become somewhat of a tradition to bring it back every year!
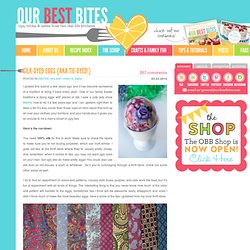
One of our family Easter traditions is dying eggs with pieces of silk. I saw a cute lady show Martha how to do it a few years ago and I ran upstairs right then to steal a tie! It’s way cooler than those cups of neon liquid that end up all over your clothes, your furniture and your hands plus it gives you an excuse to rid a man’s closet of ugly ties.
Here’s the run-down: You need 100% silk for this to work. I try to find an assortment of colors and patterns. Usually it will tell you if it’s 100% silk right on the main label of the tie, but a lot of them don’t, and if that’s the case, check that little tiny end, it’s usually hiding there. The first step is to deconstruct the tie. Next you cut a piece large enough to cover an egg. Now, notice how I tied the eggs in the above photo- with the tie on the top of the long side of the egg. I wish eggs came like this at the grocery store. Carambola Flowers by Carmen Sprung. If you’ve been following me on Flickr for a while, you’ve probably seen this picture of Carambola Flowers before – I folded them ages ago!

But since my Pro account is going to expire in a few days time (and I don’t feel like upgrading it again), a lot of my old photos won’t be displayed anymore. So I decided it would be a good idea to share the very best of them on my blog! These absolutely beautiful origami flowers were designed by Carmen Sprung and I just love them! Each flower is made from a single sheet of paper, not from a square though, but from a pentagon.
I would recommend using fairly thick and strong paper (80-90 gsm) to fold them – Tant origami paper will be just the right choice! Description Video tutorial presented by Sara Adams of HappyFolding.com. Tags: Carmen Sprung, Floral. Sticks & Stones: A Frugal & Outdoorsy Valentine's Day Craft. February 14th is right around the corner, and this weekend it dawned on me that I needed to come up with a couple of no-frills Valentine’s Day gifts for my oh-so-frugal, mountain-man husband.
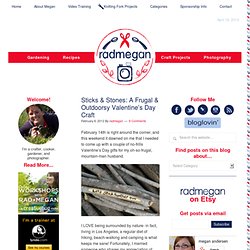
I LOVE being surrounded by nature- in fact, living in Los Angeles, a regular diet of hiking, beach-walking and camping is what keeps me sane! Fortunately, I married someone who shares my appreciation of wide open spaces, so when I thought about what he might like for Valentine’s Day, it wasn’t an expensive, glossy box of chocolates, or even a store-bought card. (I happen to love those things and buy them for other people, but not for my husband.) For Valentine’s Day inspiration for my husband, I turned to some of the “natural treasures” we have around the house; little polished rocks and especially straight twigs- the things that find their way into our pockets while we’re out exploring.
Woven paper gift topper. I‘m pretty chuffed with these woven paper gift toppers.
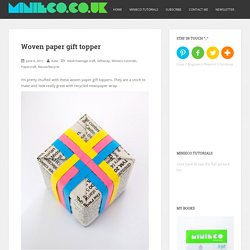
They are a sinch to make and look really great with recycled newspaper wrap. The idea originated from this woven yarn gift topper which you can see at giverslog.com and from this image which comes from the book More Last Minute Knitted Gifts. How-to ♥ Cut some strips of colored paper. Mine were 0.5cm wide. Glowing jar project – varázslat a lakásban (EN/HU) Kusudama Tutorial part 1.
The Japanese kusudama is a paper ball made out of multiple identical origami shapes glued together.
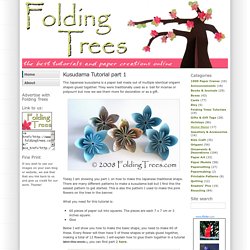
They were traditionally used as a ball for incense or potpourri but now we see them more for decoration or as a gift. Today I am showing you part 1 on how to make the Japanese traditional shape. There are many different patterns to make a kusudama ball but I find this the easiest pattern to get started. This is also the pattern I used to make the pink flowers on the tree in the banner. What you need for this tutorial is: 60 pieces of paper cut into squares. Below I will show you how to make the basic shape, you need to make 60 of these. Fold the bottom corner to the top. Fold the left and right corners up to the middle corner.
Fold the same points down. Open up the flaps you have just created and flatten them. Fold the top triangles towards you so they are level with the edges of the paper. Fold the triangles back using the crease you made earlier and glue the outside triangles together.