background preloader

Making Fused Plastic

Making Fused Plastic
March 12th, 2013 I’ve been wanting to experiment with fused plastic for ages so what better place to try it out than here on Tutorial Tuesday and share my experiences with you. I’ve got lots of plastic bags stored in the kitchen from a few online supermarket deliveries we’ve done since Milo was born and I’ve just never got round to taking them back to the supermarkets for recycling. Good job too as then I wouldn’t have any bags to experiment with. As I was experimenting and learning at the same time, the images in the tutorial below show different bags all at different stages – I hope it’s not too confusing! What you will need: - Sharp Scissors - Plastic Bags - Iron - Ironing Board - Greaseproof Paper - Large Wooden Chopping Board - Metal Ruler - Craft Knife - Cutting Mat Step One The first thing you need to do is lay your plastic bag out flat and cut off the bottom and the top so that you’re left with a large tube of plastic. Stretch and flatten this out and put aside. Step Two Step Three Related:  DIY

DIY Eco Friendly Packaging February 26th, 2013 Have you ever needed to find a box to package up a gift in a hurry? Look no further than the simple plastic PET bottle you have in your kitchen. Certainly don’t throw it in the bin! Don’t put it in the recycling either! Transform it into a fabulous pillow box and impress people with your ingenuity and resourcefulness. What you will need: - Plastic bottle - Cutting Mat - Craft Knife - Scissors - Marker Pen - A Plate - A pointy thing (I used a blunt sewing needle) Step One The first thing you need to do is cut the top and the bottom of the bottle off. Step Two Flatten the tube by pressing down on it with your hands and then flatten/crease one edge with your thumb. Then re-inforce the crease using the edge of your craft knife. Next do the other side. Step Three Place you flattened tube onto a cutting mat so that you know where the center is. Step Four Step Five Start forming your pillow box by creasing along the scored lines you’ve just drawn. Step Six

Easiest Homemade Wine Ever! Most wine making guides really over-think the wine making process. They tell you to buy all kinds of equipment and additives that you don’t really need. This tutorial is about stripping wine making down to the absolute bare minimum. It’s so simple that you can get going with just 5$ in equipment, and start a batch of wine in under a minute. See Also: The 1:30 video version. What you DON’T Need to Make Wine This is a short list of items, most pictured in this 120$ wine making kit, that you do not need to buy to make wine. You DON’T need exotic chemicals like potassium sorbate and sodium metabisulfite and campden tablets and acid blend all the other weird extras home wine makers are adding these days. You DON’T need crazy siphoning equipment and large glass carboys that take up half your garage and make your brewing corner look like a mad scientist’s laboratory. You DON’T need expensive cleaners like PBW and StarSan and Iodaphor to make good wine either. Bare Bones Wine Equipment Buy Juice

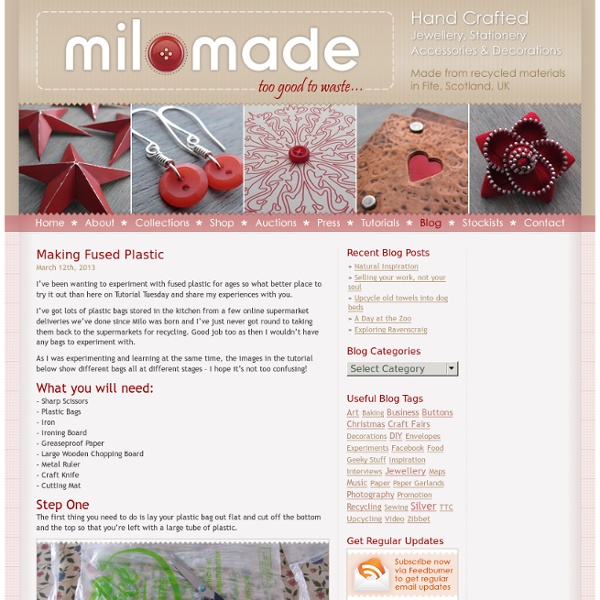
Alice's Soda Can Bookmarks What does Wonderland's Alice have to do with Christmas? Absolutely nothing. Except that the same procedure with which I made her 'Drink me' bookmark I employed to make a more Christmas-y version. First, the ingredients: An empty aluminum can (one per bookmark)White card stockMatt fixativeCraft knifeBone folder1/8” spring punch/eyelet setter and eyelet/s (I have this one) Straight edgeCutting matBlack perle cotton or crochet cottonSmall silver bell or jingle bell for the Christmas option and one large and one small silver bead for the non-Christmas onePDF of the Christmas version or the 'Drink me' version available on my Scribd pageSticky-back tape220 grit sandpaper Step 1: Print the PDF image onto white card stock. Step 2: Cut the middle section of the aluminum can into one large sheet. Step 3: Using your straight blade and craft knife, miter each of the corners of your aluminum. Step 4: Step 5: Place your straight edge along the long side of the image/print. Repeat with the other long side.

Pressing & Brewing Cider - Apple Cider Homebrew 8 Clever Uses for Plastic Straws Have you ever pried a straw out of the mouth of a young child, only to find it macerated and dripping in saliva? Let’s all let out a collective “eeeewww.” In general, my “clever uses” articles are meant to teach people how to get a second use out of something disposable. Now: It is not too gross to wash plastic drinking straws and save them for DIY projects. When the plastic drinking straws are clean and dry and you’ve amassed a decent-sized collection, try your hand at one of the following projects. Drinking straw lamp shade: The L.A. The straw cluster chandelier: Design Sponge featured a spiky-looking straw cluster chandelier. Woven coasters: According to Country Living, woven drinking straws are a great material to make coasters from. The straw weaving loom: True Blue Me & You introduced the idea of using drinking straws as a portable, simple, DIY weaving loom. Tiny vases made of drinking straws: One of my favorite blogs, Coolhunting, featured tiny vases made from drinking straws.

How To Make A Bow Out Of Recycled Magazines Guest post by Jennifer Young of I Art U blog. These easy-to-make bows will be gracing a few of my presents this year. I’ve found a lot of inspiration in magazines lately. This one is from Whole Living. Making a Bow (found in Whole Living) What you’ll need: Magazine pages or any other paper material you want to use (you’ll need one page per bow); Scissors or a paper cutter; Double-sided tape; A ruler; A pencil Step by Step Instructions: 1. 2. 3. 4. Metal Flowers Picture Tutorial I am just in love with my metal flowers!! Love making them in all different sizes and shapes. Getting better at each time! So many ways you can use them. Hope the picture tutorial will help you make some pretty ones too! Enjoy! Using a scrapbook brad, secure your flowers together. After this project, I end up with a lot of soda can bottoms. Found a way to use some of them by making this upcycle project!!

Scrap To Swank: Turn Pallets Into A Beautiful Desk | Make: Recycling pallets into something else useful is nothing new, but this desk, inspired by bowling lanes and butcher blocks, is, well, inspired. The top is made entirely out of recycled pallets found around a college campus. As this desk is for college, the creator estimates he will move “23 more times before I’m done,” so the legs were bought from IKEA in order to be “easy and non-destructive.” Like many projects here, this desk is a testament to the cool things that can be done with the proper woodworking knowledge and equipment. The boards were first separated from the pallet by cutting pieces between the support members. This was easier than prying out all of the nails, and helped keep the wood intact. In the end, after two coats of satin polyurethane and a pre-stain conditioner, the desk looks really beautiful. View All [via Imgur] Jeremy Cook Jeremy is an engineer with 10 years experience at his full-time profession, and has a BSME from Clemson University.

Festive Stars made from Recycled Drinks Cans November 1st, 2011 I’m preparing for a couple of craft fairs (details coming soon) at the moment and decided to have a go at making some Festive decorations by recycling some drinks cans I’ve been collecting. I found this tutorial the other day and thought I could adapt it to me own needs. What you will need: - Empty drinks cans - Scissors - Craft Knife - Ball point pen or an embossing tool with a fine point - Sharp pointy thing – not sure what the name of this tool is! Step One First you need to get a star shape printed onto paper or card and cut out. Step Two Next you need to cut the tops and bottoms off your drinks can and give the insides a good clean – I used a craft knife to do this as well as scissors – be careful of sharp edges! Step Three Put a bit of sticky tape (rolled up) onto the back of your cardboard star and stick this to the silver side of your can and draw around it – I use my sharp pointy tool to do this but you could also do it with a fine permanent marker. Step Four

Books and DVDs for blacksmiths, knife makers, bladesmiths, gunsmiths, metalsmiths and jewelers. DIY Triangle Shelves Photo: A Beautiful Mess This fun little project comes via the ladies over at A Beautiful Mess, combining the love of collectables, with the modern twist. Printers trays are back in fashion (though avid collectors will say they've always been in style!), there is something rather special about showcasing our little treasures and keepsakes and these DIY shelves offer just the ticket. You'll find step-by-step instructions and photos at the link below. DIY Triangle Shelves via A Beautiful Mess Tagged : How-To, shelves, wall art, DIY Triangle Shelves Material : wood Design Style : colorful, contemporary, minimalist, scandinavian Techniques : woodworking Room : bedroom, Dining room, Entryway & Hall, Kid's Room, Kitchen, living room, Office & Workspace Decor Element : wall art

Resources for Developing Characters When developing characters, many writers use personality traits that they see in themselves and in others, such as friends, family and celebrities. A new source of material and information that can help you develop characters is the Internet. The Internet offers some unique resources for character development, such as psychological testing websites, baby name databases and other reference sites and databases. These websites certainly weren't created for writers developing characters; nevertheless, these site are extremely useful for writers. Psychological Resources Psychological websites can help writers learn the underlying principles of behavior that motivate or cause people to act as they do. Psychological websites can also help writers because they explain common personality traits, people's reactions to loss, illness, stress and tragedy and they often provide case studies and examples. Biography Resources Biography resources can be a great help to writers. Naming Characters

Related: