recycling project no. 5 - rolled paper strips
I was going to save this project for next week but we were pounded with heavy rain most of the morning so here it is. I think this is the gloomiest summer we’ve ever had! This is a very simple project that again, uses materials that we probably all have at home.
The Wordclock Grew Up!
Well, It had to happen. I first published my WordClock project in September 2009. It was a Microchip PIC based clock, using a PIC16F877A microprocessor. In the last year and a half, I have been constantly improving it, and have adapted it to the Arduino, and even designed an updated controller board for it. Well, It got better. I have discovered how to cut Vinyl stencils, and have been experimenting with Perspex, so I thought it was time to share what I have been playing with.
"Stained Glass" Votive Holders
By Jenny Ryan Many times when I’m at the grocery or drug store, I can’t resist throwing a few scented votive candles in my cart. When I’m ready to burn them, it’s easy enough to sit one on a cute little vintage china saucer, but I recently decided to try and find a fancier display solution for them. I also wanted the project to be inexpensive, and the materials used to be things I already had on hand.
Birdcage Ornament
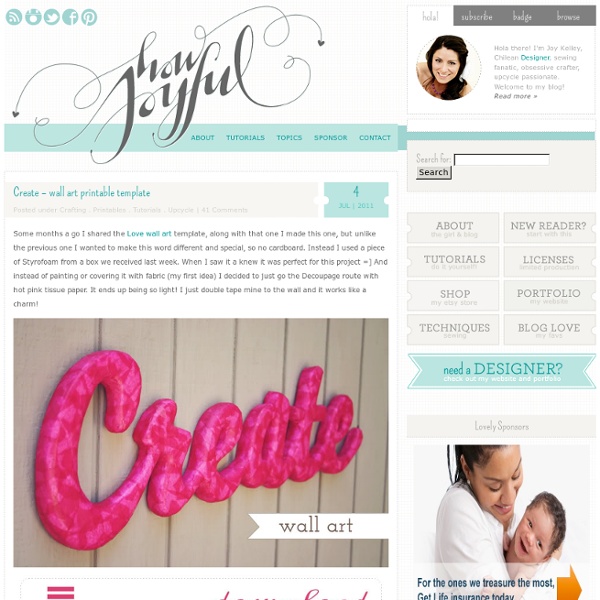
Hello Everyone! My name is Joy Kelley and I blog over at HowJoyful. I am a designer with a passion for things handmade, patterns, fabric and color. I love to blog and share the things I sew and craft.
rolled paper flowers {tutorial}
Welcome to flower week – five days of simple and delightful flower projects. I could probably do three weeks of flowers because there are so many different ways to create them, but I’ve limited it to five of my current favorites. Before we get started, let me make a few disclaimers: 1. I find inspiration for projects all over the place {online, in shops, in magazines}, then figure out how to re-create them on my own.
DIY Lace Earrings - HonestlyWTF
Dolce & Gabbana‘s Spring ’11 collection undoubtedly furthered our already fanatical obsession with lace. Honestly, how dreamy is the collection?! We thought we’d make good use of some vintage lace trim we had laying around and turn them into earrings similar to the ones we saw on the runway. And thanks to some tips from a DIY previously featured on Poppytalk, making lace earrings proved be a cinch! Mix equal parts glue to water in a bowl.
Craft DIY Projects, Patterns, How-tos, Fashion, Recipes @ Craftzine.com - Felting, Sewing, Knitting, Crocheting, Home & More
Quilling, the coiling and shaping of narrow paper strips to create a design, has been around for years — hundreds, in fact. During the Renaissance, nuns and monks would roll gold-gilded paper remnants trimmed during the bookmaking process, and use them to decorate religious objects as an alternative to costly gold filigree. Quilling later became a pastime of 18th and 19th century young ladies in England, who would decorate tea caddies and pieces of furniture with paper filigree. The practice crossed the Atlantic with colonists, who added quilling to candle sconces and trays as home decorations.
How To Crochet: Introduction to this Fabulous Craft
Welcome to the new How To Crochet series on Tip Junkie. Today we are covering the very basics for those of you who want to learn how to crochet. This is a beginners guide to crochet with an introduction to the look, the yarn, the hooks, gauge, and a new yarn called the Sashay from Red Heart Yarn. Youve probably noticed that crochet has made a comeback.
3D Paper Lizard {Craft Camp}
I am excited to be offering 30 days of fun crafts to keep kids active and entertained this summer! You won’t want to miss a day of these fun crafts for kids from some amazing bloggers! Please be sure to pay them a visit! Larissa, from mmmcrafts Hey, you Craft Campers!
Decorchick! Changing her world, one project at a time
Well Christmas is literally just around the corner, I can’t believe it! And if you are planning on making an advent calendar this year, it’s already time to start thinking about it since they need to be displayed by December 1. :) So I’ve compiled a list of my 10 favorite DIY advent calendars floating around the net, and hopefully you might get inspired to make one of them. :) All of these include tutorials as well, so enjoy! 1. Dollar Store Advent Calendar from Infarrantly Creative 2.
What can you do with an old pallet?
So many things! If you ever come across the opportunity to pick up a few pallets take a look at some of the ideas I have come across for recycling old pallets into furniture and other practical and decorative pieces. I would like to mention that the designs below were found at various sources on the Internet. Where possible I have mentioned the original source, but unfortunately too many do not.
How to tie various knots
The sheet bend is used to tie two lines together. It is perhaps the most generally useful knot of all. When used to tie a line to itself, making a loop, it is called a bowline. The strain is taken on the ropes in the middle - not the one coming out the side. How the knot is made is not critical - it is the final shape that is important. One can make the flat loop first, and work the other rope around it.