
DIY Thermosyphon Solar System. Search The Renewable Energy site for Do-It-Yourselfers System schematic -- Thermosyphon Solar Water Heater As shown in the schematic, when sun is on the Solar Panel, the water in the panel is heated, becomes less dense and rises up into the Storage Tank.

The heated water leaving the panel is replaced by cool water flowing from the bottom of the Storage Tank into the lower connection on the collector. This continuous natural circulation of the water through the collector and tank heats the tank water over time. Sun and gravity take care of the circulating the water, so no pump is needed.
The system as shown here does not have freeze protection, so it must be used in non-freezing climates, or be drained for the winter. Building the Collector I used a roll of aluminum 10 " wide, which I cut to length and fit under the tubes. There is a 3/4 insulation sheet behind the plywood and another thinner plywood on the back to protect the insulation sheet. Collector Installation Storage Tank and Plumbing. Free Heat using Pop Cans and Plexiglass. Build Your Own Solar Battery Charger. First we need an old window, I got mine from a construction site.
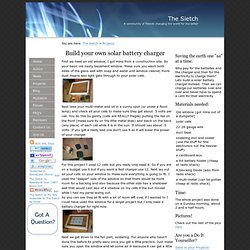
Its your basic old nasty basement window. Make sure you wash both sides of the glass well with soap and water and window cleaner, more dust means less light gets through to your solar cells. Next take your multi-meter and sit in a sunny spot (or under a flood lamp) and check all your cells to make sure they get about .5 volts per cell. You do this by gently (cells are REALLY fragile) putting the red on the front (make sure its on the little metal lines) and black on the back (any place) of each cell while it is in the sun. It should say about .5 volts. For this project I used 12 cells but you really only need 6. As you can see they all fit with a lot of room left over, if I wanted to I could have used this window for a larger project but I only need a battery charger for right now.
Next we get down to the fun part, soldering. There are two ways to wire power supplies (like batteries or solar cells) together. How I built an electricity producing Solar Panel. Several years ago I bought some remote property in Arizona.
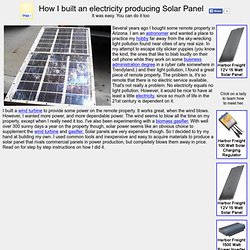
I am an astronomer and wanted a place to practice my hobby far away from the sky-wrecking light pollution found near cities of any real size. In my attempt to escape city slicker yuppies (you know the kind, the ones that like to blab loudly on their cell phone while they work on some business administration degree in a cyber cafe somewhere in Trendyland.) and their light pollution, I found a great piece of remote property. The problem is, it's so remote that there is no electric service available. That's not really a problem. How to build a Solar Panel. DIY Solar Panels. Mike Davis is an astronomer.
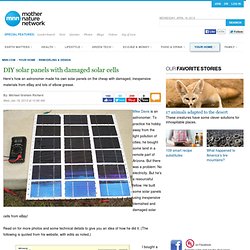
To practice his hobby away from the light pollution of cities, he bought some land in a remote part of Arizona. But there was a problem: No electricity. But he's a resourceful fellow. He built some solar panels using inexpensive blemished and damaged solar cells from eBay! Read on for more photos and some technical details to give you an idea of how he did it. I bought a couple of bricks of 3 X 6 mono-crystalline solar cells. A solar panel is really just a shallow box. Next I cut two pieces of masonite pegboard to fit inside the wells. I laid out the cells on that grid pattern upside-down so I could solder them together. I used a low-wattage soldering iron and fine rosen-core solder. Here's what the solar panel looks like from the front. Here I am testing first half panel outside in the sun. I drilled a hole in the back of the panel near the top for the wires to exit. [...]
Here is the finished product, producing 18.8 volts and 3.05 amps in the sun. My home made aluminium LTD stirling engine.