
How to Make a Solar Food Dehydrater From… Beer Cans! Please Share This Page: Google + stumbleupon tumblr reddit.

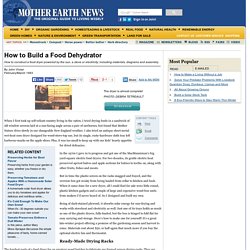
Solar Food Dehydrator. Made from two cardboard boxes, some clear plastic wrap, and a little tape.
You can build a nearly free solar dehydrator. Set it on a stool or chair and face it's solar collector towards the sun, and you have a functional food preservation machine for little work and even less money. The above picture almost says it all. Using a long thin cardboard box for the collector and a taller, nearly square, cardboard box for the drying box. Boxes could be made to size by cutting and taping together small cardboard pieces. To increase the efficiency, you may want to cover the sides and bottom of both boxes with fiberglass or styrofoam insulation. Drawing courtesy of: Mother's Energy Efficiency Book Copyright 1983 ISBN 0-938-43205-2 Rely on appearance and feel to judge dryness.
Steam blanching is safe pre-treatment which can prevent spoilage - especially of low acid foods such as vegetables. Ensure food is thoroughly cool before storing. End of Topic. How To Build A Food Dehydrator - DIY. When I first took up self-reliant country living in the 1960s, I tried drying foods in a sandwich of old window screens laid at a sun-facing angle across a pair of sawhorses, but found that Mother Nature dries slowly in our changeable New England weather.
I also tried an antique sheet-metal wet-heat corn dryer designed for wood-stove-top use, but its single, rusty-hardware cloth tray left barbecue-marks on the apple slices. Plus, it was too small to keep up with our kids' hearty appetite for dried delicacies. In the 1970s I gave in to progress and got one of the MacManniman's big yard-square electric food dryers. For two decades, its gentle electric heat preserved apricot halves and apple sections for babies to teethe on, along with other fruits, fishes and meats. But in time the plastic screen on the racks snagged and frayed, and the oversize box got creaky from being hauled from cellar to kitchen and back. Homemade Simple Solar Food Dryer. Simple Solar Food Dryer The sun is a great resource for drying food.
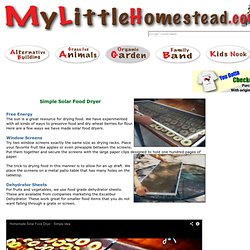
We have experimented with all kinds of ways to preserve food and dry wheat berries for flour. Here are a few ways we have made solar food dryers. Try two window screens exactly the same size as drying racks. Place your favorite fruit like apples or even pineapple between the screens. The trick to drying food in this manner is to allow for an up draft. For fruits and vegetables, we use food grade dehydrator sheets. Solar Food Dryer From Cardboard Boxes - DIY. It seems that — at long last — a goodly number of people in government and industry are beginning to come around to the notion that, yes, there might be something to this sun-energy concept after all!

Unfortunately, whenever the bigwigs begin "talking solar," they invariably speak in terms of multimillion dollar projects, brain-trust technologies, and the all-too-familiar decade-long implementation schedules. Well, all that may be necessary (although I doubt it) for some solar energy applications, but I've designed a solar food dryer that anyone — and I do mean anyone — can put together for pennies ... and in minutes!
To build your sun-powered unit, choose a long, shallow cardboard box and cut a few holes in each of the narrow ends. That done, paint the inside of the container black or line it with black plastic sheeting — whichever is easier. Cover the box with clear plastic, and your heat catcher is complete. Now, take another cardboard box and make several holes in one side. DIY Solar Food Dryer: Step By Step Photos. Why build a Solar Food Dryer?
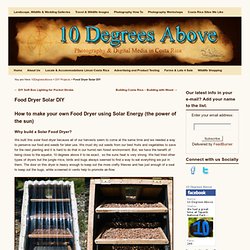
We built this solar food dryer because all of our harvests seem to come at the same time and we needed a way to perserve our food and seeds for later use. We must dry out seeds from our best fruits and vegetables to save for the next planting and it is hard to do that in our humid rain forest environment. But, we have the benefit of being close to the equator, 10 degrees above it to be exact, so the suns heat is very strong. We had tried other types of dryers but the jungle mice, birds and bugs always seemed to find a way to eat everything we put in them.
The door on this dryer is heavy enough to keep out the more crafty thieves and has just enough of a seal to keep out the bugs, while screened in vents help to promote air-flow. Materials List: Main Compartment 40 – 1 1/2″ Wood Screws 40 – 2 1/2″ Wood Screws Handful of Nails Staples 4 ‘ of Metal Screen (Food Safe Screen is Optional) 2 – Small Hinges 1 – 2′ x 3′ piece of Clear Plastic or Glass 40′ of 2×2 Wood Legs.