
LiPo USB Charger Hookup Guide - learn.sparkfun.com. Introduction We love LiPo batteries!
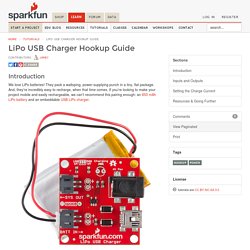
They pack a walloping, power-supplying punch in a tiny, flat package. And, they’re incredibly easy to recharge, when that time comes. If you’re looking to make your project mobile and easily rechargeable, we can’t recommend this pairing enough: an 850 mAh LiPo battery and an embeddable USB LiPo charger. This tutorial will explain how to use the USB LiPo Charger with any of our single-cell LiPo batteries. Required Materials USB LiPo ChargerA single-cell LiPo battery The charger can be made to work with batteries of any capacity, including 40mAh, 110mAh, 400mAh, 850mAh, 1000mAh, 2000mAh, and the 6000mAh fatpack.A 5V power source, options include: A computer USB port with attached mini-B USB cableA USB Wall Adapter and mini-B cableA 5V Wallwart Supply Suggested Reading Inputs and Outputs On this page, we’ll dissect the USB charger, examining all of the inputs, outputs, and specifications of the board.
Simple Solar Circuits. Simple Solar Circuits: How to get started adding solar power to your small electronics projects.
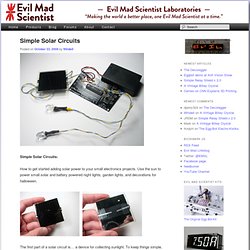
Use the sun to power small solar and battery powered night lights, garden lights, and decorations for halloween. The first part of a solar circuit is… a device for collecting sunlight. To keep things simple, we’re using a single nicely made small solar panel for all of these circuits. The panel that we’re using for these circuits is this one, part number PWR1241 from BG Micro, about $3 each. [Before we move onto our first examples, a word of caution: These are small simple circuits. Portable Solar USB Charger. -- Solar Panel; recommended max power output less than 6 W. -- 1N914 or similar diode This protects the solar panel by allowing current to flow only from the panel to the batteries (aka prevents discharge from the batteries onto the solar panel).
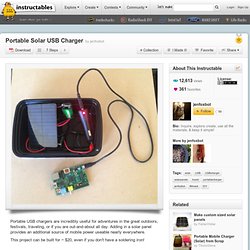
If you choose to use a similar diode, be sure it works w/ the given solar panel specs (voltage/current output). -- USB car charger -- Rechargeable 9 V battery* Use two if you want to charge an Apple product. Solar power your arduino with a playing card. Solar Pocket Factory. 2014-2015 Catalog.pdf. Solar powered arduino on the back of a playing card -Use Arduino for Projects. Here’s a six word tragedy: My arduino needs four AA batteries.

Really? Isn’t this 2012? Where’s my jetpack?!! Here’s a way to the future — a way to make a solar panel, from scratch, that can power any arduino off of sunlight or even light in your house. Time to complete: 15 minutes No soldering required Difficulty level: Easy as pie (key lime) Loss of skin during assembly: moderate This is one of the first entries in the Solar Pocket series of projects that Alex (this guy) and I are posting over the coming weeks. Step 1: What you need ++ A playing card. ++ Copper tape (single-sided adhesive): This is easy to find at most hardware or electronics shops. ++ 8 to 11 solettes: these are small pieces of monocrystalline or polycrystalline PV silicon that are typically hidden under an epoxy blob in off-the-shelf panels. ++ Superglue aka cyano: the thin stuff, like crazy glue. ++ 5-minute epoxy: this is the encapsulant that will cover the entire panel.
Step 2: Lay down the copper tape + bend the card. Solar Pocket Kit - Make your own solar panels. The Solar Pocket Kit comes with everything you need to make your own solar panels quickly and easily.
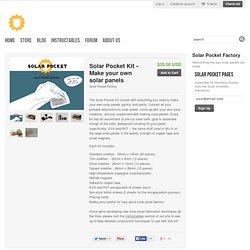
Convert all your portable electronics to solar power, come up with your own solar creations, and just experiment with making solar panels. Every kit has an assortment of pre-cut solar cells, glue to assemble strings of the cells, waterproof covering for your panel (specifically, EVA and PET -- the same stuff used in 90+% of the large solar panels in the world), a length of copper tape and small magnets. Turn a playing card into a solar charger for AA batteries. I own loads of rechargeable NiMH AA and AAA batteries, but most always seem to be dead when I need them.
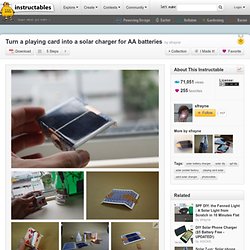
So, I wanted a cheap and fast way to make battery chargers that I can keep on my desk, so that I could have an armada of charged batteries at all times. I didn't want to take up more outlets and have more wire spaghetti with plug-in chargers, so I settled on a solar charger. I'm in the solar business so I had stacks of small pieces of raw lasercut PV silicon cells (solettes) laying around, and I first made a simple battery charger with a few business cards as a backing. Then I found that playing cards were a more stable backing -- and besides, they looked neat. This instructable details my efforts to make a simple solar battery charger made out of a playing card, some solettes, some magnets and super glue -- if anyone has ideas on how to make this simpler and more effective, please let me know in the comments.
No soldering is required for this project. First, check out this video. Solar powered arduino on the back of a playing card. ++ A playing card. ++ Copper tape (single-sided adhesive): This is easy to find at most hardware or electronics shops. ++ 8 to 11 solettes: these are small pieces of monocrystalline or polycrystalline PV silicon that are typically hidden under an epoxy blob in off-the-shelf panels.
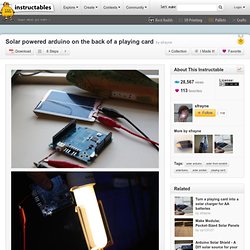
You need the raw stuff for this instructable -- this will give you the flexibility to power any arduino with varying current demands for different projects. You can get this key material here for now: But there will be a kit on Kickstarter that makes these readily available soon. ++ Superglue aka cyano: the thin stuff, like crazy glue. ++ 5-minute epoxy: this is the encapsulant that will cover the entire panel. Photovoltaics Student Guide.pdf. Photovoltaics Teacher Guide.pdf. Solar lesson plans.pdf.