
Electrified Fox Lamp Tutorial and Giveaway! My gosh, where have I been lately?
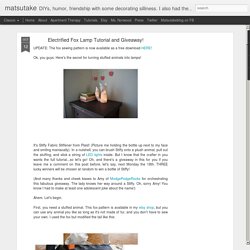
What month is it? June? We moved from Minnesota to Maryland last summer? Yes. So...here we are in Ellicott City. I had to start the kids in one school in September, and then a few weeks later when we finally closed on a house, had to move them to another school. Then just before Thanksgiving, I lost a friend to cancer. All of this is not to say that I stopped making stuff. So I have a lot of stuff in the works, but here's what I've been dabbling with for the past few weeks: Gold dimensional paint. First, there was a jellyfish. We visited the National Aquarium here in Baltimore, and I fell in love with the moon jellies. And then there was a golden longhorn. Again with the blobby paint to highlight the strange characteristics of this animal. I hear they raise ostriches out in West Texas. Free Fleece Hat with horns, dragon, dinosaur, bear ears, cat ears, pumpkin and apple pattern - Fleece Fun.
Halloween Hat Pack How To/ Tutorial / DIY These free fleece animal hat patterns have something for everyone!
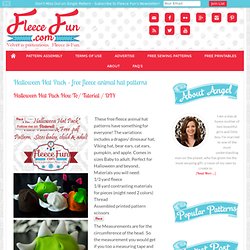
The variations includes a dragon/ dinosaur hat, Viking hat, bear ears, cat ears, pumpkin, and apple. Comes in sizes Baby to adult. Perfect for Halloween and beyond.. Materials you will need: 1/3 yard fleece 1/8 yard contrasting materials for pieces (might need 2 colors) Thread Assembled printed pattern scissors The Measurements are for the circumference of the head. Baby Small – 16 inches or 40.64 Large – 17 inches or 43.18 cm.
Quilled Snowflake Ornament. Today I have a big fat tutorial to share with you.
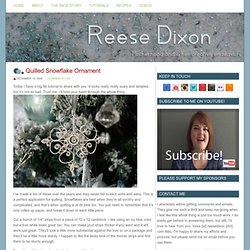
It looks really really scary and detailed, but it’s not so bad. Trust me. I’ll hold your hand through the whole thing. I’ve made a ton of these over the years and they never fail to elicit oohs and aahs. This is a perfect application for quilling. Cut a bunch of 1/4″ strips from a piece of 12 x 12 cardstock. From those thin strips, here’s what you need to cut 1 – 6″ strip for the center round 8 – 3″ strips for the arms 4 – 6″ strips for the scrolls 4 – 3″ strips for the teardrop 4 – 2″ strips for the marquis You’ll need some kind of a quilling tool, which you can find at Michael’s in the stamping aisle, or you can just make your own by cutting the top off of a needle with a pair of tin snips or wire cutters.
Insert the paper strip into the notch of the quilling tool, bring the tool to the very end of the paper, and begin rolling. Let’s start with the 6″ center round. Spread a little glue on the tail end, and glue it down. Scoodie ou écharpe-capuchon. À NOTER: ce patron permet de coudre un scoodie taille adulte avec suffisament d'aisance pour enfiler une tuque dessous.

Si vous préférez qu'il soit plus ajusté ou s'il est destiné à un enfant, réduisez la taille du patron à l'impression et testez les mesures avant de coudre. Couper les pièces comme illustré (on peut n'utiliser qu'un seul tissu si désiré): A: couper 1 dans le tissu principal et 1 dans un tissu contrasté (doublure) B: couper 2 dans le tissu principal et 2 dans la doublure C: couper 2 dans le tissu principal et 2 dans la doublure. Les marges de couture sont en rouge sur le patron. Coudre la pièce A et les deux pièces B endroit contre endroit. Coudre ensemble le capuchon et sa doublure endroit contre endroit. Coudre ensemble les pièces C endroit contre endroit. Aligner le bord non fini du capuchon, côté doublure, sur le bord de la doublure d'écharpe côté endroit en centrant bien. Recycled Glove How-to: Make a Chipmunk Softie. Gloves (like socks), while born to be part of a pair, often end their days in lonely solitude, separated from their mates by the forces of the universe that conspire at every turn to pull them apart.
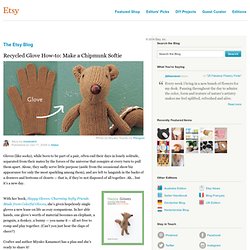
Alone, they sadly serve little purpose (aside from the occasional show biz appearance for only the most sparkling among them), and are left to languish in the backs of a drawers and bottoms of closets — that is, if they’re not disposed of all together. Ah… but it’s a new day. Thanks to the Penguin Group for sharing this project from Happy Gloves. Author Miyako Kanamori is a crafter who lives in Tokyo. She is also the author of Sock and Glove. For more cute critters made from recycled materials, search “Recycled Softie“.