Gift box tutorial - so simple to make
You will need: Card Embellishments Adhesive Scissors Hole punch Ribbon The box Making the creases for the folds In landscape fold the corners so they overlap Where the card dips use your hold punch to make a hole
little guiding stars
Since the new year has started I’ve been trying to think of ways to be more kind to my self. Especially when that nasty gremlins try to creep in and stump me. I remembered this origami star video on You Tube and had to get them involved in my plan. I thought it would be fun to make a whole bunch with kind words and “you are….” phrases inside.
Pliant 5 pointues Ornements Origami étoile de Noël
These 5 pointed origami stars are easy to fold and make beautiful Christmas decorations. You can make them from magazines, scrapbook papers or sheet music, whatever you happen to have lying around. We don’t have our tree up just yet so for now I’ve put these Christmas star decorations on our mantelpiece. One of the 5 pointed origami stars is folded from scan of a dictionary page and the others are made from vintage style scrapbook papers.
Make Your Own Silhouettes
Have you noticed that silhouettes are all the rage these days? I see them in magazines, on blogs, books, and the TV. I’ve priced them out a few times, only to be disappointed by how costly they can be. In kindergarten, I vaguely remember my teacher shining a light at us while we stood by a wall with a big piece of white paper taped on it.
dreamcatchers
I’m really diggin the whole hippy thing. And while Craig is quick to correct me on the fact that dream catchers are not hippy-ish, I still think of them that way. Natural, care free, simple.
Kusudama Tutorial part 1
The Japanese kusudama is a paper ball made out of multiple identical origami shapes glued together. They were traditionally used as a ball for incense or potpourri but now we see them more for decoration or as a gift. Today I am showing you part 1 on how to make the Japanese traditional shape. There are many different patterns to make a kusudama ball but I find this the easiest pattern to get started.
Sweet origami hearts
To be honest, I was never keen on origami hearts (or roses for that matter) for a fairly long time because it was hard to accept the way they look — I find them too edgy and not very loving. Well that’s all in the past. My perception has changed (and I’m so glad). I have embraced their looks and I will admire them as they are. I’ve been on a folding spree over the new year break, particularly enjoying making heart after heart, starting with: 1.
DIY Cozy Home
Repurposing from the recycling bin is great! It’s fun to see what you can come up with and it’s always better to make something you need rather than buy it. Like a spade for the garden or temporary planters for starts. This roundup from Awesome Inventions has whole heaps of DIY crafts and projects sure to impress. I have made the piggy bank craft with the kids before. Pablo was awesome with button eyes, a pink curly pipe-cleaner tail, and wooden spool legs.
How to make gift bags from newspaper
When I bought something at a store recently, the clerk handed me my purchase in a bag made from a newspaper. I liked it very much and had to make some more—thus today's DIY recycled newspaper project: gift bags made from the Wall Street Journal. You can vary the dimensions, of course, but here's what I used to create a bag that's 5" tall, 4.5" wide, and 3" deep. Stack two sheets of newspaper on top of each other.
No Sew Eyeglasses Case: Good Living Magazine Project #1
I am so excited to share this easy peasy tutorial! I have gone back and forth on when to post these projects but the magazine I craft for has been a bit ambiguous on their actual print date but the article and three crafts I made direct back to this blog for the tutorials in the march archives. And they are more geared towards Easter and Mother's Day so sorry if this is kind of early.
Make flowers
Ages ago I bought a package of crepe paper (like this—the folded sheets, not streamers). An impulse purchase simply because... it was orange? The other day I finally made some flowers with it while watching way too much HGTV. These will be nice gift toppers, or maybe I'll do more and make a wreath. Materials: Sheet of crepe paper Small piece of cardstock Scissors Glue (I used Aleene's Tacky Glue) Toothpick Cut 12 circles from a sheet of crepe paper, any size you like depending on how big you want the final flower to be.
Square Pillow Gift Box
Wrapping gifts yourself is half the fun of giving them. If this claim doesn’t convince you, there’s another, more down to earth, reason to prepare DIY wrapping - it’s so much cheaper than the bought one. Let the shops keep their pricey boxes and make one yourself just as we did! All you need is an old CD, triangle, scissors, sheet of thick paper, a pencil and a piece of soft fabric. Oh, I forgot about empty pen for scoring, but this doesn’t seem to be a scarce tool, huh?
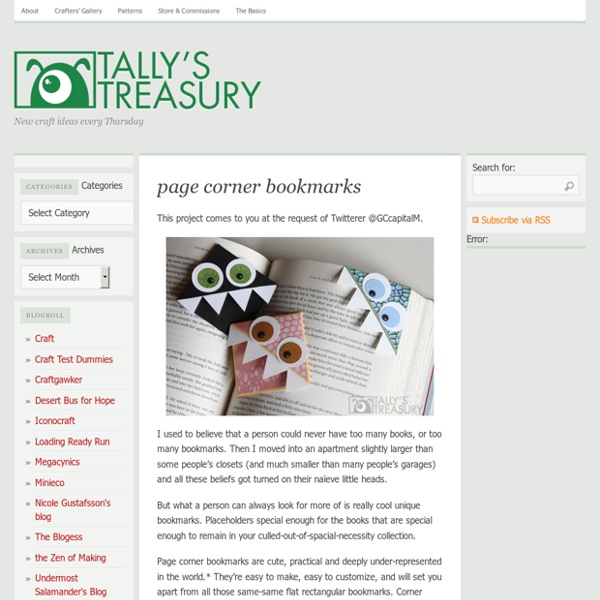
TALKING hands
Just give them a try – these talking heads are terribly easy to make. You need A4 colored paper sheets, a pair of scissors and some paper glue. Let the show begin To make a MONSTER, glue some extra eyes and teeth on the inside.
Paper Flowers - Anyone Can Do That
Japanese Kusudama, this tutorial is featured on Craftuts Anyone can do that, I assure you. The proof: I can, just take a quick look at my result below. And, believe me, I am neither meticulous nor particularly patient. You could even say I’m the opposite. Below you can see my very first attempt to create paper flowers.