
Updated DIY Valentine Treat Bags! Hi gang!
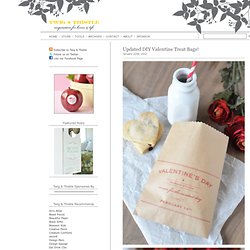
I have an updated Valentine Treat Bag PDF that’s available as a free download! These have been pretty popular over the years and I’ve made this version more universal so that it can be used for any homemade treats you might want to give to that special someone. Just download the file and print directly onto a paper bag using a color ink jet printer. I’ve found that top loading printers work the best and the flatter the bag the better. Once printed, I stuff a Glassine bag inside to help maintain freshness and to protect the paper from oil stains.
Once you’ve made the bags, fill them with any sweet treat imaginable! Instructions are included in the PDF and if you need bags, I sell them in my Etsy shop. Blog Archive » DIY FLOWER CROWN. I recently did a mini “spring-inspired” shoot with Taryn and Shelby of Joielala (which mean a handful of fun lookbook posts will be coming to the blog over the next few weeks!)
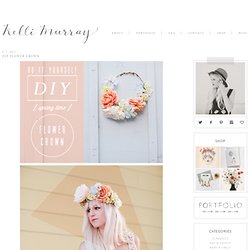
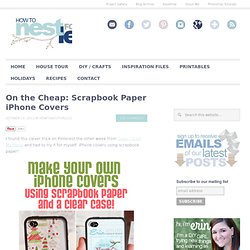
This is just a sneak peak of one of the looks because I wanted to do a quick tutorial on how I created this pastel flower crown. They make such a statement and are great for weddings, special occasions, or…just because! On the Cheap: Scrapbook Paper iPhone Covers. I found this clever trick on Pinterest the other week from Oops I Craft My Pants and had to try it for myself: iPhone covers using scrapbook paper!
H&M Magazine Summer 2012. Panther Thighs: DIY Silk Scarf Trousers. What you’ll need: Loose-fitting trousers, sewing machine, (or needle and thread if hand-stitching), large silk scarf, scissors, pins, thread of relevant colour, elastic, tape measurer Cut off labels Start by placing the trousers/PJ bottoms flat on the bottom right corner of the scarf.
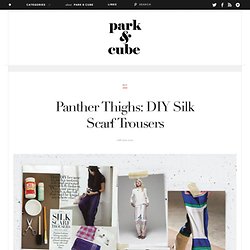
Depending on how long you want your trousers to be, the top of the trousers should not pass 3/4 of the scarf. Using the trousers as guideline, cut along with an 1-inch seam allowance. Use this as template to cut the rest out of the scarf (roll-over image below for guide). You should be able to cut four identical pieces from the scarf, following the edges. Pair the legs, right-side facing Leaving about 3 inches from the bottom corner (this will become a fly) pin the entire length of the outer-leg edge. DIY Gold Tube Bracelets. I have very vivid memories of walking into a bead store for the first time, almost 15 years ago, and being overwhelmed by the million and ten ideas that filled my mind.
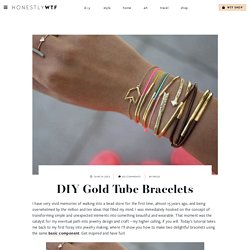
I was immediately hooked on the concept of transforming simple and unexpected elements into something beautiful and wearable. That moment was the catalyst for my eventual path into jewelry design and craft – my higher calling, if you will. DIY Vintage Table With Dictionary Pages Top. Home design DIY Kids Weddings Fashion and Style FOOD Cool stuff DIY Vintage Table With Dictionary Pages Top There are many ways to create a vintage piece, this table was made vintage with the help of dictionary pages.
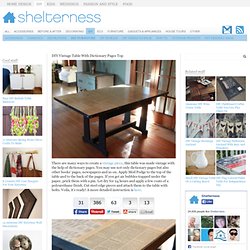
You may use not only dictionary pages but also other books’ pages, newspapers and so on. Apply Mod Podge to the top of the table and to the back of the pages. Share More about diy furniture, diy furniture projects, diy project, furniture renovations, table renovations, vintage decorating, vintage decorating ideas. Cool DIY IKEA Dresser Renovation. If you have a fine IKEA piece like this one – a small dresser.
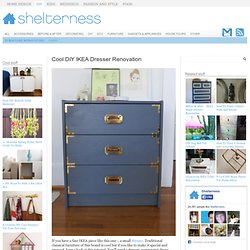
Traditional classical furniture of this brand is cool but if you like to make it special and unusual, have a look at this tutorial. You’ll need a dresser, some paint, brass hardware. The craft itself is rather simple, all you need to do is to drill the holes for the corner pieces and pulls after assembling the body of the dresser and patching the holes. Don’t forget to paint each drawer front before attaching the brass hardware. Jewelry Organizers. Sewing 101: recycled paper basket. Thanks to a few recent online purchases, I had an enormous pile of long brown packing paper strips in my studio.
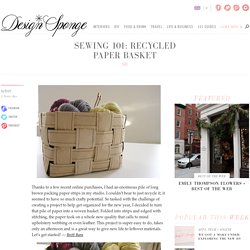
I couldn’t bear to just recycle it; it seemed to have so much crafty potential. So tasked with the challenge of creating a project to help get organized for the new year, I decided to turn that pile of paper into a woven basket. Folded into strips and edged with stitching, the paper took on a whole new quality that calls to mind upholstery webbing or even leather. This project is super easy to do, takes only an afternoon and is a great way to give new life to leftover materials. Let’s get started! Read the full how-to after the jump! Materials long lengths of paper (I used packing paper, but wallpaper scraps or gift wrap would work great, too.)sewing machineglue or hot gluepaperclips Instructions.
Page corner bookmarks. This project comes to you at the request of Twitterer @GCcapitalM.
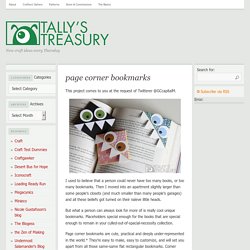
I used to believe that a person could never have too many books, or too many bookmarks. Then I moved into an apartment slightly larger than some people’s closets (and much smaller than many people’s garages) and all these beliefs got turned on their naïeve little heads. But what a person can always look for more of is really cool unique bookmarks.
Placeholders special enough for the books that are special enough to remain in your culled-out-of-spacial-necessity collection. Page corner bookmarks are cute, practical and deeply under-represented in the world.* They’re easy to make, easy to customize, and will set you apart from all those same-same flat rectangular bookmarks. Un pompon en papier de soie. Et oui je suis trop une ouf, j'ai voulu faire avec mes petites mains les mêmes pompoms en papier de soie vu sur ce post .
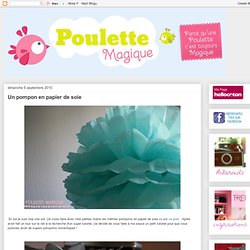
Après avoir fait un tour sur le net à la recherche d'un super tutoriel, j'ai décidé de vous faire à ma sauce un petit tutoriel pour que vous puissiez avoir de supers pompoms romantiques ! Alors comme indiqué sur la photo, il vous faut vous munir de 8 feuilles de papier de soie (2 euros les huits), d'un rouleau de scotch et d'une paire de bon ciseaux. Etape suivante, on superpose les huits feuilles et on les plies toutes ensembles en accordéon comme ceci : Une fois les feuilles pliées, on scotche le centre pour maintenir le tout : Maintenant on attrape son ciseau et on coupe les extrémités en arrondis ou en pointe selon l'effet souhaité (moi j'ai coupé en arrondis) comme ceci : Maintenant il ne vous reste plus qu'à ouvrir tout doucement les feuilles une par une, en faisant attention de ne pas les déchirer (c'est fragile ces choses là).
DIY collier à pompons. C'est doux, c'est beau, c'est corail, c'est votre nouveau collier à pompons de créateur. Et cette fois-ci le créateur, c'est vous : Buy MSGM Geometric-print dress from Matches Fashion.