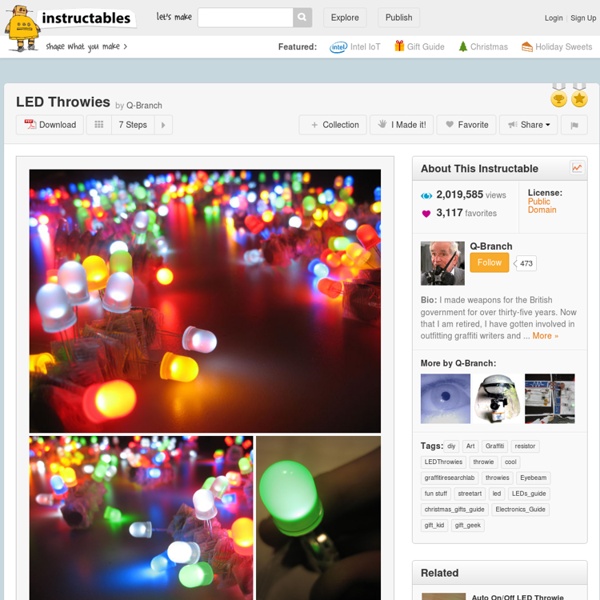
background preloader

LED Throwies

LED Throwies
LED throwies consist of only a few inexpensive parts and can be made for ~$1.00 per Throwie. You can reference the parts list below or download the attached spreadsheet for more info on parts, part's numbers, vendors and application notes. Part: 10mm Diffused LED Vendor: HB Electronic Components Average cost: $0.20 avg per LED Notes: Cost reductions for larger quantities. Comes in red, blue, amber, white in both diffused and clear. Part: CR2032 3V Lithium Batteries Vendor: CheapBatteries.com Cost: $0.25 per battery Notes: Cost reductions for larger quantities. Part: 1-inch wide Strapping Tape Vendor: Your local hardware store Cost: $2.00 for one roll Notes: One roll will make many throwies Part: 1/2" Dia x 1/8" Thick NdFeB Disc Magnet, Ni-Cu-Ni plated Vendor:Amazing MagnetsCost: $13.00 per 25 magnets Notes: Cost reductions for larger quantities

Spark, Bang, Buzz and Other Good Stuff. Fireflies - Analog version... Or, How to randomly flash 8 LEDs OK. I'll admit that the fireflies in a jar thing has been done already. The difference here will be that this version will be done entirely with an analog circuit. For anyone without a lot of electrical knowledge, what that means is that you can do the firefly circuit without needing to buy a PIC micro controller or do any programing on your computer. The one or two I have built are being used in enclosed projects with a translucent lens. The primary difficulty in designing this was in finding a way to randomly flash the LEDs. The Decade counter chip (LED driver) can actually drive up to 8 LEDs. The second difficulty was finding a simple way to get a fade-effect in the LEDs. Parts List: 1 lm555 timer chip1 cd4026b combined counter and display driver IC16v 47uf capacitor2 - 10k resistorsJumper wire, a few feet. Equipment:Soldering IronSolderWire CuttersHousing of some kind

Liquidware : Open Source Electronics You Have Just Been Poisoned Step #1: Clean bottom of glass PrevNext Moisten a paper towel with rubbing alcohol and wipe the bottom of the glass squeaky clean. Step #7: Verify that the etch is complete When the glass is completely dry, hold it up to the light and inspect the etch closely to verify that you haven't missed any spots.If there are flaws in the etching, simply reapply etching cream and rinse as in steps 5 and 6.Repeat until the etch is complete to your satisfaction.

playground - ArduinoUsers :: Exhibition :: The place to share and show off projects Until someone finds a way to categorize what is here, be sure to remember that your browser has a "find in this page" tool (ctrl-F in Firefox) which can help you find what you are looking for! Arduino user projects How Did I Improve My Central Heating Control with Arduino? felt fortune cookies – geekified (and a giveaway!) | I Could Make That It’s April! Which has nothing even remotely specific at all to do with fortune cookies, but they seemed a fun thing to make. I’ve seen these felt fortune cookie creations all over the internet, made for Chinese New Year parties or Christmas or Valentine’s Day or pretty much any other occasion. I like to geekify things, and it occurred to me that Mario has at least a couple of phrases that are very obviously well-suited to the tradition of handing out short and to-the-point fortunes and bits of wisdom. (I’m not saying that the repurposing of these phrases is in any way original, just that it’s thematically appropriate.) Below are instructions for normal, everyday felt fortune cookies, as well as for the Mario mushroom version. Also, at the end of the post I’m doing a giveaway. What you’ll need: Putting it all together: Here’s how to make a basic felt fortune cookie. 1) Trace and cut a large circle out of each of your felt colours. 11) Fold the circle in half along the line of the wire.

Electronics - News paper orchids AND spiralled paper roses | I Could Make That We’re moving soon, and I’ve been slowly going through all my stuff, organizing and paring down. When I say “stuff” I largely refer to crafting supplies, since that’s what most of my world is made of. While sorting through all that “stuff” it came to my attention that I have what might technically be referred to as a boatload of paper scraps. They’re useful, you see. And they’re paper, so it’s not like they take up much space, or weigh very much… right? So in the interest of using some of this stuff up, I started a one-woman flower-making factory a couple weeks ago. The other reason for this particular post is that last week I sort of taunted you all with “oooh, look at the pretty paper flower” photos (and suggested in passing that you could try them yourselves) without giving any instructions for them. my scrap paper collection We’ll start off with instructions for the paper orchid. What you’ll need: Putting it all together: 1) Start by printing out the template on some plain cardstock.

The Electronic Peasant's Guide to Fun and Profit with Electronic The Electronic Peasant likes to get more enjoyment from DIY for less money, and sometimes uses obsolete parts as well. Salvaging old equipment can provide many important parts at little or no cost. And it's environmentally friendly to save this stuff from going to the landfill! There's gold in them there things!!! Older equipment like this is being disposed of in huge quantities, available for free or very inexpensively. Hardware - Basic Building Blocks. Every project needs hardware. Hook-up wire Why pay good money for wire? Power Supplies Be careful of aging electrolytic capacitors, but otherwise, power to the people! Transformers Other than burning them out, these things last virtually forever! Electric Motors VCRs and cassette decks are loaded with these! Circuit Boards Many different parts can be found here. Projects Using Salvage Parts: Bench Power Supplies These were built using mostly salvaged parts! Regulated power supply

Related: