
Cab wrapping. Welcome!
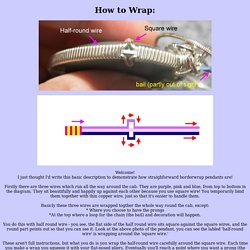
I just thought I'd write this basic description to demonstrate how straighforward borderwrap pendants are! Firstly there are three wires which run all the way around the cab. They are purple, pink and blue, from top to bottom in the diagram. They sit beautifully and happily up against each other because you use square wire! You temporarily bind them together with thin copper wire, just so that it's easier to handle them. Basicly these three wires are wrapped togther the whole way round the cab, except: * Where you choose to have the prongs *At the top where a loop for the chain (the bail) and decoration will happen. You do this with half round wire - you see, the flat side of the half round wire sits square against the square wires, and the round part points out so that you can see it. These aren't full instructions, but what you do is you wrap the half-round wire carefully around the square wire. Repeat for the other side: Keep wrapping. you end up with something like this:
Jewelry Making Tutorial. Free Jewelry Making Projects and Tutorials to Inspire Your Handcrafted Jewelry. BenchTube - Jewelry Making Videos. More Than 50 Shades: Adding Luscious Color to Your Metal Jewelry with Patinas. By now, we are all used to the price of silver and gold and the way it has escalated over the past 5 years.
With precious metals, we count out our grams or pennyweights of metal and calculate the prices at which to sell our jewelry. When dealing with grams, it's hard to believe that another of the great metals, which many of us love, is actually sold by the pound. Yep. Copper is traded on the international markets by the pound, and 51% of the world's copper comes from Chile.
It too, has risen in price, as we see copper pipe stripped from empty buildings and sold at record prices. How about changing how we work with my favorite metal? When I ask my students about patinas, they usually just know about liver of sulfur (LoS). Is there anything out there that's so gorgeous that it makes people stop and stare openmouthed and say, "That's copper? " As my grandchildren are still very young, I let them gently hold the "Luminous Relics" as I tell bedtime stories about the vessels. Step by Step Projects, Techniques, Tips, and Inspiration. Jewelry Making Tutorials &. Learn How To Make Jewelry - Beading & Wire Jewelry Classes. Jewelry making tips and techniques. Mold Making Videos - Learn How to Make Molds – They’re Free! How to make wire spiral cufflinks. Basic Mold Making Techniques, Silicone Plastique® Mold Making Video. Jewelry Tutorial on making Tubing. Making tubing is an important skill that is necessary in goldsmithing.
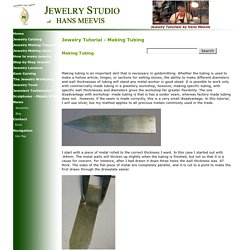
Whether the tubing is used to make a hollow article, hinges, or sections for setting stones, the ability to make different diameters and wall thicknesses of tubing will stand any metal worker in good stead. It is possible to work only with commercially made tubing in a jewellery workshop, however, making specific tubing, with specific wall thicknesses and diameters gives the workshop far greater flexibility. The one disadvantage with workshop- made tubing is that is has a solder seam, whereas factory made tubing does not. However, if the seam is made correctly, this is a very small disadvantage.
In this tutorial, I will use silver, but my method applies to all precious metals commonly used in the trade. I start with a piece of metal rolled to the correct thickness I want. Once the one side of the metal is flat, I use a divider to scribe the correct width. Nicely closed and ready for binding wire and soldering. Professional Jeweler Archive: Professional Setting of a Half-Drilled Round Pearl. Setting a Pearl Onto a Post 1.
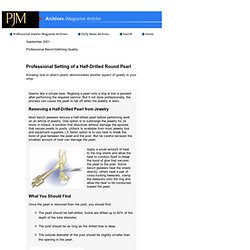
Measure the length and diameter of the post. 2. Clean out the drilled hole using a twist or pearl drill the same size or slightly smaller than the hole. This removes old epoxy and other unwanted material. When drilling a new hole, always use a pearl-drill because a twist drill chips the nacre or outside surface of the pearl.) 3. 4. 5. 6. 7. 8.