background preloader

Kelli Murray

Kelli Murray
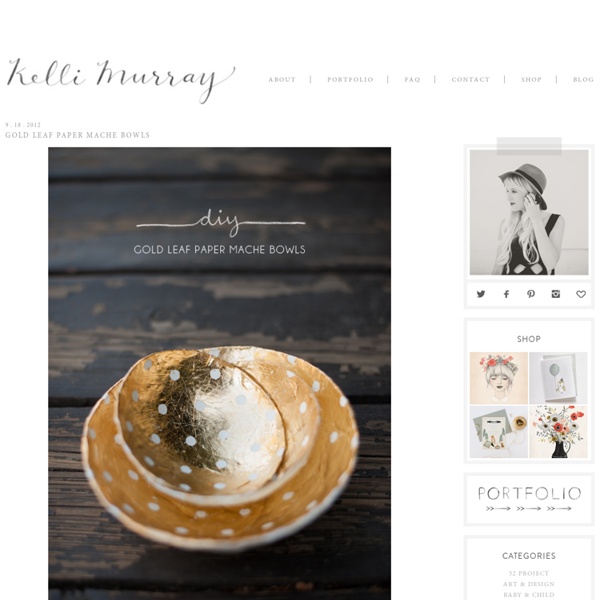
So, I think this might be my favorite DIY to date. It’s just so practical and pretty! A few friends and I decided we would get together once a month for an all day craft day. We’ve been dying to try out gold leaf for a while now. ONE – To create your bowl forms, you’ll need to start with balloons. TWO – Cut up your newspaper into small strips. THREE – Place your balloons upside down (or right side up, whichever way you want to look at it) inside paper cups and let them dry overnight. FOUR – Once dry, pop your balloon and remove the latex. Paint your bowls entirely white (or any color of your choice). I wanted my bowls to have a polka dot pattern within the gold leaf. After your dots are adhered, brush on Gold Leaf Adhesive all over the inside, over the stickers. Now for the fun part….carefully place your sheets of Gold Leaf all over the inside of the bowl, securing it to the adhesive. I hope you all have fun with this project!

The Sarah Johnson I had some leftover clay from my marble coaster project, and I always have tons of jewelry laying around my apartment, so I thought it would be fun and functional to DIY some decorative clay jewelry dishes with my favorite decoupage technique. See supplies and instructions after the jump! What you’ll need: 3.75″ Ramekin dishes (1 for each clay dish) 3.5″ round food ring white Sculpy clay Origami paper Mod Podge Gold Liquid gilding Pencil Small round pointed paint brush Large flat paint brush Scissors Rolling pin Butter knife Cookie sheet Work a 1.5″ size ball of clay in your hands until soft. On the back side of the paper, trace a circle with your ramekin. Once you’ve rolled out all the clay and placed into the center bottom of each ramekin with the edges rolled up, place all ramekins on a cookie sheet and bake as per your clay’s instructions. Once the Mod Podge dries, you’ll want to finish each dish with a touch of gold liquid gilding around the edges. As usual, please tag me in your creations!

elle oh Darice When it comes to home crafts, I’m a sucker for handmade storage solutions. There’s just something so awesome about a project that is both decorative and functional. Several years ago, I discovered the solution to the chaos on my vanity: trinket and jewelry dishes. Parchment Paper.Small Bowl.Air-dry Clay (Terra Cotta or White).Wooden Rolling Pin.Darice 1-inch Foam Brush.Darice Short & Round Brush Set.Darice Acrylic Small Half Cone Beads*.Blue and Gold Metallic Acrylic Paint.Decoupage (Optional).Strong Craft Glue. * Darice offers small half cone beads in many different finishes. Step 1. Using the wooden rolling pin, flatten the ball into a circle measuring about 4 1/4 inches wide. Step 2. Step 3. Step 4. Step 5. Step 6. Step 7. Step 8. Once everything is dry, your new DIY jewelry dish is ready to sparkle and shine. I couldn’t help but whip up two more dishes in different colors. Admittedly, each dish looks pretty stellar (no pun intended) on its own. Other Projects You May Like:

D E S I G N L O V E F E S T Almost Makes Perfect maybe it’s just me – but i can’t enough little bowls. i use them for corralling jewelry, i use a couple as pinch bowls in the kitchen, i use them for sage smudging, i use them basically. so i wanted to make a set of “ceramic” bowls for rings and bracelets — and it’s super easy. 01. condition your clay and roll it out flat. cut a round shape by either doing it manually, or using something round as a cookie cutter (i used a candle lid, you can use anything!) cut it out using an xacto. 02. to mold the shape, place your circle into a bowl or saucer and gently sculpt the sides into a bowl shape. if you use a bowl, make sure it’s one that you never use with food! 03. bake according to the package directions, with the circle still molded in the saucer or bowl. sand for a smooth finish once they’re dry and cool. 04. paint away! 06. after they’ve dried overnight, apply glaze for a finished look. i only glazed the interior of the bowls to keep them looking partially glazed. cute right?!

Lovenordic Design Blog Alice & Lois In the midst of planning and creating goals/project plans for 2015, it is best to take time and reflect all of the positive moments from the previous year. 2014 was a wonderful year for us here at the blog. We went from posting three days a week to five days! We starting working as contributors for minted’s amazing blog, Julep. We also starting working with Project Nursery as a DIY contributor. We partnered with some amazing brands to create original content; Jawbone UP24, Got Milk, Honest Company, Munchkin, and Old Navy. It’s been a great exercise to look back at our projects from this past year and to see which posts were your favorites. 1. 2. Read more for other favorite posts. 3. 4. 5. Stay tuned for more of our top posts from 2014. Photos by Melissa Fenlon and Sara Albers.

Ensuite Alice & Lois You know I’ve got a thing for air dry clay. It’s so versatile, so easy to work with and dries so well. We decided to make some little DIY stamped air dry clay bowls for Valentine’s Day. I love the simplicity of the white clay with modern black letters. You could choose whichever words you like, but we were impartial to Love and XOXO. Here are some of our other favorite air dry clay tutorials we’ve done: DIY air dry clay jewelry bowls, DIY air dry clay platters, these gorgeous gold and white DIY air dry clay place card holder bowls, and our favorite Easter project to date, the DIY air dry clay bunny bowl! Read more for the full tutorial for the DIY stamped air dry clay bowls. Supplies: Air Dry Clay / rolling pin / exacto or small kitchen knife / pencil / sponge / bowl of water / letter stamps / stamp pad Steps: 1. 2. 3. 4. 5. 6. Please remember these bowls are not food safe. photos by Melissa Fenlon. all rights reserved.

AprillAprill - Design Inspiration Vardag Oleander & Palm Lately I’ve been so busy with house projects and assignments that keep me glued to my computer. I really have had no time to just be creative and make something with my hands. Messy making is just plain good for my soul. A brand that I use everyday in my home, method, encourages folks to FEAR NO MESS. So, we dove right in and got elbow deep into playing with clay. I’ve been itching to take a ceramics class for a couple of years now. Here’s what you’ll need: Air-dry ClayCraft Paint (I used black and white)Paint Brushesmethod Gel Hand Soap Starting with a tennis ball sized amount of clay. To smooth out cracks and imperfections, wet your finger tips in a little water and rub on the clay. Allow your pieces to dry at least 3-4 days. There really is something very therapeutic about getting your hands just caked in clay. When the clay is completely dry, you can paint your pieces. When the pieces are completely dry, they are ready to be used.

emmas designblogg - design and style from a scandinavian perspective

Related: