
Leather bracelets Es uno de mis modelos de pulsera favorita porque te permite jugar con el color. Es sencilla de realizar, combina cuero e hilos de colores, yo he usado hilo de bordar cuyos colores son luminosos y el colorido es muy variado. Inspirándonos en los cartoncillos de los hilos, los peques han hecho las etiquetas. Es para un regalo especial que vamos a hacer hoy, la destinataria tendrá que escoger una bolsita con la pista de la etiqueta. Están hechas con tres cordones de cuero de 2 mm entre los que se entrelaza hilo de bordar de colores. Son muy sencillas de realizar, el material que necesitas es: 3 tiras de cuero 16,5 cm de largo (según la medida de tu muñeca) y 2 mm grosor 2 piezas metálicas centralesUn cierre de dos piezas para ambos ladosHe sujetado uno de los extremos con celo y el otro lo he dejado abierto. Inserta las piezas centrales en los extremos de los hilos y fija con un poco de pegamento.
Outlier DIY | Metallic Crochet Bracelet I have always found the different shapes and textures you can create with crochet really fun. I just learned the very basics (thanks YouTube!) and there’s a lot you can make with that as long as you pick the correct yarn. This metallic bracelet is the first thing I have tried. I have included very detailed steps here, so you can make one even if you have never tried crochet before. I didn’t have a Size 35+ knitting needle, so just tied 4 chopsticks together with a hair tie (at the top part). Step 1: Make a foundation chain of 24 – This should be long enough to make a complete circle around your wrist. Step 2: Add a row of single crochet stitch to the chain. Step 3: After the row of single crochet, start your broomstick lace stitch. Step 4: After you complete one round of broomstick lace stitch, add another round of single crochet
5 Bracelets in 10 Minutes Today I would like to show you 5 different techniques to make some nice and easy bracelets. I wanted new bracelets and a lot of them so I made these very quickly. The best thing about these bracelets is that if you're crafty you'll make them for free because they can be made with what you have in your stash:left-over pieces from other DIY projects, little pieces of ropes, some yarn and so on. These bracelets are quick to make and you can have fun making them in every color! Let's start! Yarn bracelet : I made a tiny loop with the rope, blocked with thread and needle and then I just wrapped the colored yarn around. Crystal bracelet : I made a loop with the rope and blocked it with thread and needle then I put the crystal chain over the rope and I wrapped the yarn around both. Ball chain bracelet: I made a loop with the rope and blocked it with thread and needle then I put the ball chain over the rope and I wrapped the yarn around both.
Leather Lanyard Bracelet Maeg-it Yourself « THE YESSTYLIST – Asian Fashion Blog – brought to you by YesStyle.com Okay, not the best shot of the bracelet, but I couldn’t resist! If you went to summer camp as a kid, you’ll totally remember making lanyard keychains with that brightly colored plastic lace {I had tons of them!} .So I thought, why not do it with leather laces? And I did. So I thought I’d show you how and if you like, you can buy one of mine because I’ve listed a few in my Etsy shop. * Leather laces * Chain * Clasp * Needle nose pliers/Scissors NOTE: There are tons of lanyard-making videos on youtube if these instructions are a bit confusing! * Cut 2 strips of leather laces. * To begin, find the middle of one of your laces and wrap it twice around your finger. * Getting the first and last stitches done are the most difficult, so watch these videos for help. * To secure the end knot, leave your last box stitch loose then with each lace, loop around your nearest loop/under/up through the center, then all the way around. * Using your pliers, open a link in your chain . . .
Friendship Bracelets 1 Macraméd friendship bracelets were all the rage when I was growing up in the eighties. All the girls at my school would obsessively make them for one another in a dizzying variety of colors, widths, and patterns. It's amazing, thinking back, that such young girls could make such beautifully intricate accessories. I, of course, tried my hand at making them as well. I would ride my bike down to the five-and-dime store and pick out the most sophisticated color combinations of embroidery floss I could find, but when it came to the actual macramé I never got beyond plain stripes. Fast forward 20 years: Purl Soho started carrying DMC Cotton Embroidery Floss in every conceivable color (including fluorescents! Making friendship bracelets is a surprisingly easy craft, and best of all, in the end you'll have a bunch of cute summer bracelets to give to your pals. Materials Since this is such a free form enterprise the amount of colors of DMC embroidery floss you get is really up to you. Beginning
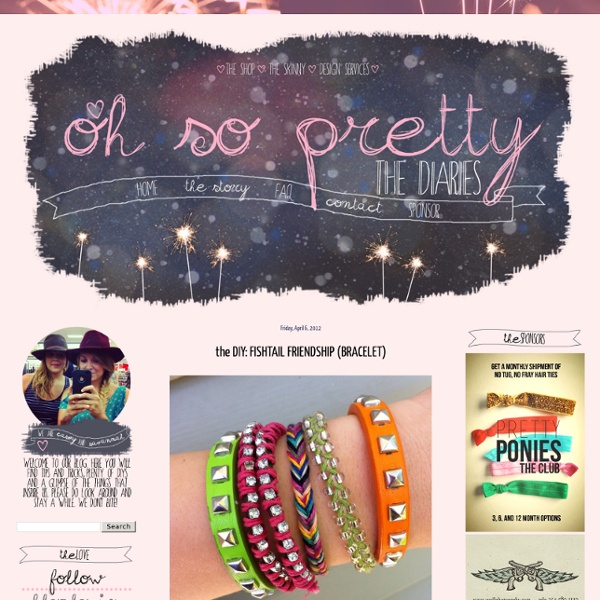
24 - THE DIRTY - Dirty Laundry - {the blog} Friendship Day is 8/7. So I'm going to try my hand at making some friendship bracelets for a few of my friends that have helped me SO much with Dirty Laundry over the past several weeks. I'm going to try to make some snazzy ones! Here is my inspiration. 1. Hand Printed 'Insanity' Braided Cuff BraceletThis bracelet is made with hand printed fabric and super soft sued.I just LOVE how it all comes together. 2. 3. 4. 5. I wonder which one I'm going to make?!? Update on Friday, April 13, 2012 at 5:27PM by Jeanee PLEASE NOTE: Due to the popularity of this blog post I want to note, again, that this is my inspiration and each bracelet has a link to the ORIGINAL maker giving them credit to their creations.
Jersey Knit Bracelet i don't know what it is about this time of year that makes me just want to have my bare feet in the sand, be watching the sun setting into the ocean, and breathing in the warm salty air of the beach...as i get older, more and more i find myself missing that place i used to go to almost every.single.day. as a teen. (my skin doesn't miss it. as a matter of fact, i now wish i listened more and DID put SPF on my face...hindsight is 20/20). my mom calls me from her walk on the beach almost every morning...*sigh*yeah, i get a little homesick around this time of the year. heck on my pinterest my "dreaming of summer" has the most pictures in it. ah yes. i miss my ocean. case in point. this bracelet, brought a flood of memories, not because i used to have one like it but because i can totally see me wearing it by the beach, not caring that it's gotten salty and wet, because i can totally make another one in like less than 5 minutes flat when i get home. *sigh* okay... *cut off excess tails!
DIY Bracelet for Mother’s Day/Prom/Evening out By Dara Today’s project is a beaded trim bracelet. You can make this bracelet as a gift for your mom, for yourself, for prom or a nice evening out. It’s an easy way to accessorize in only a few minutes. Materials: Instructions: Measure the ribbon and along the center, add glue along the six inches in the center.Slowly add the beaded trim on top of the glue.Leave it to dry and you’re done. If you want to make a headband, you can use a longer ribbon and it’s the same instruction. Like this: Like Loading... Valentines Friendship Bracelets Last summer I not only conquered my childhood fear of making Friendship Bracelets, but I also developed a new appreciation for them. They’re simple to make and cute as a can be, but most winningly, they really are great tokens of friendship. So cheerfully reminiscent of childhood and its open declarations of best-friends-forever, friendship bracelets are such a super way to let someone know you’re thinking about them. All this adds up to the perfect Valentine’s Day project! This time around I was a little more ambitious, creating adorable patterns of hearts and arrows, perfect for the holiday! Materials To make 9 bracelets: If you’ve never made a macraméd friendship bracelet before please check out our original Friendship Bracelet post to learn how to make a left knot and a right knot. Patterns Heart Bracelet Cutting and Prep You will need: 2 yarn colors: color A (the background color) and color B (the heart color)small scissorsa safety pina blunt embroidery needle to take out any mistakes.
DIY Charm Bracelet I’ve been itching to do a charm bracelet tutorial on HonestlyWTF for awhile now. And it wasn’t until I recently purchased a gorgeous vintage pearl charm bracelet that I was motivated to locate all the necessary supplies to recreate something just as pretty. The main focus of this week’s tutorial is to teach you how to wire wrap, which allows you to add any type of charm to personalize your own bracelet! You’ll need: Start by threading a headpin through a large pearl. Use the round nose pliers to bend the headpin to the left, about 2 millimeters above the spacer bead. Find the center link of the bracelet and attach the charm to that link. Now use the flat nose pliers to hold the loop tight for traction. Use the wire cutters to trim away any excess wire. Continue adding more charms, alternating between large and small pearls. Your charm bracelet is finished. Layer with your favorite bracelets and enjoy! (DIY pearl charm bracelet, crystal bracelets by J.Crew, rings and arm bangle by Mr.
Perfect Summer Bangle Here's a fun tutorial on how to make a message bangle that's one-of-a-kind, done in the sun, waterproof and weatherproof. Even after several trips to the beach, it won't fade or wash off! Essentially, it's the Perfect Summer Bangle. Used in this tutorial: Inkodye Red Prepare. Transcribe. Perfect. Pour. Brush. Wipe. Wrap. Tape. Expose. Develop. Cut. Reveal. Wash. Enjoy. Taylor’s Eclectic Light and color are clearly an important part of Taylor’s Eclectic‘s work. Her shop is full of jewelry made from paper and wire that looks remarkably like stained glass. She tells us “I am mesmerized by the way light bounces off of crashing ocean waves and the way it dips through wind blown leaves.” How romantic! You can definitely see how nature has influenced her work – water, leaves, flowers, butterflies, etc. ENVIABLE PERK: Hand sculpted jewelry made from paper and wire. Be fascinated with light and color. GIVEAWAY ALERT: Taylor’s Eclectic is giving away an item of your choice $30 or less! Photo: Courtesy of Taylor’s Eclectic Available:
Woven Friendship Bracelet i love the summer friendship bracelet trend that i keep seeing in blog land, so i thought it would be fun to share with you another way to weave a friendship bracelet. one of the parents at work showed me this technique of using a circular cardboard loom and i love how quick it goes, you can easily finish a bracelet in one sitting. - cardboard - something small and circular (like a teacup or ramekin) - scissors, ruler, pen - embroidery thread in pretty colors , thin yarn, or ribbon trace a circle onto your cardboard, and use a ruler to draw 8 lines cut a small ways into each line, between 1/2 an inch to an inch and make a hole in the middle of the circle where all the lines intersect. cut 7 strands of embroidery floss, about 24 inches long and tie them together with a slip knot. pull your thread bundle through the hole in your cardboard with the knot right up next to the hole and use a little piece of tape to hold it in place while you start. now for the fun part!
5 Ways to Turn Zippers into Awesome Arm Candy UPDATE: By popular demand, Zipper Bracelet Kits ($15) and readymade Zipper Bracelets ($20) are now available in the Brit + Co. shop! You know we love turning unconventional materials into wearable accessories. Today, we’re tackling zippers! We figured out 5 simple, beautiful ways to create bracelets, cuffs, and bangles out of metal, plastic, and repurposed zippers. Materials: - zippers - E-6000 quick hold contact adhesive - velcro or snap buttons - leather crimps + clasps - Tools: needle nose pliers, sharp scissors First thing to do is get your zippers! 1. These bangles are sweet, and have a definite friendship bracelet vibe. Use colored zippers for these, in whatever colors you like. Attach cord ends so that you can add a clasp and loop. 2. For this one, you’ll want a zipper with some contrast. We chose a black zipper with gold teeth. 3. This one is silly simple! Get a zipper with a more interesting material like denim. 4. 5. Last, the wrap bracelet! And that’s a wrap (hehe!).