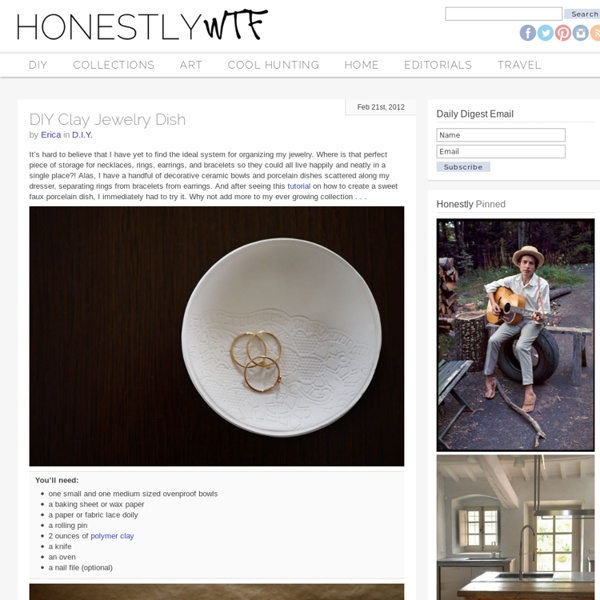
DIY Clay Jewelry Dish
DIY Marbled Glassware
When graphic designer and artist Joanna Bean Martin shared with us her technique for marbling the bottoms of glassware with nail polish, we couldn’t wait to try it ourselves. Who knew it would be such an easy way to add color and pattern to your next tablescape or party? Remember, the brighter and bolder colors you use, the more the glasses will radiate and glow. Have fun! You’ll need:flat bottomed glasswarevariety of colorful nail polishclear nail polisha disposable plastic containernail polish removerpainters tapetoothpicks Mask off the bottom of the glass with painters tape. Fill a disposable, plastic container with water. Layer the colors one on top of the other. Submerge the bottom of the glass into the polish. Allow to dry completely before applying a layer of clear polish. Once everything has dried, remove the painters tape and touch up with nail polish remover and a cotton swab. Your glowing glasses are finished! Bottoms up!
DIY Floral Lampshade
A couple of weeks ago while in London, I paid an obligatory visit to the third floor my favorite and one of the most iconic stores in the world: Liberty of London. After pulling bolts and bolts of Liberty fabric from the shelves, I eventually walked away with enough DIY supplies and material to hold me over until my next British stopover. It also didn’t take me long to whip together an incredibly simple DIY, upon my return, using a couple of sweet floral prints. This floral lampshade is a breeze to make and a fantastic way to utilize fabric without having to use a sewing machine! You’ll need:one yard of floral fabric plus 1/6 yard of fabric for trima metal lampshade framedouble sided fabric tapeneedle & threadscissors Start by finding the crosswise grain of the fabric, which is perpendicular to the selvedge edges, which are always the outside edges. The lampshade frame used in this tutorial measures 8 inches in top diameter, 14 inches in bottom diameter, and 11 inches in slant height.
kate’s recycled objet d’art
this is the last installment in the paint projects. over the years of apartment dwelling, i have amassed a fairly large collection of house paints, some of which i’ve hardly used. i decided to create some quick “objet d’art” with a few random knick knacks lying around. this is an easy way to create a little sculpture collection out of thrift shop finds; dipping them all in the same color can create a unified statement. or if you want them to be more functional, you can fill them with sand or rocks and use them as paperwieghts or bookends. happy crafting! -kate CLICK HERE for the full project instructions after the jump! what you’ll need: 1. objects (wood and plastics work best) 2. can of interior latex paint (semi gloss or matte is good, not high gloss) 3. plastic bag or saran wrap for a drying surface 4. hair dryer 5. pliers 6. clear sealant spray (look for this at craft stores or hardware stores) 7. putty or spackle (optional) 8. exacto blade (optional) 9. sand (optional)
halligan’s alchemy bookends
High-end geode and crystal home decor is everywhere! Having a rock garden in my home is right up my alley, but can be expensive. So today I’ll share how to get the look of pyrite bookends using rocks scavenged from your neighborhood streets. — Halligan CLICK HERE for the full how-to after the jump! Supplies rocks of all different shapes and sizes (make sure to get several that are flat on two sides)metallic gold spray painthot glue sticksindustrial strength glue such as liquid nails #3 or E6000gold leaf adhesive and gold leafweighted cardboard box (You can fill the box with books!) Tools hot glue guntoothpicksold paint brushsoft brushsoap and dirty toothbrush Instructions 1. 2. 3. 4. 5. 6.
DIY Telephone Bookends
Today we have a special treat for you! We invited our friends, Erin and Stefanie, from Oh So Lovely to share a fun DIY project with you. If you haven't heard of Oh So Lovely, it's a beautiful vintage boutique (run by two best friends!) based in Winnipeg. Supplies Needed: 2 old phones, 2 pieces of thin metal 1.5" wide, cut into 7.5" long strips. Step 1: Find 2 old phones and cut off the cords. Step 3: Use the larger hole to drill a countersink (a larger hole not all the way through) so that the screw can sit flush. Step 4: Spray the pieces of metal and be sure to get the sides, give them two coats and let dry. Ta-da!
Related:
Related:
