
http://mycalicoskies.blogspot.com/2012/04/52-week-challenge-10-diy-screenprint.html
Related: Ropa(clothes)Simple Bow Tie Top I'm so happy about how this turned out. This is one of those projects that's been on my to do list forever and now that I finally got it done, I wish I had done it a long time ago. This is such a simple project. One of the easiest I've ever made. Don't have much sewing experience? Give this a go, I promise it's a piece of cake and any mistakes made are hardly noticeable because of the gather. Paper Starburst Pendant Light So I had a different project that I was going to post today, an update version of my Book Pages Pendant Lantern from Project 19, but then I started working on this light idea, and I am so excited by the results I just couldn’t wait to show you guys! My inspiration and guide was this light from Design*Sponge, that I spotted on Pinterest. I really liked the idea, and I had a roll of white vellum lying around left over from college that I thought would look beautiful. So I started cutting triangles.
vintage + modern design for kids and the home Eri posted a DIY tutorial for this amazing bird wings costume on her blog, Llevo el Invierno. She provides a free pattern that you can download as well, sized for children ages 18 to 36 months. Using the template she provides, you can assemble the wings by either gluing or sewing the fabric. According to Eri, the project isn’t all that difficult. It just takes some time and patience to cut and paste/sew all the pieces of fabric. Isn’t her daughter Emma absolutely adorable? 11 awesome DIY outfits for summer 2013 The 2013 festival season is currently under way, which means wellies, hot pants and aviators shall be sported in all their glory. We've already seen celebrities donning lace, head-bands and dip-dyed hair at Coachella 2013, setting the bar high for all other festival fashionistas. To help you achieve your desired look without spending money on a new outfit, we've scoured the internet for 11 awesome DIY projects that will make you stand out in that muddy crowd. You can click on the source links for more detailed instructions.
Toilet Paper Art « This Handmade Circus This is absolutely the most popular piece of artwork in our home, so I decided that this would be the perfect tutorial to start with! This is made from all recycled paper towel and toilet paper rolls, but everyone thinks it is made of iron. It is super light weight and you can change it to look anyway you would like and costs less than 1$! I found a picture of this on pinterest and LOVED it! There was no tutorial that I could find, so I figured I would just figure it out and it turned out to be super simple and really fun. The hardest part was the looooooong wait that it took to gather and hoard and “steal” enough toilet paper/paper towel rolls.
Meet the Pocket Tie: Turn Any Tie into a Wearable Wallet You know we’re head over heels for the pocket scarf, but what about the summertime? What about all those summer weddings? Dudes, it’s time to add pockets to your tie. Ladies, it’s time to add a tie or two to your wardrobe. (And yes, this would go perfectly with a few our Men’s Shirt looks!) All you need is a tie, scissors, fabric, and a needle and thread (or sewing machine)!
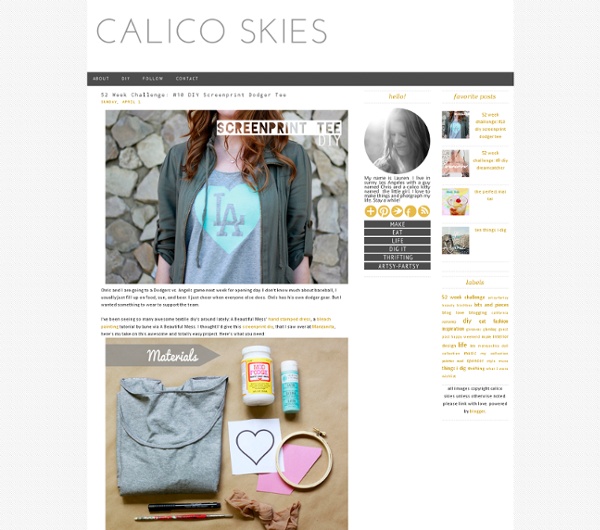
RIT Dye Tutorial It happens to me every year. The second spring hits, I’m standing in front of my closet going, I am so sick of all my clothes, if I see that shirt again I’ll throw up, but I don’t have any money for new stuff, I’M SO TIRED OF EVERYTHING I OWN. You know that feeling? Let’s kill it with instant-wardrobe-transformer (aka RIT dye). RIT is a brand of clothing dye that’s been around since the 1930s. t-shirt pom poms Learn how to turn old t-shirts into pom poms! T-shirt Pom Poms are so much more durable than tissue paper ones. And I think they look loads better! got an old tee or two {or 20!} that you don’t wear anymore? Stay-at-Home Artist: stencil with freezer paper (harry potter tee)... Yes, I am a nerd. I came up with a brilliant idea for a Harry Potter t-shirt and I couldn't resist. "Expecto Patronum!" However, you can make whatever kind of design you want with a freezer paper stencil.
how to transfer a photo to fabric Did you know you can transfer photos to fabric without using iron-on sheets? I love this technique. It's simple to execute and the end results are really pretty. It's another method for hand printing! Recycled Magazine Page Nesting Bowls I love recycling crafts, and finally had a chance to try making some bowls from recycled magazine pages. It's really quite simple and even youngish kids can help fold the pages while those old enough to handle a glue gun can make these themselves. And there are really no steadfast rules, so you can use this technique to make many kinds of shapes. Fabric Alteration Experiment 2: Overdye I've dyed fabric before, which is why I already had all the supplies handy. I used fiber-reactive dyes and other supplies from Dharma Trading Company . I started by cutting 12 fat eighths from each of these two fabrics (The bird print is from the Soiree collection by RJR and the white and gray print is from Amy Butler's Midwest Modern 2.) I followed the instructions in this book , which I bought at Fabric Depot years ago, for dyeing a 12-step color wheel. The directions have you mixing dye solutions in primary colors and then mixing them to create a color wheel in 12 dye pots. Here are my dye pots out on the deck.
Tutorials for Recycling T-Shirts So way way back, in June, I wrote this Studio Organization post, about starting the process of organizing my studio by cleaning out the closet full of junk. Well, it's September and...let's just say the closet is a work in progress. Some of the things that are taking up space in the closet are shirts that I never wear anymore. I realized I could repurpose them into something else!