background preloader

DIY Fringe Scarf

DIY Fringe Scarf
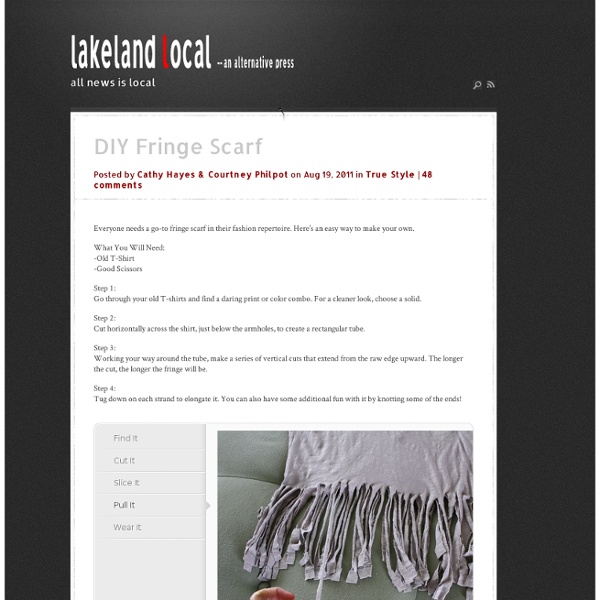
Everyone needs a go-to fringe scarf in their fashion repertoire. Here’s an easy way to make your own. What You Will Need: -Old T-Shirt -Good Scissors Step 1: Go through your old T-shirts and find a daring print or color combo. Step 2: Cut horizontally across the shirt, just below the armholes, to create a rectangular tube. Step 3: Working your way around the tube, make a series of vertical cuts that extend from the raw edge upward. Step 4: Tug down on each strand to elongate it. photo credit: Cathy Hayes for Lakeland Local

Korgar av jeans / Baskets from jeans Ni som följer oss vet att vi älskar att återanvända saker vi har hemma. Ofta ligger det en hög med grejer och väntar på att blir omgjorda. Högen med trasiga jeans har på sista tiden vuxit oroväckande och det dags att göra något åt den. Ni behöver utslitna jeans, tråd och nål. 1. 2. 3. 4. Vi har dekorerat våra korgar med bitar av band. Korgarna är lite mjuka och man kan inte stoppa för tunga saker i dem men i vårt pysselskåp passar de utmärkt. Those of you who follow us know that we love to recycle things we have at home. You need worn out jeans, thread and needle. 1. We have decorated our baskets with pieces of ribbons. The baskets are a bit soft and you want put heavy stuff in them, but as containers for our craft supplies they’re perfect.

couture Scripted Scarf Earlier this year, I had my eye on a scarf from We Are Owls . It was cashmere, hand-painted, and gorgeous. But also more than I was willing to shell out for a scarf. source: we are owls Because I’m trapped in way-hotter-than-I-would-like weather in steamy Washington DC, I wanted to focus on cooler times: nights when the slight chill in the air calls for a scarf messily thrown around your neck, but still allows you to look polished. I told you it was simple, right? I chose some phrases out of Shakespeare’s Sonnet 47 . A Few Tips Make sure you lay something underneath the scarf/pashmina. If you try this, please do send me a link to your final version! [Love handmade products? No Sew, Tee-Shirt Halter #3, DIY I have the exciting opportunity to head to the beach for a couple of days, to relax and soak up a little of that beautiful Florida sunshine. I wanted to do one more halter top to take to wear with my jeans and this is what I came up with. It can be changed in so many ways let's just say this is a 3 in one shirt. It seems like I am packing all of my DIY tops and dresses to wear. Video Tutorial Things You Need. Tee-Shirt~ mine is a mens mediumScissorsChalk Front Cut where the red lines are. The back cut the red lines Back Cut down the middle of the back cut out.. Front after cutting NOTE* you cut one continuous line from the front to the back. Back After cutting now tie the front wrap around your neck and tie to the two straps in the back. If you want to trim off the excess off the straps. I am leaving mine so I can play and change it up some more.. or tie them into a bow. Happy Monday. Lots of <3,

un pompon avec un t shirt Learn how to turn old t-shirts into pom poms! T-shirt Pom Poms are so much more durable than tissue paper ones. And I think they look loads better! got an old tee or two {or 20!} that you don’t wear anymore? Supplies t-shirts, 1 per pom pomscissorscardboard use round objects to trace circles onto cardboard to make 2 templates like those shown above. i used a roll of tape and my camera lens cap…. the diameter of the outer circle is 6.5″ and the diameter of the inner circle is 2.5″. you can play around with different template sizes to get different sized pom poms. cut your t-shirt into 1/2″ strips. i only used from the arm pits down on each shirt. . take one strip and one template and place strips as shown close to the inner circle. sandwich the strip by putting the other template on top. take a fabric strip and place on cardboard with the end even with the outer edge. continue winding the strips around the template until you reach the other side. Warning: this next step is messy. trust me.

Apprendre à faire ses vêtements: Les astuces Apprendre à faire ses vêtements est le rêve de beaucoup de gens. Pour y parvenir, il faudra y aller pas à pas, en commençant par la simple personnalisation de tenues traditionnelles, puis par la compréhension de cette phase créative. Pour réussir à concevoir votre propre vêtement, il vous faudra, après avoir été initié aux bases, comprendre la manière, dont sont conçues vos plus belles tenues. Des vêtements personnalisés S'il n’est pas facile d’apprendre à faire ses vêtements, vous pourrez, avant de franchir le pas, apprendre à personnaliser les vêtements, que vous portez. Faire ses propres vêtements Après avoir commencé par personnaliser vos tenues, vous êtes décidés à devenir le créateur de votre mode.

Catch and Release Scarf So here is my tutorial for the Catch and Release Scarf from Anthro. Better late than never right? Materials: - 1 piece of fabric about 90 inches long- elastic thread- matching thread (all purpose)- rit dye (optional)- tailors chalk- sewing needle * Your fabric needs to be light weight, breezy, and somewhat see thru. 1 - Cut your fabric so that you have one long piece that is about 90" x 17" 2 - To finish the two long edges fold in 1/4", press, fold another 1/4", and press again. 3 - Leave the top thread of your machine with your normal all purpose thread. 4 - Using your tailors chalk, mark 3 vertical lines down the middle of your fabric - each 4 inches apart. 5 - With all purpose thread as your top thread, and elastic thread as your bottom thread, stitch all three vertical lines from top to bottom allowing it to gather as it goes. 6 - Using a sewing needle, pull the regular thread to the back and tie a knot with the elastic thread to secure ends. Finished scarf:

marilyn-creations LA CREATION A PETITS PRIX POUR TOUS LES CREATEURS Boutique Profil Vendeurs favoris Produits mis de côté Collections Boutique marilyn-creations Je vous propose des articles pour vos créations A PETIT PRIX et NEUFS aux meilleures conditions du marché. Produits mis en avant par marilyn-creations Avantages clients de la boutique Satisfait ou remboursé Livraison offerte à partir de 50,00 € de commande -10 % avec le code OCTOBRE50. + d'infos Marilyn-creations vous propose le "satisfait ou remboursé" sur toute sa boutique. Si vous n'êtes pas satisfait(e)s par votre commande, il vous suffira d'indiquer dans votre espace personnel sur le site que vous souhaitez être remboursé(e) par le créateur. Vous devrez alors réexpédier le colis au créateur avant d'être remboursé(e) sur Paypal (si vous avez payé par Paypal) ou sur votre compte bancaire (si vous avez payé par CB ou chèque). Vous trouverez ci-dessous les conditions détaillées du droit de rétractation : Vous avez 14 jours à compter de la réception de la commande pour demander votre remboursement

TUTO : torchon crocheté en lavette, 1ère ! - Creativ-idees, le blog de Casse-bonbec 3 octobre 2010 7 03 /10 /octobre /2010 02:43 Je vous ai montré, ICI et LA, mes torchons transformés en lavettes pour lavabo et ça a l'air d'en intéresser plus d'une. Comme ce n'est pas facile à expliquer (si je vous parle de "rectangles concentriques" vous allez encore me dire d'arrêter les champipi hallucinogènes, ou pire : de retourner à l'école alors que j'y suis toujours ! ), j'ai décidé de vous faire un p'tit tuto photo en 2 parties. Prenez un (vieux) torchon usé. Avec des GRANDS ciseaux, découpez les ourlets (ou décousez-les si vous en avez la patience) en arrondissant les 4 angles. Ensuite, coupez tout le torchon en 1 seule lanière d'environ 1,5 cm de large. Comment faire ? Voici comment procéder : le brin de laine représente la façon dont vous allez faire votre découpe : Et maintenant, voici ce que ça donne pendant qu'on découpe le torchon. Bon courage, c'est long à faire ! Astuce n°2 : gardez toujours à portée de main un enfant patient et serviable.

Patrons de couture gratuits à télécharger 1 Flaresbuttonbutton-type-facebook flare-iconstyle-round-bevel first" style="background-color:#0b59aa;z-index:3"> button-wrap"> button-icon">Facebook button-count">0 width=120&show_faces=false&action=like&colorscheme=light&font&height=21" scrolling="no" frameborder="0" style="border:none; overflow:hidden; width:120px; height:21px;" allowTransparency="true"></iframe>">buttonbutton-type-googleplus flare-iconstyle-round-bevel" style="background-color:#d84d2f;z-index:2"> button-wrap"> button-icon">Google+ button-count">1 buttonbutton-type-pinterest flare-iconstyle-round-bevel" style="background-color:#ce1c1e;z-index:1"> button-wrap"> button-icon">Pin It Share button-count">0 pin/create/button/? Encore une mise à jour de la page Patrons gratuits ! Dans cet ajout vous trouverez entre autre mais pas seulement : www.popcouture.fr : Des centaines de patrons et tutos en français et classés par catégories ! (que c’est moi qui l’ai fait !) Leko Leko pour hommes. Leko pour femmes. Sewingpatterns.com

Related: