
Avec des rouleaux de papier wc. Le bonhomme de neige Bonjour :) Désolée j'ai pris du retard sur mon blog.
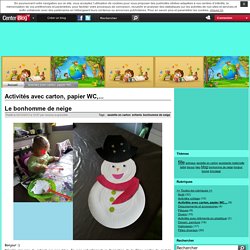
Je suis actuellement en formation de la 2ème partie du module assistante maternelle et ce 2 jours par semaine du coup moins de temps pour les activités de Noël, à mon grand regret... Ecoloquest Le blog - Agir pour l'écologie au quotidien. Les boîtes de conserves, trônant en reines dans nos placards, sont à la fois pratiques et écologiques, car 100% recyclables.
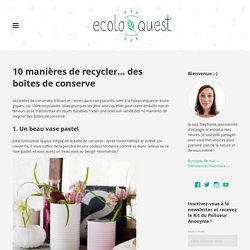
Mais pourquoi les jeter alors qu’elles pourraient embellir nos intérieurs et se transformer en objets durables ? Voici une sélection variée des 10 manières de recycler des boîtes de conserve. 1. Un beau vase pastel C’est l’utilisation la plus simple de la boîte de conserve : après l’avoir nettoyé et enlevé son couvercle, il vous suffira de la peindre en une couleur tendance comme ce blanc laiteux ou ce rose pastel, et vous aurez un beau vase au design minimaliste ! Sweet Paul Magazine 2. L’avantage de la boîte de conserve… c’est qu’elle est magnétique ! Micasa 3. Ecoloquest Le blog - Agir pour l'écologie au quotidien. Kusudama Tutorial part 1. The Japanese kusudama is a paper ball made out of multiple identical origami shapes glued together.
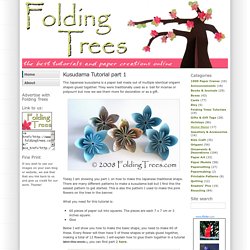
They were traditionally used as a ball for incense or potpourri but now we see them more for decoration or as a gift. Today I am showing you part 1 on how to make the Japanese traditional shape. There are many different patterns to make a kusudama ball but I find this the easiest pattern to get started. This is also the pattern I used to make the pink flowers on the tree in the banner. What you need for this tutorial is: 60 pieces of paper cut into squares.
Below I will show you how to make the basic shape, you need to make 60 of these. Fold the bottom corner to the top. Fold the left and right corners up to the middle corner. Fold the same points down. Open up the flaps you have just created and flatten them. Fold the top triangles towards you so they are level with the edges of the paper. Fold the triangles back using the crease you made earlier and glue the outside triangles together. Sewing 101: recycled paper basket. Thanks to a few recent online purchases, I had an enormous pile of long brown packing paper strips in my studio.
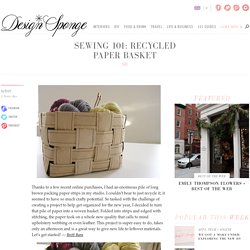
I couldn’t bear to just recycle it; it seemed to have so much crafty potential. So tasked with the challenge of creating a project to help get organized for the new year, I decided to turn that pile of paper into a woven basket. Folded into strips and edged with stitching, the paper took on a whole new quality that calls to mind upholstery webbing or even leather. This project is super easy to do, takes only an afternoon and is a great way to give new life to leftover materials. Let’s get started! Read the full how-to after the jump! Materials long lengths of paper (I used packing paper, but wallpaper scraps or gift wrap would work great, too.)sewing machineglue or hot gluepaperclips Instructions 1. Starting with a large piece of paper (mine was 30″ wide), begin folding the strips.
Next, sew along one edge of the strip, about 1/8″ or so from the folded edge. At Second Street: Upcycled Bracelets. I bought this handbag at the thrift store a while back.
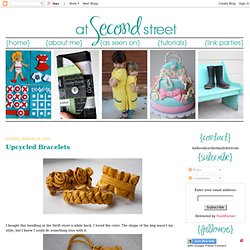
I loved the color. The shape of the bag wasn't my style, but I knew I could do something else with it. These are my creations. Other than the bag the only supplies I needed were a few beads, a needle and thread. My favorite thing about repurposing things is that most of the hard work is done for you. Now I just have to decide which one to keep and which to give away. Here is how I made them: For the Flowery Bracelet: I started by making a leather band for the base. Then I sewed seams up the sides to flatten it out. To make the flowers I cut five petal shapes. I hand sewed the petals together. After pulling it tight I sewed the two ends together to make the flower. Fiches créatives de bricolage pour enfants sur HugoLescargot.com. La rubrique Bricolage d'hugo, c'est l'occasion de sortir quelques outils, mais surtout des matériaux pour réaliser des objets : feutrine, tubes, pots, tissus, ficelles et autres matières habituées aux loisirs-créatifs.
Alors, pour s'amuser ou pour décorer, consultez nos fiches de bricolage, on est tellement fier quand on fabrique soi-même quelque chose ! Bricolage pour enfants populaires Tous les Bricolage pour enfants Avis rédigé par pikachu le samedi 31 décembre 2016 à 16:30 vous pourriez mettre des choses pour les plus grand. Avis rédigé par Lucile le dimanche 27 novembre 2016 à 18:08 C'est super juste il faudrait un peu plus de précisions dans les explications Avis rédigé par titi le jeudi 03 avril 2014 à 13:36 j'adore ce site on peut fabriquer plein d'objets originaux!!!!!!!!!!!!!!!!!!!!
Tutoriel recyclage, objets recycles, idees recup, 100 % récup, detournement objet,