
SSH Problem. Hi, I'm currently running my Pi through a serial connection but I would like to use SSH instead but I'm having problems.

When I try to connect with SSH i get "Read from socket failed: Connection reset by peer" when connecting with cygwin ("ssh pi@192.168.1.140" / "ssh 192.168.1.140") or "Network error: Software caused connection abort" when trying with PuTTy. Using "ssh -v 192.168.1.140" in Cygwin gives the following log: I've tried SSH'ing locally (ssh 127.0.0.1) on the Pi, that gives the same result. Additionally: pi@raspberrypi:~$ sudo service ssh statussshd is running. Network connection is fine, I can also ping the Pi successfully from my main computer. Any clue what my problem could be? Thanks in advance! SSH Problem. Arduino on Raspberry Pi. Connecting an Arduino to a Raspberry Pi is simple.
In a terminal, install the Arduino IDE: sudo apt-get install arduino This will take a while to download and install all of the dependencies. Once completed, you can start the IDE from the terminal: arduino Or, from the LXDE menu, Electronics->Arduino IDE. The 1 amp power supply I have connected to my Raspberry Pi was not sufficient to power both the Pi and the Arduino through the USB port, so I connected the Arduino through a powered external USB hub. Alternatively, the 5V GPIO R_Pi Pin can be used to power the Arduino. This eliminates the need for the externally powered USB hub, but can make development more of a chore due to the USB port restriction: the keyboard and Arduino will need to be swapped in and out to flash the Arduino.
Raspberry Pi Home Server. Arduino on Raspberry Pi. Raspberry Pi GPIO and Motion. This post shows how I've set up Motion with the Raspberry Pi GPIOs to indicate motion detection and video production on LEDs and a push button snapshot control.
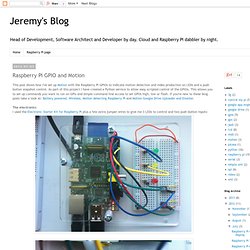
As part of this project I have created a Python service to allow easy scripted control of the GPIOs. This allows you to set up commands you want to run on GPIs and simple command line access to set GPOs high, low or flash. If you're new to these blog posts take a look at: Battery powered, Wireless, Motion detecting Raspberry Pi and Motion Google Drive Uploader and Emailer. The electronics. Connecting the Raspberry Pi with an Arduino using the UART. The use case of the GPIO pins on the Raspberry Pi are rather limited and since I have an Arduino Mega 2560 lying around I can easily connect the two.
In the next couple of weeks I’ll explain my process of connecting the Arduino with the Raspberry Pi and creating some sort of Library so the Arduino can be controlled from a web browser using a Raspberry Pi. Scratch controlling the GPIO on a RaspberryPi. Click here This post is intended to make it as Simple as Pi to get up and running and make your RaspberryPi control some lights and to respond to switches and sensors.
Minimum Requirements – a RaspberryPi with Raspbian installed and a working internet connection, a breadboard, some Light Emitting Diodes (LEDs), some resistors and some wire connectors. Total cost £5-£10. How to get a Rapsberry_Pi to control the GPIO Pins from Scratch ————————————————————— Your RaspberryPi needs to be connected to the internet to install the software but not needed to run ScratchGPIO.
Copy the text below ( left click just before the s of sudo and drag right until all the text in the line, up to and including gpio.sh, as been selected) then right-click and select copy. And then if using Raspberry Pi as a normal user, then just type (or copy and paste as before) but if your logging as as a different user then type Either way will install all the necessary extra software and some simple examples. or set pin11 on. Arduino.
Controlling an Arduino from Raspberry Pi using Processing. Hey!
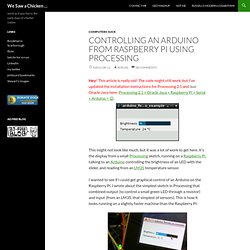
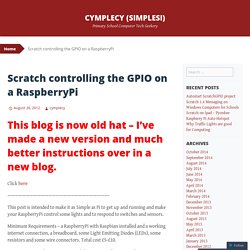
This article is really old! The code might still work, but I’ve updated the installation instructions for Processing 2.1 and Sun Oracle Java here: Processing 2.1 + Oracle Java + Raspberry Pi + Serial + Arduino = ☺. This might not look like much, but it was a lot of work to get here. It’s the display from a small Processing sketch, running on a Raspberry Pi, talking to an Arduino controlling the brightness of an LED with the slider, and reading from an LM35 temperature sensor. I wanted to see if I could get graphical control of an Arduino on the Raspberry Pi. LED at half brightness, LM35 showing 25°C LED off, sensor at 26°C LED full on, LM35 warmed up I had the same results on the Raspberry Pi; just much, much slower. Processing is both written in and generates Java, so there’s some hope that it can run on most platforms. Now fire up Processing. Despite this, it should eventually should start up fine: Now, this is slow.
Raspberry Pi – Arduino – Browser Communication. Es ist soweit.
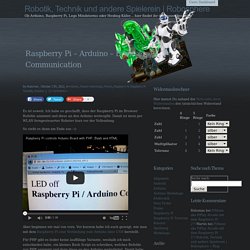
Ich habe es geschafft, dass der Raspberry Pi im Browser Befehle annimmt und diese an den Arduino weitergibt. Damit ist mein per WLAN ferngesteuerter Roboter kurz vor der Vollendung. So sieht es dann am Ende aus :-): Aber beginnen wir mal von vorn. Vor kurzem habe ich euch gezeigt, wie man mit dem Raspberry Pi eine Verbindung zum Arduino über USB herstellt. Für PHP gibt es leider keine lauffähige Variante, weshalb ich mich entschieden habe, ein kleines Bash Script zu schreiben, welches Befehle von PHP annimmt und dann diese an den Arduino weiterleitet. Hier das Script für den Connect (arduino-connect.sh): screen -S arduino /dev/ttyACM0 115200sleep 2echo "Connected to Arduino" Der Sleep ist leider notwendig, da es einen kurzen Moment dauert, bis die Connection für Befehle freigegeben ist.
Arduino + Raspberry Pi + Sending data to the web. Ever since I needed a simple thermocouple data logger at work and found that they cost at least $600, it's been a little bit of a hobby of mine to get small, cheap computers to do useful things.
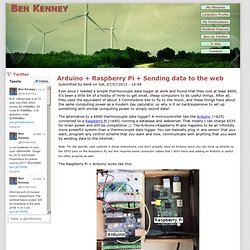
After all, they used the equivalent of about 3 Commodore 64s to fly to the moon, and these things have about the same computing power as a modern day calculator, so why is it so hard/expensive to set up something with similar computing power to simply record data? The alternative to a $600 thermocouple data logger?