
Raspi – Capteur de temperature DS18B20. Raspberry Pi – Sommaire Bonjour à tous.

Allez hop, on va enfin pouvoir tester un peu des capteurs de températures. Pour le moment, il va nous falloir : - Un capteur DS18B20 (~1 euro) - Un résistance de 4300 Omhs (~1 centime :p) Capteur DS18B20 J’ai enfin reçu mes résistances de 4300 Ohms, 2 semaines après avoir reçu mes capteurs de températures DS18B20. Si vous n’êtes pas anglophobes, vous pouvez vous référer au très bon tutoriel d’adafruit et aux explications sur le site de cambridge. Sachez aussi qu’il existe une version étanche de ce capteur, si vous avez envie de vous en servir pour mesurer la température de l’eau dans un aquarium par exemple.
Le Montage Le montage est assez simple et bien expliqué par adafruit. Montage du capteur DS18B20 Il faut par contre absolument faire attention au sens de connexion des pins du capteur. Si vous avez un doute, touchez le capteur juste après avoir mis votre circuit sous tension. A part cela le principe est simple : Et hop, le montage est terminé ! SB-Projects: Projects: Raspberry Pi. Temperature Measurements When you're backing a raspberry pie it is very important to keep a close eye on the temperature.
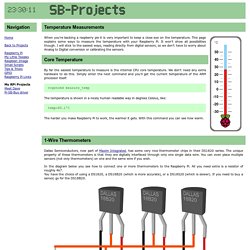
This page explains some ways to measure the temperature with your Raspberry Pi. It won't show all possibilities though. I will stick to the easiest ways, reading directly from digital sensors, so we don't have to worry about Analog to Digital conversion or calibrating the sensors. Core Temperature By far the easiest temperature to measure is the internal CPU core temperature.
Vcgencmd measure_temp The temperature is shown in a nicely human readable way in degrees Celsius, like: temp=40.1'C The harder you make Raspberry Pi to work, the warmer it gets. 1-Wire Thermometers Dallas Semiconductors, now part of Maxim Integrated, has some very nice thermometer chips in their DS1820 series. In the diagram below you see how to connect one or more thermometers to the Raspberry Pi.
Warning: Don't use the DS18x20-P versions! w1-gpio w1-therm cat 10-000800575c8b/w1_slave I2C Thermometers. Fabaff/mqtt-panel. Ben's Place. Node-RED added some new authentication/authorisation code in the 0.10 release that allows for a plugable scheme.
In this post I’m going to talk about how to use this to make Node-RED use a LDAP server to look up users. First of all, to do this properly we will need to enable HTTPS to ensure the communication channel between the browser and Node-RED is properly protected. This is done by adding a https value to the settings.js file like this: You also need to un-comment the var fs = require(‘fs’); line at the top of settings.js. You can generate the privkey.pem and cert.pem with the following commands in your node-red directory: The important bit is the Common Name value, this needs to match either the name or IP address that you will use to access your Node-RED console. Since this is a self signed certificate your browser will reject it the first time you try to connect with a warning like this: Usernames and Passwords The source for the module can be found here or on npmjs here. Controlling LIRC from the web - alexba.in. In this post I will cover how to create a web interface + API for LIRC, the Linux Infrared Remote Control project.

I will be using NodeJS and a RaspberryPi in this post, but the ideas generalize to other languages and hardware. This post will serve as Part 3 of my open source universal remote project posts. If you haven’t had an opportunity to read the first two posts, I suggest checking out Universal remote experiments (Part 1) and Setting up LIRC on the RaspberryPi (Part 2) before proceeding. You may also want to read Installing NodeJS on your RaspberryPi, where I cover installing NodeJS. If you’re completely new to the RaspberryPi and want to learn more I wrote a RaspberryPi Quickstart post which covers everything from purchasing the parts to configuring the WiFi. With that out of the way, let’s get started! Why a web interface + API? LIRC is an awesome open source project that handles all of the low level requirements of sending and receiving Infrared commands from a Linux computer.