
How to multiplex with LEDs. Arduino Code - Kevin Darrah. Open-source Arduino Clock. DIY: Binary Clock with Arduino « « DanielAndrade.net DanielAndrade.net. Arduino Digital Vibration Sensor module - Geeetech Wiki. Introduction The Arduino vibration sensor module is based on vibration switch component which can detect the weak vibration signals.

The sensor can work for vibration-related modules. Product Performance: The conductive pin will make an instant turn-on (ON) state when touched by the outside force to achieve the proper vibration force, or an appropriate speed from the (partial) energy. No direction, any angle may burst. Specification On-Time: 0.1ms Open circuit resistance: 10Mohm Pin definition Usage VCC - 5V GND - GND S - Digital pin3 Example code How to buy it Click here to buy vibration sensor.
Hardware. Creating custom character: LCD Tutorial for interfacing with Microcontrollers - 8051 Microcontroller Projects AVR PIC Projects Tutorials Ebooks Libraries codes. As already explained, all character based LCD of type HD44780 has CGRAM area to create user defined patterns.
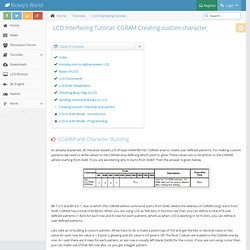
For making custom patterns we need to write values to the CGRAM area defining which pixel to glow. These values are to be written in the CGRAM adress starting from 0x40. If you are wondering why it starts from 0x40? Then the answer is given below. Bit 7 is 0 and Bit 6 is 1, due to which the CGRAM adress command starts from 0x40, where the address of CGRAM (Acg) starts from 0x00. Lets take an of bulding a custom pattern. To explain the above explaination in a better way. Now we get the values for each row as shown. Jouons un peu avec Le Deuligne... Caractères spéciaux. Jouons un peu avec...

Une fois le shield Deuligne correctement monté et la librairie installée, nous allons pouvoir essayer quelques petits sketchs sympathiques (Il y a aussi pas mal d'exemples dans la librairie, ne pas hésiter à les parcourir !!) Création de caractères spéciaux : Matériel mis en oeuvre :Un deuligne... évidemmentUn arduino... (voir commentaire précédent) Les écrans à cristaux liquides placés sur le shield "Le deuligne" peuvent stocker 8 caractères crées par l'utilisateur. Pour exemple aujourd'hui, on se propose d'insérer le logo de Snootlab (enfin, une version très pixelisée) dans du texte.
I2C Tutorial. Using the I2C Bus Judging from my emails, it is quite clear that the I2C bus can be very confusing for the newcomer.
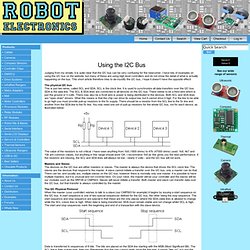
I have lots of examples on using the I2C bus on the website, but many of these are using high level controllers and do not show the detail of what is actually happening on the bus. This short article therefore tries to de-mystify the I2C bus, I hope it doesn't have the opposite effect! The physical I2C bus This is just two wires, called SCL and SDA. SCL is the clock line. The value of the resistors is not critical. Masters and Slaves The devices on the I2C bus are either masters or slaves. The I2C Physical Protocol When the master (your controller) wishes to talk to a slave (our CMPS03 for example) it begins by issuing a start sequence on the I2C bus. Data is transferred in sequences of 8 bits. How fast? I2C Device Addressing All I2C addresses are either 7 bits or 10 bits. As an example, you have an SRF08 at the factory default address of 0xE0. Easy isn't it? View topic - LiquidTWI: High-performance LCD library for I2C Backpack Module.
I like fast things.

And I like clean code. Often, the two go hand-in-hand ;) After looking through the modified LiquidCrystal library for use with the i2c backpack and darn near crying when I saw all the faux digitalRead() and pinMode() being done on each transfer, I was bound and determined to never let that happen to another friendly Arduino user again. I first made a proof of concept modification to the library to "burst" all the "LiquidCrystal::send" bits instead of digitalWrite()'ing them out one at a time (read I2C, modify, write... read, modify, write... read, modify, write... read, modify, write - over 16 I2C commands for each single character). It worked great. OK, so the next step... package it up into something usable.
Of course, next on my to-do list is a proper animation library for character LCDs. :) LiquidTWI library is attached to this post, also mirrored here: ... -1.5.1.zip Hope it helps!