
Raspberry pi: nRF24L01 and TCP. This time I will describe how I got a Raspberry pi (Wheezy) to work as a Python server that controls a RF-transmitter (nRF24L01).
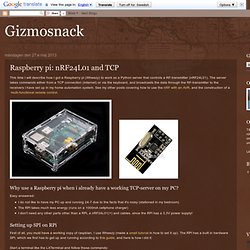
The server takes commands either from a TCP connection (internet) or via the keyboard, and broadcasts the data through the RF-transmitter to the receivers i have set up in my home automation system. See my other posts covering how to use the nRF with an AVR, and the construction of a multi-functional remote control. Why use a Raspberry pi when i already have a working TCP-server on my PC?
Easy answered:I do not like to have my PC up and running 24-7 due to the facts that it's noisy (stationed in my bedroom)The RPi takes much less energy (runs on a 1000mA cellphone charger)I don't need any other parts other than a RPi, a nRF24L01(+) and cables, since the RPi has a 3,3V power supply! Setting up SPI on RPi. PiCar Preliminar Electrical Concept.
So, What does PiCar mean?
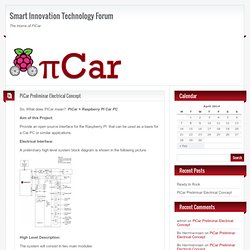
PiCar = Raspberry PI Car PC Aim of this Project: Provide an open source interface for the Raspberry PI that can be used as a basis for a Car PC or similar applications. Electrical Interface: A preliminary high level system block diagram is shown in the following picture. High Level Description: The system will consist in two main modules: The Raspberry Pi.A Vehicle I/O interface. The Raspberry Pi is a well know module. The Raspberry PI has two USB interfaces, one will be kept spare to interface to either WiFi, Bluetooth or GPS modules and the other will be used to communicate with the Vehicle I/O interface.
The Vehicle I/O interface is a custom board developed by Sinno to adquire information from the vehicle and provide a video conversion from the Raspberry Pi HDMI interface to LVDS. The Vehicle I/O interface is controlled by a Freescale Kinetis K20_100 microcontroller: MK20DN512VLK10. A RS232 interface able to run up to 115.2Kbps is also provided for debuging purposes. [WIP] Joggler - a new skin designed for touch interface with touchscreens. Hi, First, I want to thank the developers for all the good thing about this software, especially what happened in the last 3 years.
![[WIP] Joggler - a new skin designed for touch interface with touchscreens](http://cdn.pearltrees.com/s/pic/th/interface-touchscreens-55442992)
I made a xbmc Skin for this one (O2-Joggler Hardware) . I hope the performance is good - Now that the demand increases I now had to open a therad. (and sorry for my bad English) Since I only own hardware Joggler as touch, I can only test here. Google Translate. Raspberry Pi GPIO home automation. Raspberry Pi ON/OFF Power Controller, Power up Your Raspberry Pi with Latching Push-button Controlled MOSFET Switch.
It would be convenient to use a momentary contact push button switch to turn ON and turn OFF your Raspberry Pi (RPi).
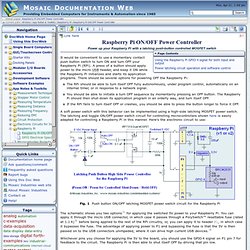
A press of a button should apply power to the micro USB header, and keep it ON while the Raspberry Pi initializes and starts its application programs. There should be several options for powering OFF the Raspberry Pi: Raspberry Pi Shutdown Switch – Safely Turning off the Pi. Posted on January 14, 2013 by 3cc in Hardware We use a model B rev 2.0 Raspberry Pi as one of our Samba and DLNA media servers, and normally turn it off through a Webmin control panel to ensure nothing untoward happens with any of the attached hard drives.

This solution is less than ideal however, as it requires a second powered-on device and a couple of clicks to get to the shutdown page in the control panel. The Raspberry Pi forum has am excellent thread about a simple & safe shutdown button, from which I copied to produce my shutdown switch. It’s something you can put together in less than 20 minutes if you have the parts. All you need is to install the RPi.GPIO Python class on the Pi (use SSH to grab it, “wget unzip it; and install it, “sudo python setup.py install”; then remove the files to tidy it all up), and you can start accessing the pins via Python scripts.
Downloads - Skins. Adding 7inch display with touchscreen to Raspberry PI. Hi!
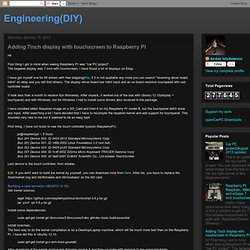
First thing I got in mind when seeing Raspberry PI was "car PC project". The targeted display was 7 inch with touchscreen. I have found a lot of displays on Ebay. I have got myself one for 85 dollars with free shipping(this; if it is not available any more you can search "reversing driver board hdmi" on ebay and you will find others).
The display driver board has hdmi input and an on board resistive touchpanel with usb controller board. It took less than a month to receive it(in Romania). I have installed latest Raspbian image on a SD_Card and tried it on my Raspberry PI model B, but the touchpanel didn't show any input. First thing, I have run lsusb to see the touch controller type(on RaspberryPI): pi@raspberrypi ~ $ lsusbBus 001 Device 002: ID 0424:9512 Standard Microsystems Corp. Last device is the touch controller, from eGalax. Edit: If you don't want to build the kernel by yourself, you can download mine from here. Building a new kernel(in UBUNTU 12.10).Get kernel sources. mkdir .. .