
Ni-c/raspberry2c. OWFS with i2c support on Raspberry Pi (English version) - Temperatur.nu/m.nu Wiki. This guide will help you to get OWFS working on Raspberry Pi's i2c GPIO port.
To get full OWFS support using the i2c bus the Raspberry Pi. This guide is written based on a clean install of Raspbian Wheezy (2013-05-25). Make sure that the i2c-bus module is not included in the blacklist file. I2C and the Raspberry Pi. Well I2C was the obvious next candidate for a driver.
Another active Raspberry Pi coder, Frank Buss, wrote some nice driver code but sadly didn’t integrate it with Linux’s own i2c driver framework. It worked, though not as I wanted it. He did the hard work. I then took his code (with his permission of course) and wrote a Linux i2c driver for it today. R-Pi i2c 1wire expansion module [v1.1] ADC Pi Raspberry Pi I2C Analog-to-Digital Converter boards available to buy online. 14. 09 2012 00:31 by brian 6 Comments After a huge response to the post for the Raspberry Pi I2C Analog to Digital Converter and being featured on the Hackaday website we decided to go ahead and build Raspberry Pi I2C Analog-to-Digital Converter boards to sell online.
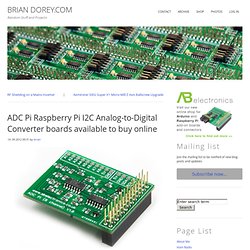
The new board is a 8 channel Analogue to Digital Converter, Buffered 5V i2c interface, stackable Design using the same style of stackable headers as used on Arduino boards we also stock the connectors for the Raspberry Pi and Arduino boards. The ADC Pi is an 8 channel 15 bit analogue to digital converter designed to work with the Raspberry Pi platform. The ADC Pi is based on two Microchip MCP3428 A/D converters each containing 4 analogue inputs with up to 16 bit resolution.
The MCP3428 is a delta-sigma A/D converter with low noise differential inputs. A voltage divider on the ADC Pi board brings the input voltage range to a much more useful 0 – 5.06V. 1-wire and/or i2c - beginner help... Hello!
I am planning a combined solar/wood heating system in my old house. Quite a job picking the right part for it, but that belongs elsewhere. What I seek here, is some basic guidelines on building a control/monitoring system running on a rPi Alright, my needs should be fairly simple for many of you in here, but I'm a little lost: I need about 12 temperature sensors (measuring water and air temperatures between 4 and 100 °C), and store the temperatures in a MySQL database. Since I'm a limited software programmer, I intend to use Cron to execute a PHP script, and send commands to a relay when measured temperatures goes higher or lower than whats desired. Now, I could head over to hobby-boards.com (please remove the link if not allowed here), and buy a 1-wire USB adaptor, sensors and two relays, and build it all for the 1-wire bus - but is it the best way to go?
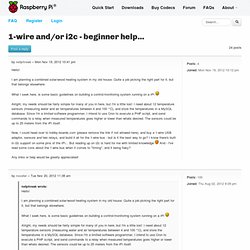
And - I've read some cons about the 1-wire bus when it comes to "timing", and it being flaky? RaspberryPi @Homelabs » i2c connected 1-wire masters. OWFS the 1-Wire filesystem allows the use of i2c connected bus masters.
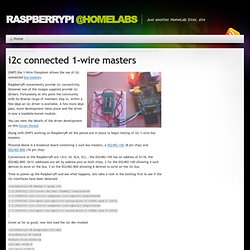
RaspberryPi conveniently provide i2c connectivity. However non of the images supplied provide i2c drivers. Fortunately at this point the community with its diverse range of members step in, within a few days an i2c driver is available. A few more days pass, more development takes place and the driver is now a loadable kernel module. You can view the details of the driver development on this forum thread. Along with OWFS working on RaspberryPi all the pieces are in place to begin testing of i2c 1-wire bus masters. Pictured above is a breakout board containing 2 such bus masters, a DS2482-100 (8 pin chip) and DS2482-800 (16 pin chip) Connections to the RaspberryPi are +3v3, 0v, SCA, SCL , the DS2482-100 has an address of 0×18, the DS2482-800 0x1C addresses are set by address pins on both chips, 2 for the DS2482-100 allowing 4 such devices to exist on the bus, 3 on the DS2482-800 allowing 8 devices to exist on the i2c bus.
I2C Installation for Raspberry Pi – Step by Step Guide. This is a step by step guide on installation I2C driver for the Raspberry Pi.
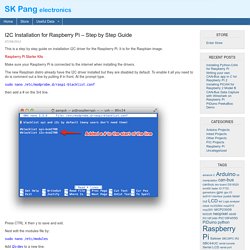
It is for the Raspbian image. Raspberry Pi Starter Kits Make sure your Raspberry Pi is connected to the internet when installing the drivers. The new Raspbian distro already have the I2C driver installed but they are disabled by default. To enable it all you need to do is comment out a line by putting # in front. Sudo nano /etc/modprobe.d/raspi-blacklist.conf then add a # on the 3rd line. Press CTRL X then y to save and exit. Ni-c/node-rasp2c-example.