
Animazione delle Immagini Fisse ⋆ Total-Photoshop. Effetti audio e transizioni video in Adobe Premiere Pro. Make GIFS in Premiere Pro — Premiere Gal. Premiere has yet to include a .GIF export option in the export settings.
So, you first need to export your GIF creation as a .MP4 file from Premiere Pro. But then you can download free software that converts your .MP4 into a .GIF format. If you want to add your GIF to Instagram, you need to use the .MP4 file, as Instagram does not accept the .GIF format. So there is one benefit of creating your GIF into a .MP4 before you convert to a .GIF format. In the video tutorial, I used GIFROCKET (free software) to convert my .MP4 GIF into a .GIF file format, but GIFROCKET only available for Macs.
KickMyGraphics 2.0 (for windows)Zamzar (Online converter, can be used on MAC or PC)Instagiffer (MAC & PC) Premiere Pro: Esportare con Adobe Media Encoder. Se la risposta è tantissime sei in buona compagnia!

In ogni caso il vero problema dell’esportazione fatta direttamente da Premiere Pro è che, una volta l’ancia l’export, non puoi più utilizzare il programma. Ebbene sì, l’export occupa il software e a te non resta che guarda la posta in arrivo, fare le faccende di casa, bere il caffè… tuttavia c’è un modo per poter ottimizzare al meglio il tuo flusso lavorativo ed essere produttivo al massimo.
Segnatempo su video aiuto! Hollywood Color: 14 Free Premiere Pro Lumetri Looks. Top images via 20th Century Fox and Shutterstock.

Keyboard Layouts. How To: Using Lumetri Color’s HSL Secondary controls in Premiere Pro CC. In Premiere Pro CC 2016.3, we added a new HSL Secondary section to the Lumetri Color panel.
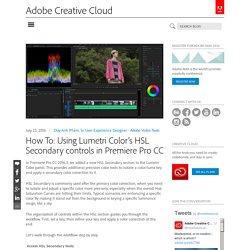
This provides additional precision color tools to isolate a color/luma key and apply a secondary color correction to it. HSL Secondary is commonly used after the primary color correction, when you need to isolate and adjust a specific color more precisely, especially when the overall Hue Saturation Curves are hitting their limits. Typical scenarios are enhancing a specific color by making it stand out from the background or keying a specific luminance range, like a sky. The organization of controls within the HSL section guides you through the workflow. First, set a key, then refine your key and apply a color correction at the end.
Let’s walk through the workflow step by step. Access HSL Secondary tools First, switch to the Color workspace by selecting it from the workspace bar at the top of application window. Pick the target color Now you should have a good starting point. Show, tweak and refine mask. Adobe Premiere Clip ⋆ Total Photoshop. Premiere CS5: impostare correttamente il progetto video ⋆ Total Photoshop. Destination Publishing in Adobe Premiere Pro and Media Encoder. Introduction Destination Publishing allows you to render and share video to popular web locations – giving you a super-fast delivery system for public or password protected content.
Whether you are posting it to your favorite social media site or sharing it to your clients via an FTP server, Adobe Premiere Pro and Media Encoder have you covered. As of the Fall 2015 release of Creative Cloud, you can publish your videos to 5 different destinations: Adobe Creative CloudFacebookFTPVimeoYouTube We will cover each of these options in greater detail below. Setting up the encode Before you can publish to any of the supported destinations, you will first need to set up your publishing settings. To access the publishing settings: L'interfaccia di Premiere Pro - Graphixmania.it. Nel precedente tutorial dedicato ad adobe premiere abbiamo visto come avviare un nuovo progetto e qualche nozione base sui tipi di filmato, adesso è il momento di familiarizzare con l’interfaccia del programma.
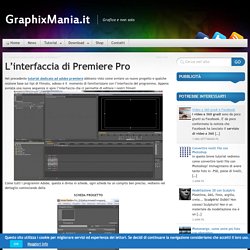
Appena avviata una nuova sequenza si apre l’interfaccia che ci permette di editare i nostri filmati Come tutti i programmi Adobe, questa è divisa in schede, ogni scheda ha un compito ben preciso, vediamo nel dettaglio cominciando dalla. Master Class PR: Tecniche di editing - Total-Photoshop Premium. Sia che tu sia un principiante alle prime armi, un professionista abituato ad utilizzare altri software oppure un autodidatta che ha cominciato a imparare da solo, questa Master Class è l'ideale per toglierti tutti i dubbi e iniziare ad utilizzare Adobe Premiere al meglio.

Esercitazioni pratiche, esempi semplici e reali, argomenti chiave trattati in maniera semplice, sono gli ingredienti di questa nuova Master Class. Tutorial: Exporting for Digital Cinema with Adobe Premiere Pro and Adobe Media Encoder CC 2014 - Streaming Media Producer. A key concern for any producer is to ensure that the work you produce will play back on as many platforms (online, mobile, broadcast) as possible.

Until recently, delivering content in digital cinema environments was the exclusive province of high-end facilities with specialized equipment. But with the release of Adobe Media Encoder CC 2014 and its Wraptor DCP plug-in, DCP has become just another export option, putting digital cinema delivery well within the reach of any Adobe CC user. Here how it you can add it to your offerings when your clients or projects demand it. Adobe released an update to all of its Creative Cloud applications last week, and one of the new features available in Premiere Pro and Adobe Media Encoder is the ability to export a Digital Cinema Package.
Derek Lieu – Editor » 26 Simple Tricks For Faster Editing (Premiere Pro CC) This is a list of the keyboard shortcuts, features and techniques that I use most frequently in my day to day editing that help me edit faster.
I made this video/blog post because almost no one talks about the small trimming shortcuts that aren’t very sexy, but will shave seconds from the most frequently performed tasks. This covers the most basic (seriously, you’ll wonder to yourself “Does this REALLY qualify as a tip???”) To advanced trimming shortcuts that you might not even know exist. As of the writing of this post, the keyboard shortcut system in Premiere Pro leaves much to be desired, so I wouldn’t be surprised if you overlooked many of these. At the end of each entry I also include the equivalent function in Final Cut Pro 7, Final Cut Pro X and Avid Media Composer (assuming it exists). Here we go! 0. 1. Tutti registi con Premiere. Le tecniche e gli strumenti per realizzare un ... - Marco Petri.
Work directly with native camera formats. In this video you’ll see how easy it is to work with several formats within one Premiere Pro project: ARRI AMIRA, Canon EOS C300 and EOS-1D C, GoPro Hero, LongG on a Panasonic, RED media, and Sony F55.
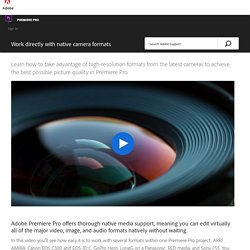
You can pretty much disregard the format you’re working with when cutting with Premiere Pro. Enhanced format support: Premiere Pro enables you to work with the vast majority of formats natively — including 4K, 5K, and 6K RED media; XAVC; ProRes; and DNxHD — without transcoding or file rewrapping. Premiere Pro supports Sony SStP and Canon RAW, and also CinemaDNG formats. You can mix formats on a single timeline and still expect the best-quality performance on a well-configured system — that is, a multicore CPU and modern GPU with a minimum 1 GB of video RAM and high disk throughput.Enhanced graphics performance: The Mercury Playback Engine takes full advantage of supported GPUs so you get smoother playback without rendering.