
Autunno..torna la voglia di leggere!! Bentrovate dopo questa lunga pausa estiva!!
Vi ritrovo ad autunno appena iniziato, e vi guiderò nella creazione di un segnalibro con cuciture in libertà, adatto ai libri che sicuramente appena farà più fresco, riappariranno nelle nostre mani, sotto un pile, alla sera sul divano :) : Vi occorrono ritagli di lino, ritagli di stoffine americane, ritagli di ovatta adesiva su un lato e di teletta di rinforzo ( o anche Vliesofix..) un pezzetto di nastro, un bottone ( TUTTO reperibile nello shop di Hobby di carta ) ma soprattutto una macchina da cucire, perchè finalmente NON faremo cuciture dritte ma ci divertiremo a disegnare con l'ago! Ritagliate dall'ovatta adesiva due cuori, e stirateli sul retro delle due stoffine americane. Tagliate il contorno del cuore con la forbice a zig zag tenendovi leggermente al di fuori dell'ovatta.
Su questa linea, senza ancora ritagliare nulla, cucite con filo bianco seguendo il tratto della penna, lungo tutto il perimetro. Alla prossima!! Mommi. Big heart tote bag Organic Love in red di lacreatureandyou. Portable game console case – DIY tutorial. My daughter has been asking for a case for her portable game console for ages.
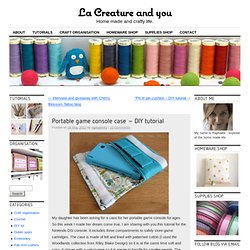
So this week I made her dream come true. I am sharing with you this tutorial for the Nintendo DSi console. It includes three compartments to safely store game cartridges. The case is made of felt and lined with patterned cotton (I used the Woodlands collection from Riley Blake Design) so it is at the same time soft and cosy. It closes with a velcro tape so it is easier to handle for smaller people. The project is of medium difficulty, it may take from 3 hours to half a day to complete. Supplies For this project you will need: Two pieces of felt: a 31×18.5 cm (12.2×7.3”) piece and a 4×12 cm (1.6×4.7”) pieceThread matching felt colourLining fabric: a 31×18.5 cm (12.2×7.3”) pieceVelcro tape: approximately 19 cm (7.5”) Optional – for appliqué: Fabric matching lining and featuring motives that can be used for appliquéThread matching appliqué fabricFusible interfacing fabric 1 – Adding velcro to lining fabric.
Make a felt pencil case – easy felt project (1/3) As I am about to open my new supplies boutique (this is happening tomorrow, remember?)
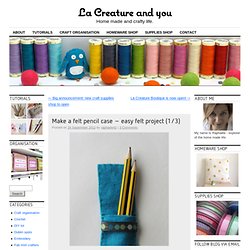
, I thought I would celebrate with a series of 3 easy sewing projects using felt. Here is the first instalment: the quick and easy pencil case. This simply designed case can accommodate two to three pencils and would fit in most (hand)bags. It is made of three pieces of felt and some ribbon. It can usually be completed within one hour. Burlap Christmas ornament – DIY tutorial. It is about time I post the second tutorial of the Christmas 2012 series.

The first one was this felt mini stocking ornament. Today we make a lovely bauble like ornament with burlap, some ribbon and felt scraps. Burlap is a beautiful though a bit tricky to work with material. It is not easy to cut it straight and it ends to fray a lot. For this project we will use fusible interfacing to prevent this to happen. Apart from that this is an easy project that offers as many variations as you can imagine. "My Cup of Tea" Tea Bag Pouch Tutorial. I like to take my own tea with me whenever we go camping or just whenever we travel.
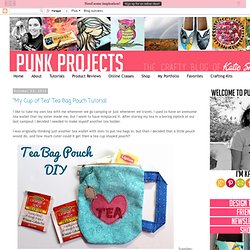
I used to have an awesome tea wallet that my sister made me, but I seem to have misplaced it. After storing my tea in a boring ziplock at our last campout I decided I needed to make myself another tea holder. I was originally thinking just another tea wallet with slots to put tea bags in, but then I decided that a little pouch would do, and how much cuter could it get then a tea cup shaped pouch?! Supplies: Fabric, zipper, sewing machine 1. 2. 3. 4. 4. Bolsa, por reutilização de gravatas... - Reciclagem , Jardinagem e Decoração. Car seat organizer tutorial « 8th Day Creations. Ta Da!
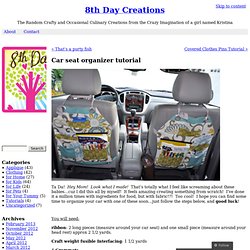
Hey Mom! Look what I made! That’s totally what I feel like screaming about these babies…cuz I did this all by myself! It feels amazing creating something from scratch! I’ve done it a million times with ingredients for food, but with fabric!?! You will need: ribbon: 2 long pieces (measure around your car seat) and one small piece (measure around your head rest) approx 2 1/2 yards. Craft weight fusible Interfacing: 1 1/2 yards 4 Grommets 1 yard main canvas weight fabric 1 yard accent canvas weight fabric and back of organizer.
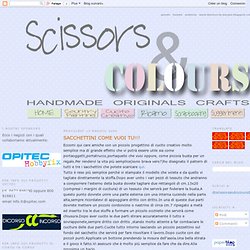
SACCHETTINI COME VUOI TU!!! Eccomi qui care amiche con un piccolo progettino di cucito creativo molto semplice ma di grande effetto che vi potrà essere utile sia come portaoggetti,portatrucco,portaquello che vuoi oppure, come piccola busta per un regalo.Per rendervi la vita più semplice(sono brava vero?)
CreativeMamy - bella idea tovaglietta e porta posate. Rosely Pignataro. CreativeMamy - carinissima borsa con cartamodello Cris. CreativeMamy - cestino porta strumenti. CreativeMamyporta chiavi-cuffie - grazioso tutorial.