
Bike Basket Liner. How to Make a Bike Basket Liner designed by Simplicity Creative Group Keep it all together in style, with a custom bike basket liner that shows off your personal style while it helps hold everything securely while you're on the go. We suggest mid-weight cotton twill, denim, or even laminated fabrics in fun colors and prints. You will need: NOTE: Read instructions carefully before starting this project. Making the Pattern: With the basket placed upside down, measure the height of the basket.
Making the Bike Basket Liner: Using the pattern , cut one of fabric and one of lining. Creative Group - 3/8" Scroll Braid. Sub Page - Sewing Patterns. Harbor Tote. CELINE CLUTCH DIY. Solo tuve que verlo una vez para sentir amor a primera vista When I saw this clutch I fall in love!
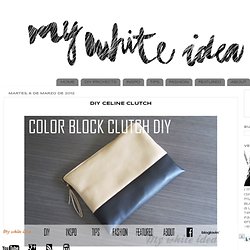
Necesitamos:We need: CremalleraZipper Telas Fabric Los materiales del Clutch me costaron 2€ Faux Vintage Quilt Fun. I adore vintage quilts.
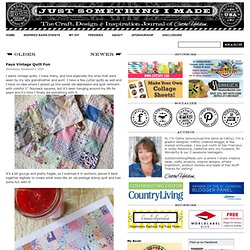
I have many, and love especially the ones that were sewn by my late grandmother and aunt. I have a few cutter quilts as well and I have no idea where I picked up this sweet old depression-era quilt remnant with colorful 2″ floursack squares, but it’s been hanging around my life for years and it’s time I finally did something with it. It’s a bit grungy and pretty fragile, so I scanned it in sections, pieced it back together digitally to create what looks like an old postage stamp quilt and had some fun with it!
I printed out the quilt image onto plain paper and with my sewing machine stitched along the squares. With one 8.5″ x 11″ sheet and my pinking shears I was able to wrap these two altar candles (about $1 at the grocery store) and tie up with string and buttons. I also printed the image onto an inkjet T-shirt transfer for dark shirts and pressed that onto a piece of leather. How to make tiny bows @ Do It Yourself Pins. Organizing Fabric Remnants. Over the weekend I did a bit of destashing of bins and bins of fabric remnants that I had let pile up in my craft shed and barn.
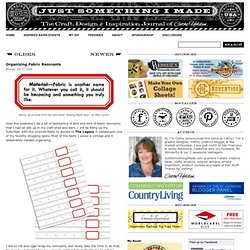
I will be filling up my Suburban with the unloved fabric to donate to The Legacy in Sebastopol, one of my favorite shopping spots. Most of the fabric I saved is vintage and it desperately needed organizing. I like to roll and cigar-wrap my remnants, but rarely take the time to do that. On Sunday, I designed some wraps to print out to motivate me to get ’er done.
And of course, I made them for you, too. I cut along the margin edge of each sheet to remove the white non-printed section (so when the bands overlap, the image blends onto itself,) then cut between each graphic to make the strips. Before rolling my fabric, I measured each and wrote the dimensions on the label of the wrap. I placed a 12-inch piece of tape on the table as a folding guide so that all my rolls would be uniform in length. I wrapped the roll with the band and secured with clear tape. Share. Cute shirt tutorial. Handkerchief Valance. Sewing 101: image transfer produce bags. With farmers’ market season upon us, it’s always a good idea to have lots of reusable produce bags on hand.

But the problem with regular cloth bags is that they’re not see-through, making it easy to lose track of what’s in the fridge and resulting in tragic forgotten-vegetable casualties. To help keep track of what you’ve got, whip up some of these image transfer bags. Simply snap some shots of the veggies you buy most, print them out on photo transfer paper and iron the images onto these easy-to-sew muslin bags. Never lose your Swiss chard again. — Brett Bara Read the full how-to after the jump . . .
Materials cotton muslin fabriciron-on transfer sheetsphotos of your favorite producetwine or ribbonsewing machine, iron and basic sewing supplies 1. To begin, cut a piece of muslin fabric that is twice the size you’d like your finished bags to be, plus a couple extra inches for the drawstring casing. Sewing 101: fabric boxes. It seems no matter what I do, I can never get a handle on all the tiny odds and ends that accumulate around my house.
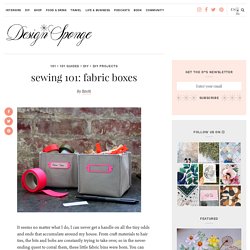
From craft materials to hair ties, the bits and bobs are constantly trying to take over, so in the never-ending quest to corral them, these little fabric bins were born. You can make one of these soft boxes in almost no time, and in almost any size, so you can customize them to perfectly fit whatever you need to hold. Top each one off with a label holder (also customizable in any shade of the rainbow, thanks to nail polish), and you’ll have a leg up on clutter . . . for a little while, at least. — Brett Bara Read the full how-to after the jump . . . Materials a sturdy fabric, such as canvasthread to matchsewing machine, iron and basic sewing supplieslabel holdersnail polish (optional)