
40 sewing hack, tips & tricks that you should know!
SEWING - Knits Lycra Elastic. Seams & Hems. Buttonholes. Gathering Ruching Shirring. Facing Interfacing Linings. Blogs of Tutorials. Pockets. Rounded Corners and Binding. I have decided after seeing Nettie's rounded corner quilts here and here that I fancy the effect for this quilt.
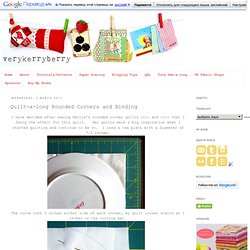
Her quilts were a big inspiration when I started quilting and continue to be so. I used a tea plate with a diameter of 7.5 inches. The curve runs 3 inches either side of each corner, my quilt corner starts at 1 inches on the cutting mat. I pinned the curves about an inch from the edge after I cut them just to hold them for the next stage. I always zig zag around the edges of any quilt before I bind, from a coaster to a full size quilt. I worked out how much binding I needed using Julie at Jaybird Quilts wonderful bias tute and calculation table.
Press the binding in half long ways- this takes ages! I use the Red Pepper binding method but with some adjustments. About 12 inches before the end of the binding meets the start, stop, secure and get ready to join the binding ends together. Turn the quilt over. Piecing Strips on Diagonal with Serger. Last week I posted a quick how-to on ruffling with your serger.
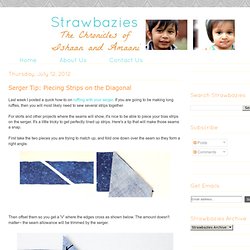
If you are going to be making long ruffles, then you will most likely need to sew several strips together. French seam a dart. After making my emerald shift dress I found I was left with about 70cm of fabric, so I thought while the sewing machine is still threaded up with green thread, I would put this remainder to good use by making a camisole top - the #101 top from Burda 12/2006 to be exact!
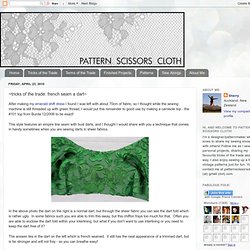
This style features an empire line seam with bust darts, and I thought I would share with you a technique that comes in handy sometimes when you are sewing darts in sheer fabrics. In the above photo the dart on the right is a normal dart, but through the sheer fabric you can see the dart fold which is rather ugly. In some fabrics such you are able to trim this away, but this chiffon frays too much for that.
Often you are able to enclose the dart fold within your interlining, but what if you don't want to use interlining or you need to keep the dart free of it? The answer lies in the dart on the left which is french seamed. I have used this method many times now, and still haven't seen it documented anywhere else. Twenty Tips for Topstitching. I promised to write this post AGES ago, and here it finally is – my top tips for topstitching, gained through many hours of frustration, swearing, and unpicking tangled threads from my Bernina.
The basics: Use topstitching thread in your top spool, normal thread in your bobbin.You must use a topstitching needle (or a jeans needle). If you don’t do this, terrible things will happen. Never, never, never use a normal needle for topstitching with heavy thread, unless you actively enjoy frustration.Set your stitch length to be slightly longer than normal, I usually click mine up three lengths on my Bernina.Take a scrap of your fashion fabric and fold it in half. This is now your practice scrap. Using a double needle – ninja level topstitching. Lace Edging to Fabric. Lightly starch and press the fabric and lace. With right sides together, pin the lace edging to the fabric about 1/8" to 1/4" from the fabric raw edge. Stitch the lace to the fabric using a straight stitch of 2.0. Whip and roll the lace to the fabric by setting the machine on a zigzag stitch width of 3.0 and length of 1.0.
Using an open toed or a rolled hem foot, "zig" into the straight edge of the lace and "zag" off the edge of the fabric. The fabric edge should roll over onto the lace. Hold the thread tails as you begin to stitch. Your Sewing Machine's Overlock Stitch. Did you know that most regular sewing machines have a special overlock stitch that mimics a serger's stitch?
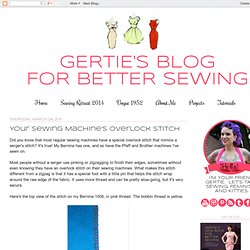
It's true! My Bernina has one, and so have the Pfaff and Brother machines I've sewn on. Отделка изделия оборками и воланами. Чтобы придать одежде своеобразие и неповторимый шарм, пофантазируйте с отделкой.

Она может представлять собой тонкую ручную работу или быть более простой в исполнении. В дюбом случае разные виды отделки, сделают ваш наряд уникальным. Оборки — это прямоугольные полосы ткани, на которых выполняется сборка. Воланы в отличие от оборок выкраиваются в форме круга. How to sew in piping. Adding piping to a seam can make a beautiful statement.
It can add an interesting splash of color to an otherwise dull seam. I'm going to show you how easy it is to add piping to any seam. Sewing On Leather: Stitching and Seams. Now that I've confessed to fusing all kinds of fusibles to my leather with an iron, it's time to talk about how I'm sewing things together.
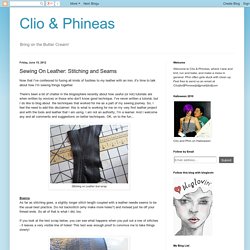
There's been a bit of chatter in the blogosphere recently about how useful (or not) tutorials are when written by novices or those who don't know good technique. I've never written a tutorial, but I do like to blog about the techniques that worked for me as a part of my sewing journey. So, I feel the need to add this disclaimer: this is what is working for me on my very first leather project and with the tools and leather that I am using.
I am not an authority; I'm a learner. And I welcome any and all comments and suggestions on better techniques. Basics As far as stitching goes, a slightly longer stitch length coupled with a leather needle seems to be the usual best practice. Two Understitching Techniques. In "Understitch by Hand" from the SewStylish Fall 2014 issue, couture expert Susan Khalje shares fundamental hand-understitching techniques to help improve your sewing.

In this Web extra, Susan shares two more understitching methods, one by machine and one by hand. Machine UnderstitchingQuick to learn and simple to do, understitching by machine instantly gives your garments a professional appearance. Sewing Dictionary with Pictures-Learn to Sew. If you are new around here please check out my Learn to Sew series AND my Sew Crazy Monthly Challenge.
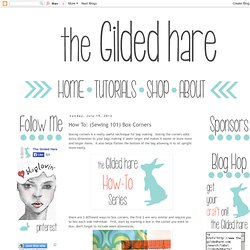
Both are great opportunities to improve your sewing skills or to learn how to sew! 21 Sewing Myths Debunked. How To: (Sewing 101) Box Corners. Boxing corners is a really useful technique for bag making. boxing the corners adds extra dimension to your bags making it seem larger and makes it easier to store more and larger items. it also helps flatten the bottom of the bag allowing it to sit upright more easily. there are 3 different ways to box corners, the first 2 are very similar and require you to box each side individual. first, start by marking a box in the corner you want to box, don't forget to include seam allowances. for the first method, cut out the corner once you've marked it. fold your fabric, right sides together, so that the adjacent sides of the square you cut are lined up. sew along that edges, backstitching at the beginning and end. for the second method, mark the corner as before but don't cut yet. fold the fabric as you did before and sew along your mark, backstitching at the beginning and end. then trim the excess fabric. projects using Method 1 or 2: -custom laptop sleeve the third method is coming soon!
Sew Better with Staystitching Fundamentals. Be careful not to stretch or straighten a curve while staystitching. Mary Ray Staystitching should be done directionally with the fabric's grain, which is generally from the top to the bottom of a neck or armhole edge. Start at the shoulder and sew to center front, flip the piece over and repeat. V-necklines should be staystitched because of their angular lines and reinforced because they need to be clipped at the V. This can be done in one operation, pivoting at the point. Photo: Mary Ray Although one of my favorite parts of sewing is creating interesting surface design, I'm well aware that it's the underpinning steps in the process that make a garment truly successful and wearable. One of those essential steps is staystitching-a row of stitches on a single fabric layer that prevents a curved or angled edge, because they are cut across the bias, from stretching during the construction process.
Video: How to Sew a Welt Opening. Sewing Terms to Know. Fabric Cutting Techniques & Tricks. I had a run in with a piece of rayon spandex jersey this past week. I ended up cutting it with an underlay to keep it from moving around. It reminded me that an underlay is useful for other things besides chiffon, georgette, and charmeuse. Sewing Tips for Sewing Darts. Serger and Coverstitch Techniques with the Baby Lock Diana // Stretch Yourself. This series is sponsored by Baby Lock. For over 40 years, Baby Lock has been dedicated to the love of sewing by creating machines for sewing, embroidery, quilting and serging – all with ease-of-use, high quality and a touch of elegance.
I am completely fascinated by clothing construction. There is something magical about turning long, flat fabric into the shapely, form-fitting pieces that fill our closets and dress our bodies. Every time I shop for clothes you’ll find me not only gazing at the beautiful designs and fantastic fabrics, but flipping everything inside out and trying to discover just how it was put together. In fact, a few months ago I was rambling on and on explaining about sewing machines and sergers to a friend looking to buy one for his wife. Getting Flat Bias Necklines.
I often get questions asking how I get my bias faced necklines to lay flat, so I’m here today with a tutorial to help you do just that. It can be really frustrating to make a garment that looks so good only to have the neckline not lay right against the curves of the body, in fact, I’m pretty sure that was a telltale sign that I had made the garment I was wearing back in the day.
So first off, if you’re wondering what a bias faced neckline is, it’s where the neckline if finished with a strip of bias fabric that is turned to the inside and stitched in place. It’s how I finished the necklines of both the Tiny Pocket Tank and the Scout Woven Tee. It’s really very easy, just a few extra steps and some pressing that are well worth it in the end. As usual with tutorials this is an image heavy post, so click the link below to view the entire tutorial. ▲ A quick note. Lace Insertion. Sewing a collar: a different order. So I've kind of become obsessed with mastering the techniques of sewing a button-up collared shirt (or shirt dress!) Lately.