
Fashion in Infographics. ReFashionista: Thrift Fashion Revitalized. Tilly and the Buttons. How to Sew Pockets: A Tutorial. Pockets add so much functionality to a garment.

Have you ever thought your favorite party dress would just be so much better if it had pockets to stash your lip gloss and cell phone? When you’re in the midst of sewing garments, it’s easy to incorporate a pocket into your construction. But the really good news is that it’s also super simple to add pockets in the side seam of any garment — even garments you’ve purchased off the rack — just get out your seam ripper!
Step 1: Fold your fabric in half and cut two pocket bag pieces. Note: If you’re not using a pattern, you can easily draft a pattern yourself. Although you can certainly make your pocket out of the same fabric as your garment (unless it’s super bulky), this is also a great time to use up scraps of fabric or play around with color and add something unexpected. Step 2: Mark the pocket placement on the front and back pieces of your garment with a notch or chalk mark. Hand Sewing: Basic Slip Stitch (Blind Stitch) DIY Peter Pan Collar.
We almost lost our marbles when we first spotted these scalloped white Louis Vuitton collars on the runway.
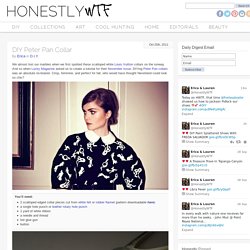
And so when Lucky Magazine asked us to create a tutorial for their November issue, DIYing Peter Pan collars was an absolute no-brainer. Crisp, feminine, and perfect for fall, who would have thought Neverland could look so chic? You’ll need:2 scalloped edged collar pieces cut from white felt or rubber flannel (pattern downloadable here)a single hole punch or leather rotary hole punch1 yard of white ribbona needle and threadhot glue gunbutton Using the pattern template, cut out the two collar pieces. Create small holes between each scallop, using the hole punch. Overlap the two wider end pieces and push a button through the last two aligning holes.
Cut the ribbon into two half-yard lengths. Wrap the collar around your neck and tie it into a bow. DIY CIRCLE SKIRT. Upcycle Style: Braided T-shirt Rug. I love making projects that involve at least one of the following criteria: decluttering, upcycling, sewing and a need.
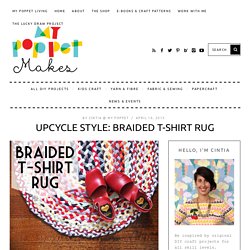
This Braided T-shirt Rug ticks all the boxes, so when I spotted a circular rug made by Sewing For Life on Pinterest, I was itching to start on my own immediately. Here’s why…Declutter – I’d been hounding Mr Man to clear out some of his old t-shirts that he no longer wears, the bottom actually fell out of his t-shirt draw from the weight of all the excess clothing! Upcycle – Most of said t-shirts were well past their use by date with most of them having holes, stretching or stains, so charity donation was not an option.
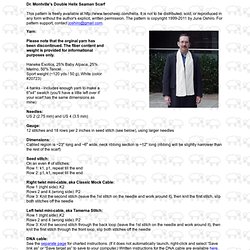
Usually I tear old shirts up for dusting rags, but the truth is, who needs to dust that much? Sewing – enough saidNeed – With a chilly winter on the way in Melbourne, I thought it would be lovely to finally have a bedside rug to treat my feet to some cushy comfort on a chilly morning. Ruffle_Duffle. DNA Scarf Pattern. US 2 (2.75 mm) and US 4 (3.5 mm) Gauge: 12 stitches and 18 rows per 2 inches in seed stitch (see below), using larger needles Dimensions: Cabled region is ~23" long and ~6" wide, neck ribbing section is ~12" long (ribbing will be slightly narrower than the rest of the scarf) Seed stitch: On an even # of stitches: Row 1: k1, p1, repeat till the end Row 2: p1, k1, repeat till the end Right twist mini-cable, aka Classic Mock Cable: Row 1 (right side): K2 Rows 2 and 4 (wrong side): P2 Row 3: Knit the second stitch (leave the 1st stitch on the needle and work around it), then knit the first stitch, slip both stitches off the needle Left twist mini-cable, aka Tamerna Stitch: Row 1 (right side): K2 Rows 2 and 4 (wrong side): P2 Row 3: Knit the second stitch through the back loop (leave the 1st stitch on the needle and work around it), then knit the first stitch through the front loop, slip both stitches off the needle DNA cable: See the separate page for charted instructions.
DIY Shoe Wings. I do hope that this goes here...
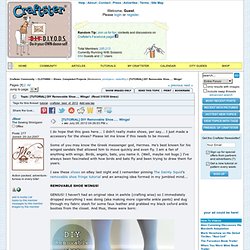
I didn't really make shoes, per say... I just made a accessory for the shoes? Please let me know if this needs to be moved. Some of you may know the Greek messenger god, Hermes. He's best known for his winged sandals that allowed him to move quickly and even fly. Fluffy fruit pom poms that you can make yourself. Am loving the Pom Pom Fruit project over at Mr Printables Blog, a relatively new educational site for creative children and families (and really anyone who likes quirky DIY projects).

So, grab your yarn and learn how to make your own fruity pom poms at Mr Printables. via Etsy. Bow with a fork.