
PCL - Point Cloud Library (PCL) HKPilot Mega V2.5 Flight Controller USB/GYRO/ACC/MAG/BARO. HKPilot Mega V2.5 Flight Controller USB/GYRO/ACC/MAG/BARO. Cognitive Machines Group. Speechome Recorder for the Study of Child Development Disorders Soroush Vosoughi, Matthew Goodwin and Deb Roy Collection and analysis of dense, longitudinal observational data of child behavior in natural, ecologically valid, non-laboratory settings holds significant benefits for advancing the understanding of autism and other developmental disorders.
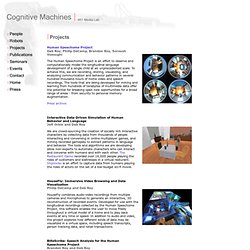
We have developed the Speechome Recorder, a portable version of the embedded audio/video recording technology originally developed for the Human Speechome Project, to facilitate swift, cost-effective deployment in special-needs clinics and homes. How to make your first robot. If you have purchased an "Instant Robot" shield, you can find a project using that shield here.
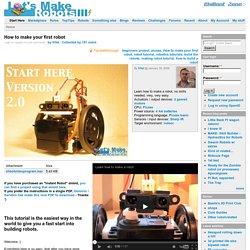
If you prefer the instructions in a single PDF, Dominic / Servello has made this nice PDF to download - Thanks :) Welcome :) Everything here is so easy, that after you have gone through it, you can make a robot in a couple of hours. Les robots domestiques ne sont pas pour demain. Documentation. Installation. Overview. Our mission is to help advance the state-of-the-art in autonomous robotics technologies.
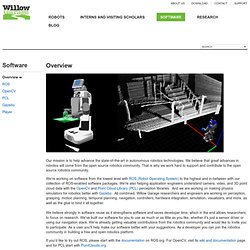
We believe that great advances in robotics will come from the open source robotics community. That is why we work hard to support and contribute to the open source robotics community. We're working on software from the lowest level with ROS (Robot Operating System) to the highest and in-between with our collection of ROS-enabled software packages. We're also helping application engineers understand camera, video, and 3D point cloud data with the OpenCV and Point Cloud Library (PCL) perception libraries. And we are working on making physics simulators for robotics better with Gazebo. We believe strongly in software reuse as it strengthens software and saves developer time, which in the end allows researchers to focus on research.
If you'd like to try out ROS, please start with the documentation on ROS.org. GitHub Says 'No Thanks' to Bots — Even if They're Nice. Erik Michaels-Ober Photo: Ryan Resella When something called Imageoptimiser said it could improve Erik Michaels-Ober’s software on the GitHub code-sharing website last Sunday, Michaels-Ober wasn’t sure what to make of it.

In fact, he was pretty certain that the request had come from an automated program — a bot. On GitHub, these offers — called pull requests — are supposed to come from people. That’s part of the power of GitHub — coders can see each other’s software and share fixes much in the same way that the rest of us swap photos on Facebook. It’s a very social, and very human kind of interaction. NXTI2CDevice/examples/NXTServo/NXTServo.pde at master · rwldrn/NXTI2CDevice. My Robot, Makey. The NodeCopter - Programming flying robots with node.js. Lego NXT – Arduino Truck « Robotics / Electronics / Physical Computing. Grove - 3-axis Gyro. Basic Servo Motor Controlling with Microchip PIC Microcontroller. Basic Servo Motor Controlling with Microchip PIC Microcontroller February 17, 2009 by rwb, under Robotics.
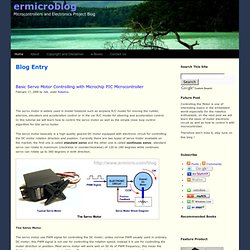
The servo motor is widely used in model hobbyist such as airplane R/C model for moving the rudder, ailerons, elevators and acceleration control or in the car R/C model for steering and acceleration control. In this tutorial we will learn how to control the servo motor as well as the simple close loop control algorithm for this servo motor. The servo motor basically is a high quality geared DC motor equipped with electronic circuit for controlling the DC motor rotation direction and position.
Currently there are two types of servo motor available on the market, the first one is called standard servo and the other one is called continues servo; standard servo can rotate to maximum (clockwise or counterclockwise) of 120 to 180 degrees while continues servo can rotate up to 360 degrees in both direction. Mission - ardupilot-mega - Official ArduPlane repository. The Mission Planner, created by Michael Oborne, does a lot more than its name.
Here are some of the features: Point-and-click waypoint entry, using Google Maps. Select mission commands from drop-down menus Download mission log files and analyze them Configure APM settings for your airframe Interface with a PC flight simulator to create a full hardware-in-the-loop UAV simulator. See the output from APM's serial terminal Set up the software. Arducopter - Arduino-based autopilot for mulitrotor craft, from quadcopters to traditional helis. The DIY Drones development team is proud to bring you the ultimate open source quadcopter and helicopter UAV!
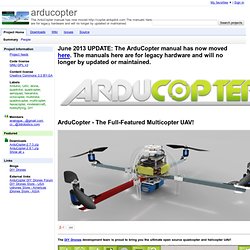
ArduCopter's autopilot is based on APM 2, the most sophisticated IMU-based open source autopilot on the market. It provides full UAV functionality, with scripted waypoints, Ground Station and more. IrRanger. ROS package or Stack If you're creating the initial page for a stack or package, please give it the page the same name as the stack or package itself, and use one of the following templates:
Conversion of cheap optical mouse to robot odometer. For a small robot project I'm working on I needed a way to measure the robot's progress across the floor.
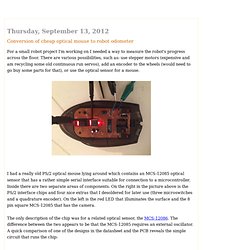
There are various possibilities, such as: use stepper motors (expensive and am recycling some old continuous run servos), add an encoder to the wheels (would need to go buy some parts for that), or use the optical sensor for a mouse. I had a really old PS/2 optical mouse lying around which contains an MCS-12085 optical sensor that has a rather simple serial interface suitable for connection to a microcontroller. Inside there are two separate areas of components. On the right in the picture above is the PS/2 interface chips and four nice extras that I desoldered for later use (three microswitches and a quadrature encoder).
On the left is the red LED that illuminates the surface and the 8 pin square MCS-12085 that has the camera. The only description of the chip was for a related optical sensor, the MCS-12086. Here's a marked up picture of the mouse internals: 'BOB' V2.0. Odométrie du Pobot Easy. Voici une odométrie simple, avec une seule détection.
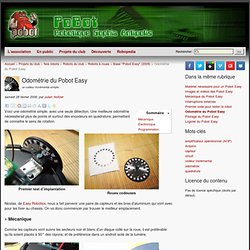
Une meilleure odométrie nécessiterait plus de points et surtout des encodeurs en quadrature, permettant de connaitre le sens de rotation. Premier test d’implantation Roues codeuses Nicolas, de Easy Robotics, nous a fait parvenir une paire de capteurs et les bras d’aluminium qui vont avec pour les fixer au chassis. Odométrie. Un article de Wikipédia, l'encyclopédie libre. Pilotage du Pobot Easy. On va pouvoir piloter le robot à distance avec les modules XBee. Une bonne occasion de faire un peu de télémétrie pour recevoir les différents événements qui se produisent à bord.
L’idée est d’installer sur ordinateur tout un tas de petites applets de visualisation : consignes de vitesse, vitesses des servomoteurs, positionnement par odométrie, vision par capteurs Sharp, etc... Accéléromètre Analog ADXL311. Un accéléromètre est un composant de plus en plus courant dans des objets du quotidien : stabilisateurs d’image des camescopes numériques grand public, manette de console de jeux vidéo Nintendo Wii, etc..
On peut les utiliser dans des robots pour détecter des chocs, ou pour mesurer un déplacement (c’est un des composants d’une centrale inertielle, ou IMU, avec le gyroscope). Les puces MEMS L’accéléromètre que nous utilisons prend la forme d’un petit bout de silicium de quelques millimètres de large. Visualisation radar d'une détection de distance. Robotique. (w/ Video) Basic Arduino Robot, Light Seeker! Many times I have Googled for "Arduino Robot" in hopes of finding a robot to build. I end up finding many versions of a obstacle avoiding robot that uses either an infrared or a sonar range finder sensor mounted on a servo to detect objects in its way while randomly roaming the area around it.
The problem with this robot is it is expensive and very advanced in some aspects for a "first robot" to make with an Arduino board. The cost of a servo is about $10, and a range finder sensor runs from about $10 - $30. This instructable will cover how to make a light seeking robot (Photovore), and some robotics and motor control basics. This robot can be built with parts found at the nearest Radio Shack, if you already have an Arduino board and a robotic base. Please remember, this is my first instructable. Check out our website Note: by posting any pictures in the comments, you are giving me full rights to the posted image (disclaimer to post robot pictures on the last step.)
MD1.3 2A Dual Motor Controller (SKU: DRI0002) Introduction MD1.3 2A Dual Motor Controller (SKU: DRI0002) This is a 4.8-46V, 2A Dual Motor Controller which is the revised version of the DF-MDV1.0. Its performance has been improved greatly. It can bear larger current due to the increased haetsink dissipation. It is easy to control, using LGS's outstanding high-power motor driver chip, the L298N. Specifications. Make: Microcontrolled Bots. Art Of Code. Store DIYdrones - UAV Robotics parts. ArduCopter - arducopter - Arduino-based autopilot for mulitrotor craft, from quadcopters to traditional helis.