
Create a Futuristic Animated Computer Screen Shader in the Unreal 3 Editor. The Unreal 3 Editor is a powerful game development tool that ships free with most Unreal 3 games (Unreal Tournament, Gears of War, Roboblitz).
It's quickly becoming a standard tool in the game development industry and is known for putting a lot of power directly in the artist's hands, particularly through it's node-based material editor. This tutorial offers an introduction to Unreal's material editor and assumes no prior knowledge of the tool, or the presence of any other tools but the editor itself. Through the creation of a 'flickering monitor' material (or “shader”), this tutorial will demonstrate some of the powerful things that are capable with the material editor. This tutorial was created using the version of the Unreal Editor that shipped with Unreal Tournament 3, but is likely to work with other versions of the editor. Final Effect Preview Step 1. DepthBiasBlendUsage. Search public documentation: DepthBiasBlendUsage 日本語訳中国翻译한국어 Interested in the Unreal Engine?
Visit the Unreal Technology site. Looking for jobs and company info? Questions about support via UDN? Overview The DepthBiasedBlend material expression provides the ability to do a blend between the source object being rendered and the contents of the destination buffer based on a bias value. If (DestinationDepth < SourceDepth) { FinalColor = DestinationColor; // Do not draw the source pixel } else if (SourceDepth < (DestinationDepth - ((1 - Bias) * BiasScale))) { FinalColor = SourceColor; // Draw the source pixel } else { FinalColor = LinearInterpolation(DestinationColor, SourceColor, ((DestinationDepth - Source Depth) / ((1 - Bias) * BiasScale))); } The most obvious usage of this type of blending is to eliminate the harsh edges that occur when sprite particles intersect geometry.
Example. DevelopmentKitGemsSobelEdgeDetection. Search public documentation: DevelopmentKitGemsSobelEdgeDetection.

CGMasterTraining: UDK Intelligent Materials - Scale Aware Tiling. Earth / Planet Material Shader - UDK Tutorials by Javahawk.
3D Buzz UDK Tutorials - Part 6 - Materials. FlipbookTextures. Search public documentation: FlipbookTextures 日本語訳中国翻译한국어 Interested in the Unreal Engine?
Visit the Unreal Technology site. Looking for jobs and company info? Questions about support via UDN? Overview Flipbook textures are special textures which provide the ability to cylce through a series of sub-images, similar to the way particle SubUV animations work in ParticleSystems. MaterialExamples. Search public documentation: MaterialExamples.
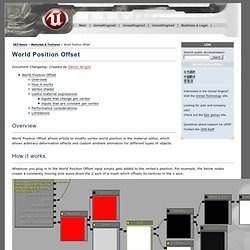
WorldPositionOffset. Search public documentation: WorldPositionOffset.
Texture Creation using nDo2. About : Creating textures using photosources for Diffuse, and nDo2 for the Normal map.
Target Audience : Photoshop and nDo2 users – Intermediate Platform : Photoshop/nDo2 Latest Update :October 2011 Introduction I never really got into zBrush and Mudbox, I have always stuck to the oldschool approach of pure Photoshop for 2D work. No sculpting or such. zBrush and Mudbox are great tools, but it really adds an extra layer of complexity to texture creation, and I am not too fond of using too many different tools next to each other. I much prefer a one stop solution for all I want to do. That pure Photoshop approach regained a lot of its credibility again with the recent release of nDo2. nDo2 is a new program that hooks into Photoshop, and allows you paint, sculpt, convert, and draw normal maps directly from within PS.
In this tutorial I am going to show you how I usually create my diffuse textures, and how to then take a diffuse texture into nDo2 and use it to create a normal map for it. Tutorials – UE3 Reflections/Cameras. About : This tutorial will explain the reader how to set up a simple real time reflection/camera.
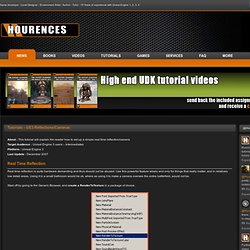
Target Audience : Unreal Engine 3 users – Intermediates Platform : Unreal Engine 3 Last Update : December 2007 Real Time Reflection Real time reflection is quite hardware demanding and thus should not be abused. Use this powerful feature wisely and only for things that really matter, and in relatively low detail areas. Using it in a small bathroom would be ok, where as using it to make a camera oversee the entire battlefield, would not be. Start off by going to the Generic Browser, and create a RenderToTexture in a package of choice. A new window will pop up, asking for a name and package name. Once you’ve got the RenderToTexture, leave it alone for the time being, and go to the Actor Browser.
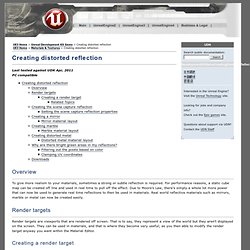
The actor is invisible, don’t worry about this. Other important properties are: DevelopmentKitGemsCreatingDistortedReflection. Search public documentation: DevelopmentKitGemsCreatingDistortedReflection.
DevelopmentKitGemsParallaxOccludedMapping. Search public documentation: DevelopmentKitGemsParallaxOccludedMapping 日本語訳中国翻译한국어 Interested in the Unreal Engine?
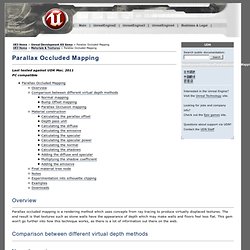
Visit the Unreal Technology site. Looking for jobs and company info? Questions about support via UDN? Last tested against UDK Mar, 2011PC compatible Overview Parallax occluded mapping is a rendering method which uses concepts from ray tracing to produce virtually displaced textures. Comparison between different virtual depth methods Normal mapping Normal mapping is the standard way to achieve a level of depth derived from lighting. Bump Offset mapping Bump offset mapping (or parallax mapping) adds depth by altering the texture coordinates based on the camera's view direction. The main problem with bump offset mapping is that it often leads to pixel swimming at high height offsets, and is generally not visually correct. Parallax Occlusion mapping Parallax occlusion mapping adds depth by ray tracing to find the correct texture coordinate based on the camera's view direction.
Notes. TextureOptimizationTechniques. Search public documentation: TextureOptimizationTechniques 日本語訳中国翻译한국어 Interested in the Unreal Engine? Visit the Unreal Technology site. Looking for jobs and company info? Questions about support via UDN? Overview Memory and disk space usage is a constant struggle with the development of any game. This document explains some tricks for cleaning up inefficient texture use and making smarter, more efficient content up front instead of at the end of a project. Content Assesment If you are running into issues with disk space during development, running an assessment of the content making it onto the disk may be able to provide some insight as to where savings can be achieved.