
ZBrush Tileable Textures 07 - Photoshop Demonstration. ZBrush Tileable Textures 06 - Custom Material Masks. ZBrush Tileable Textures 06 - Custom Material Masks. ZBrush Tileable Textures 05 - Rendering Ambient Occlusion. ZBrush Tileable Textures 04 - Zapplink & Basic Render Passes. ZBrush Tileable Textures 03 - Lighting. ZBrush Tileable Textures 03 - Lighting. ZBrush Tileable Textures 02 - Finishing Up. ZBrush Tileable Textures 01 - 2.5D Workflow. Download Zbrush Wear and Tear Brushes. Lunchcrunch5.31.2014. Artof.NickMiller. - Load Stored ZPR: This button will load a project stored with the "Open" button to the right. - Pick: This button will open the browser for you to select a project.
This button automatically stores the project you open. So after you "Open" a project with this button once its forever stored until you open other with this button. - Save 1-3: These buttons will save over the mesh saved with the corresponding "Store Tool" slot. If a different mesh is selected or the mesh has a different name than the one saved a warning prompt will appear. SplinesToPlanes Preview. ZBRUSH EZ-WireFrame. Basic Lighting in Zbrush and Photoshop. Zbrush Tutorial. 10320516_867898689891088_1026926896510056447_n.jpg (Image JPEG, 445 × 960 pixels) Épinglé par HeavyTheory sur Zbrush Tutorials. Quick Tips: Sculpting the mouth. 178_tid_Tip 3 LN Modeling.jpg. Épinglé par Daniel Hamilton sur ZBrush. Épinglé par Ana sur tutorials&tips. Zbrush Lace Quick Tip.
Elf [Character] - Polycount Forum. Torn Cloth Tutorial. Working on one of my projects I wanted to add a torn look to the edges of fabric.
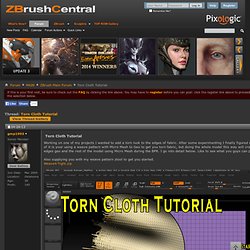
After some experimenting I finally figured out how to do it in Zbrush, and it looks pretty good. Quick overview of it is your using a weave pattern with Micro Mesh to Geo to get you torn fabric, but doing the whole model this way will create an insane amount of polys, so figured out how to just make the edges geo and the rest of the model using Micro Mesh during the BPR. I go into detail below. Like to see what you guys can produce with this effect, so feel free to post your results.Also supplying you with my weave pattern ztool to get you started.Weave4-Tight.zip (Update: Click Align Edge on the Modify Topology next to Micro Mesh Button to prevent the Micro Mesh from flipping or rotating your Micro Mesh.)
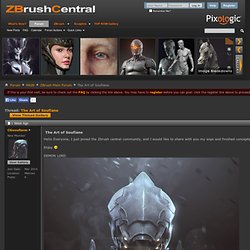
Comicon 2014. Lip detailing Zbrush. Zbrush Tutorial sur Pinterest. Zbrush Sculpting - 1x Sculpting Nose, Mouth, Eye, Ear. Zbrush - Adding details to a coin in Zbrush 3. ZBrush GoZ Posing Pipeline. The Art of Soufiane. Hello everyone !!
ZBrush sketchbook of Zhelong Xu - Page 7. Features. Working with Alphas and Masks With the new ZBrush 4R2b, Surface mode allows you to create fine details with your Alphas without changing the overall shape of your model.
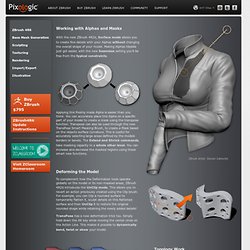
Making Alphas tileable just got easier, with the new Seamless setting you’ll be free from the typical constraints. Applying this freshly made Alpha is easier than you think. You can accurately place this Alpha on a specific part of your model to create a mask using the transpose function. Transpose can also be used through the new TransPose Smart Masking Brush, to create a Mask based on the objects surface curvature. Deforming the Model To complement how the Deformation tools operate globally on the model or its non-masked areas, ZBrush 4R2b introduces the UnClip mode.
Curve Bridge » ZBrush Docs. The Curve Bridge Brush creates a polygon bridge between two drawn curves and automatically welds this bridge’s edge points to the original surface.
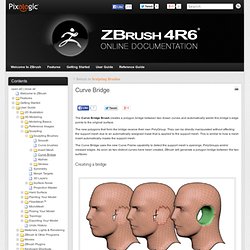
The new polygons that form the bridge receive their own PolyGroup. They can be directly manipulated without affecting the support mesh due to an automatically assigned mask that is applied to the support mesh. This is similar to how a mesh insert automatically masks the support mesh. The Curve Bridge uses the new Curve Frame capability to detect the support mesh’s openings, PolyGroups and/or creased edges.
As soon as two distinct curves have been created, ZBrush will generate a polygon bridge between the two surfaces. ZBRUSH Intermedio III - NUEVAS BROCHAS ESPECIALES I - ZBrush 4R6. Режим кривых Curve Mode в ZBrush 4R2: SliceCurve, CurveLathe. UnClip » ZBrush Docs. Features. Marvelous Designer 2 to quads using ZBrush 4 R4. ZBrush tutorial: Monster-size sculpting tips from the BBC's Planet Dinosaur. Creating dinosaurs for a TV series can be a tricky process.

In my experience, deadlines are tight and most of the time you only have one shot at getting the creatures right. But with some basic planning and forethought, you can focus on creating the creatures - knowing that they will fulfil all the necessary requirements - and facilitating any changes that may be required. Monsterous 3D modelling At Jellyfish Pictures, while working on Planet Dinosaur, it was decided that the theropods (I sculpted 27 of them) should have scaly skin, which can be time-consuming. So I planned a quick and simple character pipeline that would ensure consistent style across all the characters and enable artists to follow the same style. This is an overview of the settings, brushes and steps we used to create the dinosaurs.
Making great bevels with Photoshop and Zbrush. Hello all,I happened to be looking at the alpha pallet yesterday and I noticed for the first time the Make 3D option.

I tried it out and I was surprised at how totally awesome this feature is. With it you can make great bevels which is something I have tried to do in the past with displacement. The problem I had with doing this with displacement was that I could not get a clean cut along the edge of the letters.To make the image above I created a 16 bit gray scale displacement map in Photoshop. I brought that image into the Zbrush alpha pallet and used the Make 3D feature to create the shape. 1782519_10153784123315162_890456559_o.jpg (Image JPEG, 450 × 2458 pixels) Musketeer (breakdown Pg 3) - Page 3.
Thanks for the comments guys.
I'm glad you enjoyed. This model has many things to share, is free to ask your questions I will try explicalas.darktimax - Render in Vray! Broken Concrete For Cryengine 3 Tutorial - Highpoly modeling Part 2/4. Products. How To Design Appealing Characters - Part 1. Depth on Alpha. Wear&Tear Brushes.rar. ZBrush Tileable Textures 01 - 2.5D Workflow.
Vigil Nights. ZBrush 4 - Lasso and Curve Masking Brushes. Baking ZBrush Materials to Texture Maps. Joseph Drust, Senior Character Artist at Vicious Cycle Software, demonstrates how to bake ZBrush materials into a texture map.

Video - 39.9 MB If you are on slow connection or want to keep these tutorials for future viewing then you can download these video tutorials from CGArena forum. You need to register (free) to download these and many other video tutorials. Don't forget to leave your comments and critiques which help us in improving the videos. Image plan_transparency. [WIP] Sci-Fi Cave Environment - Page 3. I got the Low-Poly for the outer rim in now.
![[WIP] Sci-Fi Cave Environment - Page 3](http://cdn.pearltrees.com/s/pic/th/environment-polycount-forum-59387433)
Seems to be working out pretty well. There is a bit of stretching on the UV's near the very top sections, but I am willing to take it and work with it. Took a bit to figure out exactly how I was going to do a few sections. What it ended up being was the low-poly is broken up into 4 sections that I baked it to. The main circle, support beam low, support beam top, and then the side pipes transitioning to the top support.
Cave Scene Cliff Rock Sculpt. Holdeen's Max - Real Time - Page 4. Hi guys.. Sorry to delay for answer and thanks for the comments! Zbrush - QuickTips # 1 - BulletHoles/Custom Decal Brushes. Zbrush Quick Rock technique. Zbrush Sculpting - Black Sorceress. Ligament technique. Hec's 2012 early 2013 works dump. Hi Jake,The master for the minis get printed at places that have high definition printers, one of the ones I know of is moddler.com in California I think and the other place I know of is somewhere in Munich. The previous two characters were character skins for League of Legends, skin is just a term for models wearing alternate outfits, these used to be just texture variations, but these days they're more full blown new sculpts and low poly meshes with new textures.Here's a couple more minis, the ninja girl might get re-posed before printing, my client and I are still deciding some of that: Many of the Kingdom Death minis I make are based on concept art by the amazing lokman lam:
ZBrush Projects - ZBrushInfo. ZBrush Custom Menu. Lord Pendleton (Dishonored) Timelapse. Get Insert MeshMaster and MatCap Baker for ZBrush. Friday, October 12th, 2012 | Posted by Jim Thacker Joseph Drust’s MatCap Baker plugin in action, in a fan video created by YouTube user zbro z. Ubisoft lead character artist Joseph Drust has released two new free ZBrush plugins: Insert MeshMaster and MatCap Baker. (Actually, they came out earlier, but we only spotted them in a recent Pixologic newsletter.) Insert MeshMaster speeds up the creation of Insert Mesh brushes by combining settings from the Stroke Panel and Brush Palette. MatCap Baker creates a baked MatCap texture from a UV-ed model. HD: Generating game geometry with simple photographs (Part 1) Joseph Drust.
Mask n inflat. Pixologic Release - Hotkey Editor. Xnormal Zbrush Polypaint. PolySculpt. ZBrush Tutorials - MatCap to Texture Map - part 1. ZBrushFR. Chaîne de cannedmushrooms. My Zbrush Plugin! - Page 2. ZBrush 4R2b ZClassroom Movies. - Page 4. Creating Tileable Textures in ZBrush. Image Heavy-Textures, props, and Personal - First Post (sorta) Advanced Texturing and Lighting with Andrew Klein. Some Terrain stuff. -It helps for me to have lots of reference, Delicate arch and the nearby "Brain Rocks" provided some inspiration. Eof's Sketchbook (base mesh to share Page 9/movie page 12) - Page 45.
Danial_rashidi_grid_walktrough.gif (GIF Image, 1344 × 728 pixels) Ryan Kingslien. Mesh Insert Grotesque Tutorial. ZBrush 4R2 Tip # 1: DynaMesh / Remesh. Ctrl+Z. Sportlight/polypaint tutorial. ZBrush 4 - a hyperlink list of the YouTube video tutorials (updated) Dynamesh 6 Adding subtools to sculpt.mp4. Dynamesh 7 Slice and Dice.mp4. Zbrush plane constraint. 0107 Zbrush4 DVD (SubMenus).mov. Zbrush 4 - all features. This DVD will be for sale at jasonwelsh.com when I complete chapter 15. If you are interested in series and want a full high res copy that plays on both MAC and PC the DVD would make a great addition to you collection. For those that offer donations I would rather you wait for the DVD so that you get something out of the donation. The entire series will also be on youtube located here. Enjoy the series as it unfolds and I hope it enriches your lives a gets you interested in 3D as either a Hobby or a Student.
This DVD will be the same training I will be using in my Modeling II college class. Please do not turn your work into me unless you are my student watching the series. The number at the top of the videos stand for Chapter and Video number. Zbrush Hard Surface Sculpting - Mike Jensen. Some Zbrush and Max Work - Page 23. Darksiders demon. Thx guys I started out with a simple base in maya and then blocked out the details in zbrush. Whne I was satisfied I split him up att the shoulders, thighs, calves and feet to be able to work on the underlying surfaces and easier baking (if I want to make a low-res in the future) and rebuilt the topology at the same time.
Then I just added some stuff that was prebuilt in maya and when the mesh was done I started adding some color and trying some material settings. It's all polypaint done in zbrush, haven't unwrapped anything at all. Polypaint To Xnormal. ZBrush 4R2 Betatesting By: Geert Melis. "I bought a Porsche last year.
Today, the new model came out and guess what... they gave it to me for free... full option and all... . How cool is that!!!!!!!! " ZBrush_Noisemaker_Chainmail.mp4. ZClassroom Digital Sculpting.